Free original lessons
Snowy Owl Drawing Step by Step: White Plumage Value Shading
Learn to draw a snowy owl with a body-proportion guide and a white-plumage value scale, then build up soft grey shading in clear steps.
Free lesson
Four exercises
Worked answers
Object Drawing Lessons
Snowy owls are almost entirely white, which makes them a useful subject for learning value control. Because the bird has so little colour, every visible shape comes from subtle differences in lightness: the shadow under a wing, the grey barring on the back, the faint tone inside the facial disk. This lesson shows a repeatable step-by-step method for drawing a perched snowy owl with white plumage shading. You will set up body proportions, define a small value scale for white feathers, and build tone in layers so the owl reads as white rather than grey or flat. The convention used here is simple: value means how light or dark a mark is, from 1 (paper white) to 5 (dark grey). You do not need special paper or tools; a pencil, eraser, and ordinary drawing paper are enough. Measure your own pencil and paper if you want to scale the guide, and treat any numbers below as hypothetical examples rather than fixed standards.
Practice materials: Printable downloads are not available for this lesson yet. Use the instructions and four exercises below.
Reference illustration
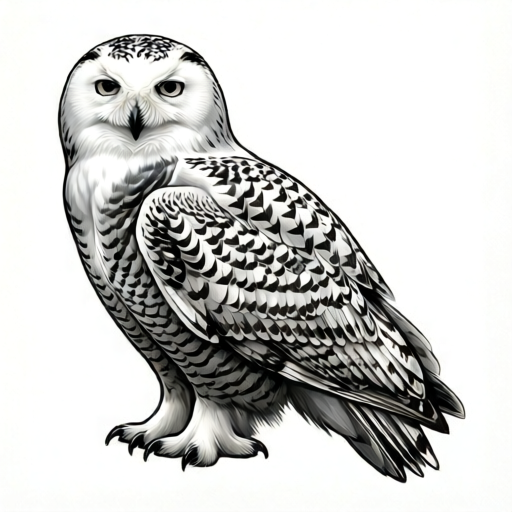
Use the stated measurements and conventions for each exercise.
Set the body proportions before shading
A snowy owl perched upright is roughly egg-shaped: a rounded head sits directly on a broad chest, and the body tapers toward the tail. Begin with a light construction drawing using simple ovals and a centre line. Keep the head small relative to the body; a common error is making the head too large, which makes the owl look like a cartoon.
Use your pencil to compare lengths rather than guessing. For example, if the body oval is about three pencil-widths tall, the head oval might be about one and a half pencil-widths tall. These are hypothetical proportions for practice, not measurements of a real bird. Check that the facial disk, the round area around the eyes, sits in the lower half of the head and that the eyes are level.
- Draw a light vertical centre line for the body and a shorter one for the head.
- Sketch a large oval for the body, wider at the chest and narrower at the tail.
- Add a smaller oval for the head, overlapping the top of the body oval slightly.
- Mark two level eye positions in the lower half of the head oval.
- Indicate the wing edges as soft curves along the sides of the body.
- Check the whole construction against your pencil-width comparisons before adding detail.
Make a white-plumage value scale
Before shading the owl, make a five-step value scale on scrap paper. Label 1 as bare paper, 2 as very light grey, 3 as light grey, 4 as medium grey, and 5 as dark grey. The scale is a reference, not a rule: your pencil and paper will produce different tones, so adjust pressure until the steps are clearly different from one another.
For white plumage, most of the owl should stay at values 1 to 3. Reserve value 4 for deep shadows under the wing and tail, and use value 5 only for the darkest accents such as the eyes or a strong shadow line. This restraint is what keeps the owl looking white. If you shade everything at value 3 or darker, the bird will look grey rather than snowy.
- Draw five small squares in a row on scrap paper.
- Leave square 1 blank and shade square 2 with very light pressure.
- Shade squares 3, 4, and 5 with increasing pressure, keeping each square even.
- Label the squares 1 to 5 and keep the scale beside your drawing.
- Test a light layer on the owl's back and compare it with square 2 or 3.
Build up shading in layers
Work from light to dark. First, add a very light layer over the areas that are slightly shaded: under the chin, along the lower edge of the wing, and beneath the tail. Use the side of the pencil and small circular strokes so the tone stays soft. Compare each area with your value scale as you go.
Next, add the faint grey barring that snowy owls show on the back and wings. These marks are not solid blocks; they are short, broken lines that follow the direction of the feathers. Keep them sparse and light. Finally, deepen only the few areas that need contrast: the shadow where the wing meets the body, the underside of the tail, and the dark ring around each eye. Leave the chest and facial disk mostly at value 1 or 2 so the owl still reads as white.
- Add a value 2 layer under the chin and along the lower wing edge.
- Add short, broken value 3 marks on the back and upper wing.
- Soften any harsh edges with a light eraser touch or a clean finger.
- Deepen the wing-body shadow to value 4 in a narrow band.
- Darken the eye rings and the tail underside slightly, then compare the whole drawing with the value scale.
Check the white plumage reads correctly
Step back from the drawing and squint slightly. The owl should still look mostly white, with grey only in the shadow areas. If the bird looks grey overall, erase some of the middle tones rather than adding more dark marks. If it looks flat, deepen one or two shadows rather than shading everything evenly.
A useful check is to cover the value scale and ask whether the lightest areas of the owl match the paper. The chest and the top of the head should be close to value 1. The darkest marks should be limited to small accents. This balance is the main skill in drawing white plumage.
- Squint at the drawing to see the overall value pattern.
- Compare the lightest owl areas with bare paper.
- Erase any middle tone that makes the owl look grey.
- Deepen only the smallest shadow accents if the drawing looks flat.
- Make a final pass to keep feather marks following the body direction.
Worked example
A student draws a body oval three pencil-widths tall and a head oval two pencil-widths tall. They shade the chest at value 3 and the wing shadow at value 4. What should they change to make the owl look white?
Worked answer
Reduce the head oval to about one and a half pencil-widths tall, and lighten the chest to value 1 or 2. Keep the wing shadow at value 4 but make it a narrow band. This restores the white plumage while keeping contrast.
Four practice exercises
Exercise 1
Draw a five-step value scale on scrap paper. Label 1 as bare paper and 5 as dark grey. Shade squares 2, 3, and 4 with increasing pressure. Then draw a small oval and shade it only at value 2. Check that the oval still looks white.
Show answer and check
The scale should show five clearly different steps. The oval should be mostly bare paper with a very light grey layer, reading as white rather than grey.
Why: White plumage depends on keeping most areas at values 1 and 2. Practising the scale first makes it easier to compare the owl's tones later.
Check: Compare the oval with square 1 and square 2. If the oval matches square 3 or darker, erase and lighten the layer.
Exercise 2
Sketch a perched snowy owl using two ovals: a body oval about three pencil-widths tall and a head oval about one and a half pencil-widths tall. Mark two level eyes in the lower half of the head. Do not shade yet.
Show answer and check
The construction should show a small head on a broad body, with level eyes in the lower half of the head oval.
Why: Proportions are easier to correct before shading. A small head and level eyes are the main structural checks for a perched owl.
Check: Measure the head and body with your pencil. If the head is as tall as the body or taller, redraw it smaller.
Exercise 3
On your construction drawing, add a value 2 layer under the chin and along the lower wing edge. Then add short, broken value 3 marks on the back. Leave the chest and facial disk at value 1.
Show answer and check
The chin and lower wing edge should show a soft light grey, the back should have sparse broken marks, and the chest and facial disk should remain close to bare paper.
Why: This exercise practises light-to-dark layering and keeps the white areas dominant. Broken marks suggest feather barring without making solid dark blocks.
Check: Squint at the drawing. If the chest looks grey, erase the layer there. If the back marks look like solid blocks, break them into shorter lines.
Exercise 4
Finish the owl by adding a narrow value 4 shadow where the wing meets the body and a small value 5 accent at each eye ring. Then compare the whole drawing with your value scale and adjust any area that looks too grey.
Show answer and check
The finished owl should be mostly values 1 to 3, with a narrow dark shadow at the wing-body join and tiny dark eye accents. Any broad grey area should be lightened.
Why: Dark accents create contrast without turning the bird grey. The final comparison with the scale catches areas that were shaded too heavily.
Check: Cover the value scale and check that the lightest owl areas match bare paper. If more than a small area is at value 4 or 5, erase and lighten it.
Common mistakes
- Shading the whole owl evenly with medium grey. Keep most of the body at values 1 and 2, and limit value 3 or darker to shadows and broken feather marks.
- Making the head too large compared with the body. Compare the head and body with pencil-widths before shading, and redraw the head oval smaller if needed.
- Drawing solid dark blocks for feather barring. Use short, broken lines that follow the feather direction, and keep them light enough to compare with value 3.
- Adding dark outlines around the whole bird. Let the shadow under the wing and tail create the edge instead; erase any heavy outline that makes the owl look flat.
Self-check rubric
- Body proportions: head smaller than body, eyes level and in the lower half of the head.
- Value scale: five steps clearly different, with most owl areas at values 1 to 3.
- Shading build-up: light layers first, dark accents limited to small shadow areas.
- Feather marks: short and broken, following the body direction rather than solid blocks.
- White plumage effect: the owl reads as white overall, not grey or flat.
- Valid alternatives: different pencil pressures and paper textures are acceptable if the value relationships hold.
Questions and answers
Do I need special paper to draw a white owl?
No. Ordinary drawing paper works. The key is to keep most of the paper untouched and use light pencil layers for shadows.
How dark should the darkest shadow be?
Use value 4 for deep shadows and value 5 only for tiny accents such as the eye ring. Most of the owl should stay at values 1 to 3.
Can I use a pen instead of a pencil?
A pencil is easier because you can erase and build soft layers. If you use a pen, work with very light hatching and leave most of the paper white.
How do I know if my proportions are correct?
Check that the head is smaller than the body and that the eyes sit in the lower half of the head. Compare lengths with your pencil before shading.