Free original lessons
Draw a Strawberry Cross-Section: Core, Seed Rings, and Flesh
Learn to draw the inside of a strawberry with a clear core, seed rings, and flesh zones using a simple convention and checkable steps.
Free lesson
Four exercises
Worked answers
Object Drawing Lessons
This lesson teaches a reliable way to draw a strawberry cross-section, focusing on the interior anatomy: the central core, the seed placement rings, and the surrounding flesh. You will use a defined drawing convention so that your result can be checked and compared, while still allowing valid stylistic variation. The approach is built on simple shapes and measured placement, not on artistic talent. By the end, you will be able to produce a labeled cross-section and verify its key features with arithmetic and visual checks.
Practice materials: Printable downloads are not available for this lesson yet. Use the instructions and four exercises below.
Reference illustration
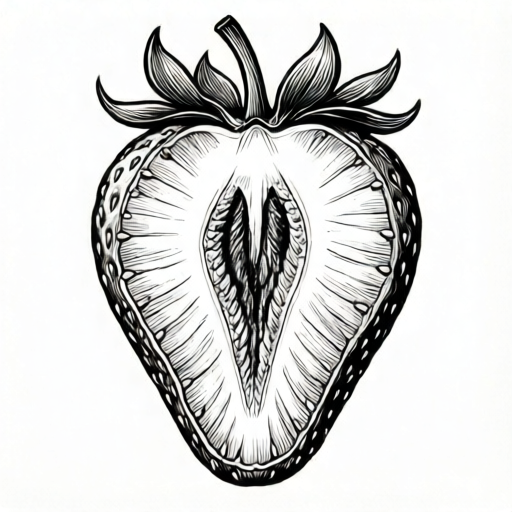
Use the stated measurements and conventions for each exercise.
Set the convention and the outline
A strawberry cross-section is a cut through the fruit that reveals the interior. For this lesson, use a vertical cut through the long axis, so the outline is a rounded heart-like or conical shape, wider at the top and tapering to a point at the bottom. Draw the outline lightly with a pencil. The convention is that the cut face is shown as a flat two-dimensional shape; you are not drawing the outside surface.
Define the bottom tip as the outline's lowest point and the vertical axis as the drawing midline. For labels, the x-height convention runs from the letter baseline to the letter x-height midline; letter styles may vary, so labels are judged by placement and legibility, not by a single font.
- Draw a light vertical midline about 8 cm long on plain paper.
- Sketch a rounded top about 5 cm wide, centered on the midline.
- Taper the sides down to a point at the bottom of the midline.
- Check that the outline is symmetric left and right within about 5 mm.
Place the core and flesh rings
The core is a lighter, firmer central region. In this convention, draw the core as a narrow vertical oval or column centered on the midline, extending from about 20 percent below the top to about 20 percent above the bottom tip. Its width is roughly one-fifth of the widest part of the outline. This is a hypothetical proportion for practice, not a botanical standard.
Around the core, draw two or three concentric flesh rings that follow the outline shape. These rings represent zones of flesh, not perfect circles. Keep the spacing even: if the widest half-width is 25 mm and the core half-width is about 5 mm, use ring offsets of about 5 mm and 10 mm from the core edge, and add a third at about 15 mm only if the outline permits. Label the zones lightly.
- Mark the core top and bottom on the midline using the 20 percent rule.
- Draw the core as a narrow oval about 5 mm wide at its widest.
- Draw the first flesh ring 5 mm outside the core, following the outline.
- Add a second ring 10 mm outside the core and a third at 15 mm if space allows.
- Check that ring spacing is even within about 2 mm.
Add seed rings and labels
Seeds in a strawberry cross-section appear mainly near the outer flesh, often in a ring or band. In this convention, place small seed marks in a ring about 5 mm inside the outline, spaced roughly every 10 mm along the curve. Draw each seed as a short oval or teardrop, angled slightly outward. Do not place seeds inside the core.
Add labels using the letter baseline to letter x-height midline convention: write 'core', 'flesh ring', and 'seed ring' with the baseline of each label on a horizontal guide line. Letter style may vary; check that labels are legible and point to the correct region with a straight leader line.
- Mark seed positions every 10 mm along a line 5 mm inside the outline.
- Draw each seed as a 2 mm oval angled outward.
- Label the core, one flesh ring, and the seed ring.
- Check that no seed mark lies within the core oval.
Worked example
A student draws an outline 50 mm wide at the top and 80 mm tall. Using the convention, where should the core top and bottom be, and what is a reasonable core width?
Worked answer
Core top is 20 percent of 80 mm = 16 mm below the top. Core bottom is 16 mm above the bottom tip. Core width is about one-fifth of 50 mm = 10 mm at its widest, so the core half-width is about 5 mm. With a 25 mm half-width, offsets of 5 mm and 10 mm from the core edge fit within the outline; a 15 mm offset fits only where the local half-width is at least about 20 mm.
Four practice exercises
Exercise 1
An outline is 60 mm wide and 90 mm tall. Calculate the core top and bottom positions using the 20 percent rule, and the core width using the one-fifth rule.
Show answer and check
Core top: 18 mm below the top. Core bottom: 18 mm above the bottom tip. Core width: 12 mm at the widest.
Why: 20 percent of 90 mm is 18 mm; one-fifth of 60 mm is 12 mm. These are hypothetical proportions for the convention.
Check: Recompute 0.20 × 90 for the top and bottom positions and 60 ÷ 5 (one-fifth) for the core width; confirm units are millimetres and values match the drawing marks.
Exercise 2
A drawing has a half-width of 30 mm at the widest point. If you use ring offsets of 5 mm, 10 mm, and 15 mm from the core edge, do all three rings fit inside the outline? Explain.
Show answer and check
At the widest point, the full width is 2 × 30 mm = 60 mm. Core full width is one-fifth of 60 mm = 12 mm, so the core half-width is 6 mm. Available flesh on each side at the widest point is 30 mm − 6 mm = 24 mm, so all three offsets (5 mm, 10 mm, 15 mm) fit there. However, the rings must follow the tapering outline. The 5 mm ring fits wherever the local half-width is at least 6 + 5 = 11 mm; the 10 mm ring fits wherever the local half-width is at least 6 + 10 = 16 mm; the 15 mm ring fits only where the local half-width is at least 6 + 15 = 21 mm. So all three rings fit only in the wider upper portion; near the tapering tip, only the 5 mm ring (and possibly the 10 mm ring) fits.
Why: Subtract the core half-width from the outline half-width to find available flesh width, then compare with the largest offset.
Check: Recompute 2 × 30 mm = 60 mm full width; 60 mm ÷ 5 = 12 mm core width; 12 mm ÷ 2 = 6 mm core half-width. For each offset, add the core half-width: 6 + 5 = 11 mm, 6 + 10 = 16 mm, 6 + 15 = 21 mm. Measure the local half-width at several heights along the tapering outline and confirm each ring is drawn only where the local half-width meets its required value. Keep units in millimetres.
Exercise 3
You plan to place seeds every 10 mm along a seed ring. The seed ring path is about 120 mm long. How many seed marks should you place, and where should the first and last marks go?
Show answer and check
Place 12 seed marks evenly spaced around the closed ring, giving 12 gaps of about 10 mm. Put the first mark at the top center of the ring, then place marks at 10, 20, ..., 110 mm along the ring path. Do not add a 13th mark at 120 mm, because that point coincides with the first mark. The gap from the 12th mark back to the first is also about 10 mm.
Why: 120 mm divided by 10 mm equals 12 intervals; using 12 marks keeps spacing close to 10 mm without doubling at the start.
Check: Count the marks and measure two adjacent gaps; both should be about 10 mm within 2 mm.
Exercise 4
A student labels the core with the baseline 3 mm below the core top and the midline of the letters 5 mm above the baseline. Is the label placed correctly under the convention? What should be checked?
Show answer and check
The placement is acceptable under the convention. The baseline is 3 mm below the core top and the letter x-height midline is 5 mm above the baseline; the convention does not fix a specific millimetre height, only that the baseline is horizontal and the x-height midline is clear. Check that the leader line points to the core and that the label does not overlap the seed ring.
Why: The convention fixes the letter baseline to letter x-height midline and legibility, not a specific font or exact millimetre height. Placement and clarity are the checks.
Check: Verify the baseline is horizontal, the letters are legible, and the leader line ends inside the core region.
Common mistakes
- Drawing the core as a perfect circle in the center. Use a narrow vertical oval or column centered on the midline, following the 20 percent top and bottom rule.
- Placing seeds randomly across the whole interior. Place seeds in a ring about 5 mm inside the outline, spaced about 10 mm apart, and keep them out of the core.
- Making flesh rings perfect circles that ignore the outline. Draw each ring as a smaller version of the outline shape, keeping even spacing from the core.
- Using inconsistent label placement or unreadable lettering. Use a horizontal guide line and the letter baseline to letter x-height midline convention; keep leader lines straight and short.
Self-check rubric
- Outline is a single closed shape, wider at top and tapering to a bottom point, symmetric within 5 mm.
- Core is a narrow vertical oval centered on the midline, with top and bottom near the 20 percent marks.
- At least two flesh rings follow the outline shape with even spacing within 2 mm.
- Seed marks form a ring about 5 mm inside the outline, spaced about 10 mm apart, and none lie in the core.
- Labels use the letter baseline to letter x-height midline convention, are legible, and point to correct regions.
- Valid alternatives: letter style, exact seed shape, and slight outline asymmetry are acceptable if the checks pass.
Questions and answers
Do I need to draw the outside of the strawberry?
No. This task is only the interior cross-section. The outline represents the cut face, not the exterior surface.
How many seed rings should I draw?
One clear seed ring is enough for the basic task. You may add a second partial ring near the top if space allows, but keep seeds out of the core.
Can I use my own lettering style?
Yes. The convention fixes the letter baseline to letter x-height midline and label placement, not the font. Any legible style is acceptable.
Are the proportions real strawberry measurements?
No. The 20 percent core rule and 5 mm ring spacing are hypothetical examples for practice. Measure your own drawing and keep units consistent.