Free original lessons
Whale Shark Side View Drawing: Spots, Gill Slits, and Proportions
Learn to draw a whale shark side view with a proportion guide, spot pattern placement, gill slit detail, and a blank outline practice plan.
Free lesson
Four exercises
Worked answers
Object Drawing Lessons
This lesson teaches a clear, repeatable method for drawing a whale shark in side view. You will set body proportions, place the dorsal fin and gill slits, and build a spot pattern that reads as a whale shark rather than another shark species. The approach uses simple measured units and a defined drawing convention so you can check your work without needing a single universal answer. The instructional steps below are complete on their own.
Practice materials: Printable downloads are not available for this lesson yet. Use the instructions and four exercises below.
Reference illustration
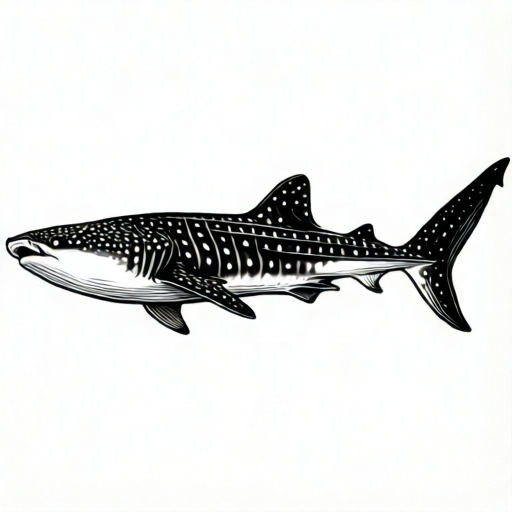
Use the stated measurements and conventions for each exercise.
Set the side-view proportions
Work on plain paper with a pencil and eraser. Choose a body length unit, called L, as any convenient length on your page, such as the width of your hand or a ruler segment. Label this chosen value as a hypothetical example if you write numbers. The whale shark side view is long and robust: the head is broad and flattened, the body tapers gently, and the tail is large and crescent-shaped.
Use a baseline for the belly and a midline for the back. Mark the snout at the left and the tail tip at the right. Divide the body length into five equal parts to locate the gill region, the dorsal fin, and the tail base. Keep the dorsal fin base roughly three-fifths of the body length from the snout: on a five-unit body that is unit three, which leaves two units (two-fifths of the body length) from the tail tip. Keep the gill slits just behind the head, between unit one and unit two.
- Draw a horizontal baseline and mark a total length of five equal units.
- Place the snout at unit zero and the tail tip at unit five.
- Sketch the back line rising gently from the snout, peaking near unit two, then sloping to the tail base.
- Sketch the belly line nearly flat, with a slight dip behind the head.
- Mark the dorsal fin base near unit three and the tail base near unit four and a half.
Place gill slits and dorsal fin
Whale sharks have five long gill slits on each side, grouped just behind the head. In side view, draw five slightly curved vertical lines that follow the body contour. Space them evenly, with the first slit closest to the head and the fifth slit shorter and farther back. The slits should not cross the belly line or the back line.
The dorsal fin is tall and triangular with a rounded tip. Its front edge rises steeply from the back, and its rear edge slopes down to the body. Draw the fin base between the gill slits and the tail, closer to the tail than to the head. A small second dorsal fin may appear near the tail base, but keep it subtle so the main fin remains the focus.
- Mark five evenly spaced points behind the head for the gill slits.
- Draw each slit as a short curved line that follows the body curve.
- Check that the first slit is longest and the fifth is shortest.
- Draw the dorsal fin as a triangle with a rounded tip, using the back line as its base.
- Add a small second dorsal fin near the tail base only if it helps the silhouette.
Build the spot pattern
Whale shark spots are pale, round or oval marks on a darker body. Use a defined convention: draw spots as small circles or ovals with a clear outline, and vary their size from tiny dots near the head to larger ovals along the body. Do not fill every space; leave irregular gaps so the pattern looks natural.
Place spots in loose rows that follow the body contour. Keep the gill slits clear by leaving a narrow unspotted band around each slit. On the dorsal fin, add a few small spots near the base. The tail usually has fewer spots. Valid alternatives include slightly different spot sizes, spacing, and row curvature, as long as the pattern remains irregular and avoids the gill slits.
- Lightly sketch three to five wavy rows along the body from head to tail.
- Place spots along the rows, varying size and spacing.
- Leave a clear band around each gill slit.
- Add a few spots near the dorsal fin base and fewer on the tail.
- Erase guide rows and refine spot outlines.
Refine the silhouette and check
A whale shark side view should read as broad-headed and heavy-bodied, not sleek like a mako or pointed like a great white. Check the head width, the flat belly, and the crescent tail. The mouth is wide and near the front of the head, not underneath. The eye is small and set behind the mouth corner.
Use a simple arithmetic check: if your body length is five units, the dorsal fin base should sit near unit three, and the gill slits should fall between unit one and unit two. Measure with a ruler or mark intervals on scrap paper. Adjust any part that falls outside these ranges before adding final details.
- Compare the head width to the body depth; the head should look broad, not narrow.
- Check that the mouth is wide and forward-facing.
- Confirm five gill slits behind the head.
- Measure the dorsal fin position against your five-unit guide.
- Erase stray guide lines and darken the final outline.
Worked example
A learner draws a whale shark side view on a five-unit body length. The dorsal fin base is marked at unit two, and the gill slits are placed between unit three and unit four. Identify the main proportion error and state a correction.
Worked answer
The dorsal fin is too far forward and the gill slits are too far back. Move the dorsal fin base to about unit three and shift the five gill slits to fall between unit one and unit two, just behind the head.
Four practice exercises
Exercise 1
On a five-unit body length, mark the snout at unit zero and the tail tip at unit five. Where should the dorsal fin base be placed, and where should the five gill slits fall?
Show answer and check
Dorsal fin base near unit three; gill slits between unit one and unit two.
Why: The dorsal fin sits closer to the tail than the head, and the gill slits are grouped just behind the head.
Check: Measure the marks against the five equal units and confirm the fin base is near unit three and all five slits lie between unit one and unit two.
Exercise 2
A drawing shows seven short vertical lines behind the head and a pointed snout. Name two corrections that would make the side view read more like a whale shark.
Show answer and check
Reduce the gill slits to exactly five and widen the snout so the head is broad and blunt.
Why: Whale sharks have five gill slits and a broad, flattened head, unlike pointed-headed sharks.
Check: Count the gill slits and compare the head width to the body depth; the head should look broad, not narrow.
Exercise 3
Describe how to place spots so the gill slits remain visible. Include one valid alternative for spot spacing.
Show answer and check
Leave a narrow unspotted band around each gill slit and place spots in loose rows elsewhere. A valid alternative is wider spacing between rows, as long as the pattern stays irregular and avoids the slits.
Why: Spots should not obscure the gill slits, and irregular spacing is acceptable under the defined convention.
Check: Trace each gill slit and confirm no spot crosses it; check that spot spacing varies rather than forming a grid.
Exercise 4
A learner measures a body length of five units and places the dorsal fin base at unit four and a half. Is this acceptable? Explain using the proportion guide.
Show answer and check
No. The dorsal fin base is too close to the tail; it should sit near unit three.
Why: The guide places the dorsal fin base roughly three-fifths of the body length from the snout, not near the tail tip.
Check: Re-measure the fin base against the five-unit guide and move it to the three-unit mark if it falls outside the expected range.
Common mistakes
- Drawing a pointed, narrow head like a great white shark. Widen the head and flatten the snout; the whale shark head is broad and blunt.
- Placing gill slits too far back or drawing more than five. Group exactly five slits just behind the head and keep them short and curved.
- Making the spot pattern too regular, like a grid. Vary spot size and spacing, and leave irregular gaps between rows.
- Putting the dorsal fin too close to the head. Move the fin base toward the tail, near the three-unit mark on a five-unit body.
Self-check rubric
- Body length is divided into five consistent units and the snout and tail tip are clearly marked.
- The head is broad and blunt, and the mouth is wide and forward-facing.
- Exactly five gill slits are grouped just behind the head and follow the body curve.
- The dorsal fin base sits near the three-unit mark and the fin has a rounded tip.
- The spot pattern is irregular, varies in size, and leaves a clear band around the gill slits.
- The tail is crescent-shaped and the overall silhouette reads as a whale shark, not another shark species.
- Valid alternatives in spot size, spacing, and row curvature are accepted if the pattern remains irregular and avoids the gill slits.
Questions and answers
How many gill slits should I draw?
Draw five gill slits on the visible side, grouped just behind the head.
Can I use different spot sizes?
Yes. Vary spot size and spacing as long as the pattern stays irregular and avoids the gill slits.
Where does the dorsal fin go?
Place the dorsal fin base roughly three-fifths of the body length from the snout, closer to the tail than the head.
Do I need to draw the second dorsal fin?
It is optional. A small second dorsal fin near the tail base can help, but keep it subtle.