Free original lessons
Akita Drawing Guide: Head, Ears, and Curled Tail
Learn to draw an Akita with breed-specific head, ear, and curled-tail construction using clear proportions, steps, and practice tasks.
Free lesson
Four exercises
Worked answers
Object Drawing Lessons
This guide teaches a repeatable method for drawing an Akita, focusing on the breed's distinctive head shape, upright triangular ears, and tail that curls over the back. You will use simple proportional relationships and a defined drawing convention so that valid stylistic variations remain acceptable. All measurements are relative to the drawing's own scale; no printer tolerances or hardware standards are assumed. Work on plain paper with a pencil and eraser. The goal is structural accuracy, not photorealism, so you can adapt line weight and detail to your style.
Practice materials: Printable downloads are not available for this lesson yet. Use the instructions and four exercises below.
Reference illustration
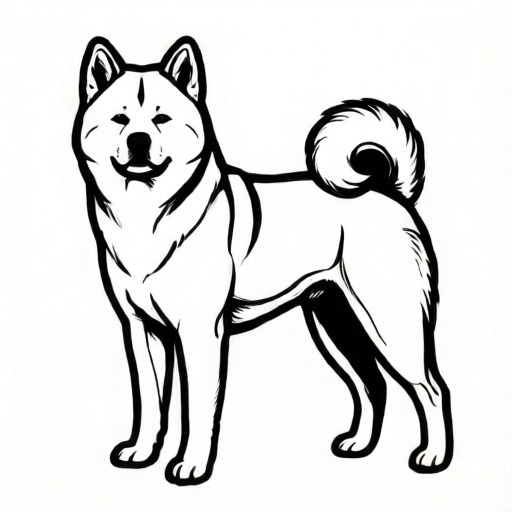
Use the stated measurements and conventions for each exercise.
Head and Ear Proportions
Begin with a circle for the cranium and a slightly wider, shorter trapezoid for the muzzle. The Akita head is broad and slightly rounded at the top, with a blunt muzzle. A useful convention is to set the muzzle length at about half the cranium width and the head width at about one and a half times the cranium height. These are relative proportions, not fixed measurements.
Ears are thick, triangular, and tipped slightly forward. Place them on the top corners of the cranium, leaving a small gap between them. Each ear's height should be roughly equal to the muzzle length, and the ear base should be about one-third of the cranium width. Draw the ear as a rounded triangle with a slight inward curve on the front edge.
- Draw a circle for the cranium and mark a vertical center line.
- Add a trapezoid muzzle below the circle, centered on the line, with length about half the cranium width.
- Place two triangular ear bases at the top corners of the circle, separated by a gap about one-quarter of the cranium width.
- Draw each ear upward with a rounded tip, height about equal to muzzle length, and tilt the tips slightly forward.
- Check that the ears sit above the eyes and that the muzzle is blunt, not pointed.
Curled Tail Construction
The Akita tail is thick and curls over the back, often forming a loose spiral or a single curl. Start by drawing the back line from the shoulders to the rump. At the rump, draw a thick curved line that rises upward and then curls forward over the back. The curl should sit above the spine and not overlap the head.
Use a simple spiral guide: draw a small circle at the rump, then a larger arc that loops over the back. The tail thickness should be about one-third of the ear height. Keep the curl open enough to see the back line beneath it. A valid alternative is a tighter curl or a double loop, as long as the tail remains thick and positioned over the back.
- Draw the back line from shoulders to rump.
- At the rump, sketch a thick curved line rising upward.
- Curl the line forward over the back, keeping it above the spine.
- Adjust the curl size so it does not cover the head or front legs.
- Check that the tail thickness is consistent and the curl reads as a single continuous form.
Body and Leg Placement
The Akita body is rectangular and sturdy. Draw a horizontal rectangle for the torso, with length about twice the height. The chest is deep, and the legs are straight and thick. Place the front legs under the chest and the back legs under the rump, with the hind legs slightly angled.
Use the head width as a unit: the torso length should be about three head widths, and the leg length about one and a half head widths. These proportions help keep the dog from looking too long or too short. The neck is thick and short, connecting the head to the shoulders without a sharp angle.
- Draw a rectangle for the torso, length about twice its height.
- Add a thick, short neck from the head to the shoulders.
- Place front legs under the chest, straight and thick.
- Place back legs under the rump, with a slight bend at the hock.
- Check that the body is rectangular and the legs are proportionate to the head width.
Refining and Checking
After the basic shapes are in place, refine the outline by smoothing transitions between the head, neck, and body. Erase construction lines only after you have checked the proportions. Use the ear height as a reference for the tail thickness and the muzzle length as a reference for the ear height.
A simple check is to compare the drawing to the breed-specific features: broad head, blunt muzzle, thick triangular ears tipped forward, and a thick tail curled over the back. If any feature is missing or exaggerated, adjust before adding detail. Valid stylistic alternatives include sharper ear tips or a tighter tail curl, provided the overall structure remains recognizable.
- Smooth the outline from head to neck to body.
- Erase construction lines after checking proportions.
- Compare the drawing to the four key features: head, ears, tail curl, and body shape.
- Adjust any feature that is too small, too large, or misplaced.
- Add minimal detail such as eyes and nose, keeping the focus on structure.
Worked example
Draw an Akita head with ears using a cranium circle of width 4 cm. The muzzle length is half the cranium width, and each ear height equals the muzzle length. What are the muzzle length and ear height?
Worked answer
Muzzle length = 4 cm ÷ 2 = 2 cm. Ear height = 2 cm. The ear base width is about one-third of 4 cm, or roughly 1.3 cm.
Four practice exercises
Exercise 1
A cranium circle has width 6 cm. The muzzle length is half the cranium width. What is the muzzle length?
Show answer and check
3 cm.
Why: Half of 6 cm is 3 cm, so the muzzle length is 3 cm.
Check: Multiply the answer by 2 to confirm it equals the cranium width: 3 cm × 2 = 6 cm.
Exercise 2
An ear base is one-third of a cranium width of 9 cm. What is the ear base width?
Show answer and check
3 cm.
Why: One-third of 9 cm is 3 cm, so the ear base width is 3 cm.
Check: Multiply the answer by 3 to confirm it equals the cranium width: 3 cm × 3 = 9 cm.
Exercise 3
A torso length is three head widths. If the head width is 5 cm, what is the torso length?
Show answer and check
15 cm.
Why: Three head widths means 3 × 5 cm = 15 cm.
Check: Divide the torso length by 3 to confirm it equals the head width: 15 cm ÷ 3 = 5 cm.
Exercise 4
A tail thickness is one-third of an ear height of 4.5 cm. What is the tail thickness?
Show answer and check
1.5 cm.
Why: One-third of 4.5 cm is 1.5 cm, so the tail thickness is 1.5 cm.
Check: Multiply the answer by 3 to confirm it equals the ear height: 1.5 cm × 3 = 4.5 cm.
Common mistakes
- Drawing pointed, wolf-like ears instead of thick triangular ears. Round the ear tips and widen the base to about one-third of the cranium width.
- Making the tail curl too thin or placing it beside the body. Keep the tail thickness about one-third of the ear height and curl it over the back, above the spine.
- Using a long, narrow muzzle. Shorten the muzzle to about half the cranium width and make it blunt.
- Drawing a square or round body instead of a rectangular torso. Set the torso length to about twice its height and use the head width as a unit.
Self-check rubric
- Head is broad with a blunt muzzle about half the cranium width.
- Ears are thick triangles with rounded tips, height about equal to muzzle length, and tilted slightly forward.
- Tail is thick and curls over the back, above the spine, without covering the head.
- Body is rectangular, length about twice its height, with legs proportionate to head width.
- Construction lines are erased and the outline is smooth.
- Valid stylistic alternatives (sharper ear tips, tighter curl) are accepted if breed features remain clear.
Questions and answers
Do I need to measure exact angles for the ears?
No. Use relative proportions: ear height about equal to muzzle length, base about one-third of cranium width, and tips tilted slightly forward. Small variations are acceptable.
Can the tail curl be tighter or looser?
Yes. A single loose curl or a tighter spiral are both valid as long as the tail is thick and positioned over the back.
What if my drawing looks too long?
Check the torso length against the head width. It should be about three head widths. Shorten the torso or widen the head if needed.
How do I know the ears are placed correctly?
The ear bases should sit on the top corners of the cranium with a small gap between them, and the tips should be above the eyes.