Free original lessons
Face Symmetry Drawing: Axis, Paired Features, and Proportion Checks
Learn to draw a symmetrical face using a central axis, paired features, and simple proportion checks. Includes a worked example, four practice tasks, and a rubric.
Free lesson
Four exercises
Worked answers
Object Drawing Lessons
Symmetry in a face drawing depends on a clear vertical axis and paired features placed at matching distances from that axis. This lesson teaches a repeatable method: establish the axis, mark horizontal guides for feature heights, place each feature on one side, then mirror it to the other side using measured distances. You will also learn to check your work with simple arithmetic and a defined convention for line placement. The goal is structural symmetry, not identical shading or expression. All measurements are in centimeters unless stated otherwise, and any numerical values are hypothetical examples you can adjust to your paper size.
Practice materials: Printable downloads are not available for this lesson yet. Use the instructions and four exercises below.
Reference illustration
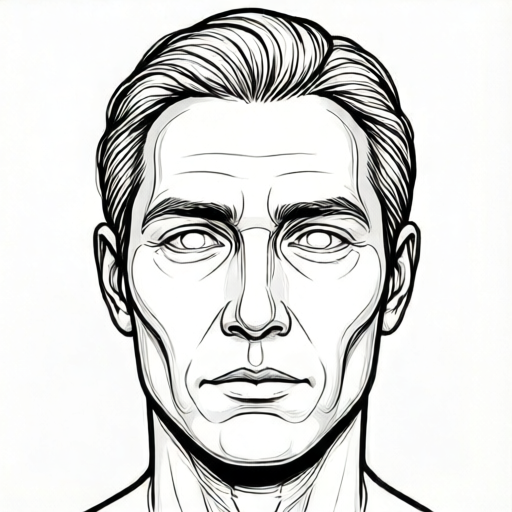
Use the stated measurements and conventions for each exercise.
Set the axis and horizontal guides
Draw a light vertical line down the center of your paper. This is the symmetry axis. It should be straight and easy to see but not so dark that it dominates the finished drawing. Next, decide the top and bottom of the face along the axis. For a hypothetical example, mark the top of the head at 0 cm and the chin at 12 cm, giving a face height of 12 cm. Mark the chin line horizontally across the axis.
Add horizontal guide lines for feature heights. A common proportional scheme places the eye line near the midpoint of the face height, the nose base about two-thirds down from the top, and the mouth line about three-quarters down. Using the 12 cm example: eye line at 6 cm, nose base at 8 cm, mouth line at 9 cm. These are hypothetical starting points, not universal rules. Keep the guides light and horizontal, and label them if helpful.
- Draw a vertical axis line and mark the top and chin points.
- Measure the face height and divide it to place the eye line near the midpoint.
- Mark the nose base and mouth line at chosen fractions of the face height.
- Draw light horizontal guides through each marked height, crossing the axis.
Place paired features by measured distance
Work on one side first. Choose a distance from the axis for each feature and mark it. For example, place the left eye center 2 cm left of the axis on the eye line. The right eye center must then be 2 cm right of the axis on the same horizontal line. Use the same measured distance for the outer corner, inner corner, and pupil if you draw them. For the nose, mark the left nostril 1 cm left of the axis and the right nostril 1 cm right. For the mouth, mark the left corner 1.5 cm left and the right corner 1.5 cm right.
A practical convention for line placement: measure to the center of the line you draw, not its outer edge. If a line is thick, its center is the reference point. This convention keeps paired features consistent even when line weights vary. Letter styles and feature shapes can differ as long as the measured centers match. For example, one eye may be drawn with a heavier upper lid line, but its center still sits at the same distance from the axis as the other eye.
- Mark the left feature center at a measured distance from the axis.
- Mark the right feature center at the same distance on the opposite side.
- Draw each feature around its marked center, using the same height guide.
- Repeat for eyes, nostrils, mouth corners, and ears if included.
Check symmetry with simple arithmetic
After drawing, measure each pair of feature centers from the axis. For the eyes, if the left center is 2.0 cm left and the right center is 2.0 cm right, the pair is symmetric. The total distance between the centers is 4.0 cm, and the axis is exactly halfway. If the left is 2.0 cm and the right is 2.3 cm, the difference is 0.3 cm, so adjust the right center toward the axis by 0.15 cm to make both 2.15 cm. This arithmetic works for any pair.
Also check that paired features share the same height guide. If the left eye center is on the 6 cm line and the right eye center is 0.2 cm above it, move the right center down to the 6 cm line. For the mouth, compare corner distances and heights. A small mismatch is normal in freehand drawing; the goal is to notice and correct it. Keep all measurements in the same unit and record them lightly beside the drawing or on a separate check sheet.
- Measure each left feature center from the axis and record the value.
- Measure the matching right feature center and record the value.
- Subtract the smaller from the larger to find the difference.
- Adjust one or both centers by half the difference to equalize distances.
- Confirm both features sit on the same horizontal guide.
Complete the mirror half and review
If you started with a half-face reference, use the axis as the mirror line. For each feature on the reference side, measure its distance from the axis and its height, then mark the matching point on the blank side. Draw the mirrored feature around that point. Keep the axis visible until the end so you can check distances. When finished, review the paired-feature check boxes: eyes level and equidistant, nostrils equidistant, mouth corners equidistant, and ears at matching heights if drawn.
Symmetry does not require identical line weight or shading. A valid drawing may have different letter styles or feature shapes on each side as long as the measured centers and heights match. Use the rubric to assess axis clarity, paired placement, proportion consistency, and completion of the mirror half. If a check fails, correct the measured center first, then redraw the feature outline around it.
- Measure each reference feature center from the axis and note its height.
- Mark the mirrored center on the blank side at the same distance and height.
- Draw the mirrored feature around its center.
- Complete the paired-feature check boxes and adjust any mismatch.
- Review the drawing against the rubric before finalizing.
Worked example
A face is 10 cm tall on the axis. The eye line is at 5 cm, the nose base at 6.5 cm, and the mouth line at 7.5 cm. The left eye center is 1.8 cm left of the axis, the left nostril is 0.9 cm left, and the left mouth corner is 1.4 cm left. State the matching right-side distances and the total distance between each pair.
Worked answer
Right eye center: 1.8 cm right; total eye-center distance 3.6 cm. Right nostril: 0.9 cm right; total nostril distance 1.8 cm. Right mouth corner: 1.4 cm right; total mouth-corner distance 2.8 cm. All pairs sit on their respective height guides: eyes at 5 cm, nostrils at 6.5 cm, mouth corners at 7.5 cm.
Four practice exercises
Exercise 1
A face height is 12 cm. The eye line is at 6 cm, the nose base at 8 cm, and the mouth line at 9 cm. The left eye center is 2.2 cm left of the axis. What is the right eye center distance, and what is the total distance between the eye centers?
Show answer and check
Right eye center: 2.2 cm right of the axis. Total distance between eye centers: 4.4 cm.
Why: Symmetry requires equal distances from the axis. The right center mirrors the left at 2.2 cm. The total is 2.2 + 2.2 = 4.4 cm.
Check: Measure both centers from the axis with a ruler; each should read 2.2 cm, and the sum should be 4.4 cm.
Exercise 2
The left nostril is 1.1 cm left of the axis and the right nostril is 1.4 cm right. By how much should each center move to become symmetric, and what is the new common distance?
Show answer and check
Each center moves 0.15 cm toward the common value. The new common distance is 1.25 cm from the axis.
Why: The difference is 1.4 - 1.1 = 0.3 cm. Half the difference is 0.15 cm. Add 0.15 to 1.1 and subtract 0.15 from 1.4 to reach 1.25 cm on both sides.
Check: Re-measure both nostrils after adjustment; both should read 1.25 cm from the axis, and the total distance should be 2.5 cm.
Exercise 3
A drawing has the left mouth corner at 1.6 cm left of the axis on the 7.5 cm guide, but the right mouth corner is at 1.6 cm right on the 7.8 cm guide. Describe the correction needed and state the final measured values.
Show answer and check
Move the right mouth corner down to the 7.5 cm guide while keeping its 1.6 cm distance from the axis. Final values: left corner 1.6 cm left at 7.5 cm; right corner 1.6 cm right at 7.5 cm.
Why: The horizontal distances already match, so only the height needs correction. Both corners must sit on the same guide line for a symmetric pair.
Check: Measure each corner's distance from the axis and its height from the top mark; both distances should be 1.6 cm and both heights 7.5 cm.
Exercise 4
On a 14 cm face, the eye line is at 7 cm. The left eye center is 2.5 cm left of the axis, and the right eye center is 2.1 cm right. Find the difference, the adjustment per side, and the new common distance. Then state the total distance between the corrected eye centers.
Show answer and check
Difference: 0.4 cm. Adjustment per side: 0.2 cm. New common distance: 2.3 cm from the axis. Total distance between corrected eye centers: 4.6 cm.
Why: Subtract 2.1 from 2.5 to get 0.4 cm. Half is 0.2 cm. Move the left center inward to 2.3 cm and the right center outward to 2.3 cm. The total is 2.3 + 2.3 = 4.6 cm.
Check: Measure both eye centers from the axis after adjustment; each should read 2.3 cm, and the sum should be 4.6 cm. Confirm both centers remain on the 7 cm eye line.
Common mistakes
- Drawing the axis but not using it to measure feature distances. Measure each feature center from the axis with a ruler and record the value before drawing the feature.
- Placing paired features at different heights. Use one horizontal guide per feature pair and mark both centers on that same guide.
- Measuring to the outer edge of a thick line instead of its center. Apply the center-of-line convention: measure to the middle of the line you draw, not its edge.
- Assuming both sides must look identical in line weight or style. Check measured centers and heights instead; allow valid differences in line weight and feature shape.
Self-check rubric
- Axis is a clear vertical line and remains visible for checking.
- Each paired feature center is measured from the axis and recorded.
- Paired feature centers are equidistant from the axis within the chosen tolerance.
- Paired features share the same horizontal height guide.
- The mirror half is completed using measured distances, not guessed placement.
- Valid alternative line weights and feature shapes are accepted when measured centers match.
Questions and answers
Do both sides of the face need to be identical?
No. Symmetry here means paired feature centers are at equal distances from the axis and on the same height guides. Line weight, letter style, and small shape differences can vary.
What if my measured distances differ by a small amount?
Subtract the smaller distance from the larger, then adjust one or both centers by half the difference. For example, 2.0 cm and 2.3 cm differ by 0.3 cm; move each toward 2.15 cm.
Are the numerical proportions in this lesson fixed rules?
No. The 12 cm face height and the 6 cm, 8 cm, and 9 cm guides are hypothetical examples. Choose values that fit your paper and check them with simple arithmetic.
How do I check the mouth corners?
Measure each corner's distance from the axis and confirm both sit on the mouth guide line. Equal distances and equal heights indicate a symmetric pair.