Free original lessons
Contour Drawing: Three-Drawer Dresser Essentials
Learn to draw a three-drawer dresser in clean contour lines, covering drawer fronts, legs, and edges with checkable steps and practice tasks.
Free lesson
Four exercises
Worked answers
Object Drawing Lessons
Contour drawing captures the outline and key edges of an object without shading. This lesson focuses on a three-drawer dresser: its rectangular case, three stacked drawer fronts, and supporting legs. You will use a simple convention for line weight and spacing, then apply it to a worked example and four practice tasks. All measurements are hypothetical examples; measure your own reference or object to set real values. The goal is accurate proportion and clear edge separation, not decorative rendering.
Practice materials: Printable downloads are not available for this lesson yet. Use the instructions and four exercises below.
Reference illustration
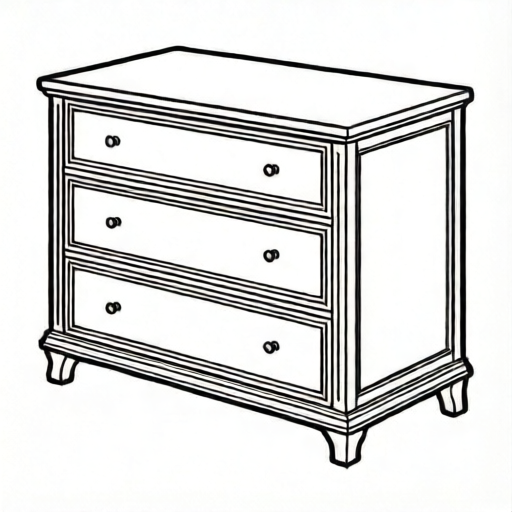
Use the stated measurements and conventions for each exercise.
Setting Up Your Contour Convention
Use a single line weight for all visible edges. Draw outer boundaries slightly heavier only if you choose; state your choice before starting. Keep drawer gaps as narrow parallel lines, not filled shadows. X-height convention: for any lettering or labels, baseline to midline defines x-height; letter styles vary, so do not force a single alphabet. For the dresser itself, treat each drawer front as a rectangle with a small inset gap from the case edge.
Work on plain paper with a pencil or fine pen. Measure the overall width and height of the dresser front in your reference. For example, suppose the front is 90 cm wide and 75 cm tall (hypothetical). The three drawer fronts stack vertically; if each gap is 1 cm, the three fronts share 75 minus two gaps = 73 cm, so each front is about 24.3 cm tall. These numbers are examples only; substitute your measured values.
- Measure overall width and height of the dresser front; record in centimetres.
- Decide gap width between drawer fronts and between drawers and case; record.
- Subtract total gap height from overall height to get combined drawer front height.
- Divide combined height by three for equal drawer fronts, or adjust if drawers differ.
- Mark the outer case rectangle lightly before adding drawer lines.
Drawing the Case and Drawer Fronts
Start with the outer case as a rectangle. Add a second rectangle inside for the drawer bank, leaving a uniform margin on left, right, and top. This margin represents the case face around the drawers. Then draw two horizontal gap lines to separate the three drawer fronts. Each drawer front is a rectangle; its left and right edges align with the drawer bank, not the outer case.
Check alignment by comparing opposite sides: the left margin should equal the right margin, and the top margin should equal the bottom margin if the design is symmetric. If your dresser has a different margin, measure and label it. Keep all lines continuous where edges meet; avoid sketchy overlaps that confuse the contour.
- Draw outer case rectangle using measured width and height.
- Draw inner drawer bank rectangle with chosen margins.
- Mark two horizontal gap lines to create three equal drawer front heights.
- Draw vertical edges of each drawer front at the drawer bank sides.
- Verify margins and gap widths with a ruler before inking.
Adding Legs and Edge Details
Legs attach below the case. Decide leg height and width; for example, 12 cm tall and 4 cm wide (hypothetical). Draw two front legs at the outer corners, and indicate rear legs only if visible from your viewpoint. Each leg is a narrow rectangle or tapered shape; keep the contour simple. Add a bottom rail line if your dresser has one, but do not shade.
Edge details include the top overhang and any side panels. If the top overhangs by 2 cm (hypothetical), draw a line 2 cm outside the case top on visible sides. Keep all lines as contours: no hatching, no smudging. The final drawing should read as a flat outline with clear drawer and leg separation.
- Measure leg height and width; record.
- Draw front legs as rectangles at outer corners below the case.
- Add rear legs only if visible; otherwise omit.
- Draw top overhang lines if present, using measured overhang.
- Review all edges for continuity and remove stray marks.
Worked example
A dresser front is 80 cm wide and 70 cm tall. The case margin is 5 cm on left, right, and top. Gaps between drawer fronts are 1 cm each. Legs are 10 cm tall and 3 cm wide. Calculate drawer front height and describe the contour sequence.
Worked answer
Drawer bank width = 80 - 5 - 5 = 70 cm. Drawer bank height = 70 - 5 = 65 cm. Two gaps total 2 cm, so combined drawer front height = 65 - 2 = 63 cm. Each drawer front height = 63 / 3 = 21 cm. Draw outer case 80 by 70 cm. Draw inner bank 70 by 65 cm, offset 5 cm from left, right, and top. Mark two horizontal gap lines 1 cm apart to create three 21 cm fronts. Draw front legs 3 cm wide and 10 cm tall at outer corners below the case. Check: 21 + 1 + 21 + 1 + 21 = 65 cm bank height; 70 + 5 + 5 = 80 cm width.
Four practice exercises
Exercise 1
A dresser front is 100 cm wide and 80 cm tall. Case margins are 4 cm left, right, and top. Gaps between three drawer fronts are 2 cm each. Calculate each drawer front height and state the drawer bank dimensions.
Show answer and check
Drawer bank width = 100 - 4 - 4 = 92 cm. Drawer bank height = 80 - 4 = 76 cm. Two gaps total 4 cm, so combined front height = 76 - 4 = 72 cm. Each front height = 72 / 3 = 24 cm. Drawer bank is 92 cm wide by 76 cm tall.
Why: Subtract side margins from width; subtract top margin from height. Remove gap height from bank height, then divide by three.
Check: Verify 24 + 2 + 24 + 2 + 24 = 76 cm bank height; 92 + 4 + 4 = 100 cm width.
Exercise 2
A dresser has three drawer fronts each 20 cm tall, with 1.5 cm gaps between them. The top margin is 6 cm. What is the total height from the top of the case to the bottom of the lowest drawer front?
Show answer and check
Total height = top margin + three fronts + two gaps = 6 + 20 + 20 + 20 + 1.5 + 1.5 = 69 cm.
Why: Add the top margin, all three drawer front heights, and both gap heights.
Check: Re-add in a different order: 20 + 1.5 + 20 + 1.5 + 20 + 6 = 69 cm.
Exercise 3
A dresser front is 75 cm wide. Case margins are 3 cm left and 3 cm right. Drawer fronts align with the drawer bank. What is the width of each drawer front?
Show answer and check
Drawer bank width = 75 - 3 - 3 = 69 cm. Each drawer front width = 69 cm.
Why: Drawer fronts span the full drawer bank width, so subtract side margins from overall width.
Check: 69 + 3 + 3 = 75 cm overall width.
Exercise 4
Legs are 14 cm tall and 5 cm wide. The case height is 70 cm. What is the total height of the dresser from the floor to the case top?
Show answer and check
Total height = leg height + case height = 14 + 70 = 84 cm.
Why: The legs raise the case above the floor, so add leg height to case height for the overall height.
Check: 84 - 70 = 14 cm leg height; confirm all units are centimetres.
Common mistakes
- Drawing drawer fronts as one tall rectangle without gap lines. Add two horizontal gap lines to separate three equal drawer fronts; measure combined height minus gaps first.
- Making drawer fronts wider than the drawer bank. Align drawer front left and right edges with the inner bank rectangle, not the outer case.
- Shading or hatching to show depth. Use only contour lines; indicate depth with edge placement and overhang lines, not tone.
- Legs placed inside the case width instead of at corners. Place front legs at the outer corners below the case; measure leg width and offset from case edge.
Self-check rubric
- Outer case rectangle matches measured width and height within 1 cm.
- Drawer bank margins are equal on left and right, and top margin matches chosen value.
- Three drawer fronts are separated by two gap lines; heights sum correctly with gaps.
- Drawer front edges align with drawer bank sides, not outer case.
- Front legs are placed at outer corners below the case with measured width and height.
- All lines are contour only; no shading, hatching, or smudging.
- Labels or lettering follow stated x-height convention (baseline to midline) and are legible.
Questions and answers
Do I need to draw perfect straight lines?
Aim for steady lines, but slight wobble is acceptable if proportions and edge placement are correct. Use a ruler for measurements, then draw freehand if you prefer.
How do I handle drawers that are not equal height?
Measure each drawer front height separately and mark gap lines accordingly. The method still works; just replace equal division with measured values.
Should I include the back legs?
Include only legs visible from your chosen viewpoint. If the view is straight-on, rear legs may be hidden; omit them to keep the contour clear.
What if my dresser has a different number of drawers?
This lesson solves three drawers. For other counts, adjust the number of gap lines and divide the drawer bank height by the drawer count.