Free original lessons
Contour Line Drawing of Shoes: Slow vs Quick Edge Study
Learn shoe-specific contour drawing by tracing sole, heel, and lace edges slowly, then comparing with quick contour sketches. Includes practice plate plan and rubric.
Free lesson
Four exercises
Worked answers
Object Drawing Lessons
Contour line drawing of shoes trains your eye to follow visible edges without shading or guesswork. This lesson focuses only on shoe contours: the sole outline, heel curve, and lace edges. You will compare a slow contour, drawn while looking mostly at the shoe, with a quick contour drawn in one continuous line. The goal is not a perfect shoe shape but honest edge observation. All practice resources are planned as free printables; this text describes what they will contain so you can draw on plain paper now.
Practice materials: Printable downloads are not available for this lesson yet. Use the instructions and four exercises below.
Reference illustration
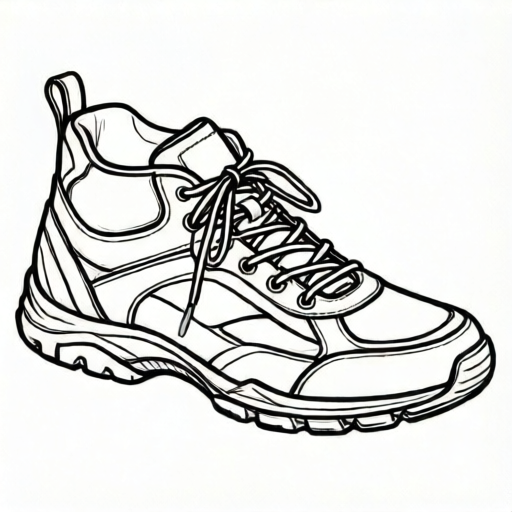
Use the stated measurements and conventions for each exercise.
Set Up and Define the Contour Convention
Place one shoe on a plain surface at eye level. Use a pencil and one sheet of paper. Define your contour convention before drawing: a contour line records a visible edge where the shoe meets background or where one shoe part overlaps another. Do not shade, smudge, or lift the pencil to redraw. X-height is not relevant here because shoes are not letters; instead, treat the sole top edge as a baseline and the shoe opening as a midline reference. Letter styles vary, and so do shoe contours: a sneaker, boot, and sandal will produce different valid outlines.
Label any numerical values as hypothetical examples. For instance, you might decide a slow contour takes about 3 minutes and a quick contour about 30 seconds. These are chosen practice values, not standards. Measure your own paper and shoe with a ruler if you want consistent units; record centimeters or inches on the page.
- Place the shoe so its side profile is visible and does not move.
- Mark a baseline under the sole and a midline at the shoe opening with light pencil dots.
- Choose one edge to start: the sole outline is easiest.
- Keep the pencil on the paper for the whole slow contour.
Slow Contour: Sole, Heel, and Lace Edges
Slow contour means your eye moves along the edge while your pencil follows at the same pace. Spend most of the time looking at the shoe, not the paper. Trace the sole from toe to heel, then the heel curve upward, then the lace edges where they cross the tongue. If a lace disappears under another lace, stop the line at the overlap and begin a new line at the visible edge. This is not cheating; it records what is actually visible.
Compare your slow contour to the shoe after finishing. Check three specific edges: the toe curve, the heel back curve, and the top lace edge. If a line drifts, note where your eye jumped ahead. Do not erase; the drift is useful information for the next attempt.
- Start at the toe tip of the sole and move slowly toward the heel.
- Follow the heel curve upward to the shoe opening.
- Trace each visible lace edge as a separate line where overlaps occur.
- After finishing, point to the toe, heel, and top lace edge and compare each to the shoe.
Quick Contour and Side-by-Side Comparison
Quick contour uses the same edge-following rule but with less time. Draw one continuous line for the main shoe outline, then add only the most visible lace edge. The purpose is to compare which edges your hand remembers versus which edges you actually see. A quick contour may look looser; that is expected and valid.
Place the slow and quick contours side by side. Ask three questions: Which drawing shows the heel curve more accurately? Which shows the sole thickness more clearly? Which lace edge is easier to identify? Write one sentence for each answer. This comparison is the core of the lesson, not a judgment of artistic skill.
- Set a short timer using your chosen hypothetical value, such as 30 seconds.
- Draw the main shoe outline in one continuous line without lifting the pencil.
- Add one lace edge only.
- Place both drawings side by side and answer the three comparison questions in writing.
Edge-Tracing Prompts for the Printable Plate
The planned printable plate will include a shoe outline contour reference, two side-by-side practice boxes labeled slow and quick, and three edge-tracing prompts: trace the sole edge, trace the heel edge, and trace the lace edges. The plate is not yet built; this description lets you recreate it on plain paper. Draw two boxes of equal size, sketch a simple shoe outline in the reference area, and write the three prompts above the boxes.
Use the same shoe for all prompts so comparisons stay fair. If you switch shoes, note the change and treat the new drawing as a separate exercise. Keep units consistent: if you measure the sole length in centimeters, measure the heel height in centimeters too.
- Draw two equal boxes on one sheet and label them Slow and Quick.
- Sketch a simple shoe outline in a reference area above the boxes.
- Write the three edge prompts: sole, heel, lace.
- Complete one slow and one quick contour using the same shoe.
Worked example
A student draws a slow contour of a low sneaker in 3 minutes and a quick contour in 30 seconds. The slow drawing shows the sole edge and heel curve clearly but misses the top lace edge. The quick drawing shows the sole edge but the heel curve is flattened. Compare the two drawings using three specific edges.
Worked answer
The slow contour is stronger on the heel curve and sole edge; the quick contour is weaker on the heel curve but still shows the sole edge. Neither drawing clearly shows the top lace edge. The next practice should focus on tracing the top lace edge slowly, then adding only that edge to a quick contour.
Four practice exercises
Exercise 1
Draw a slow contour of one shoe on plain paper. Keep the pencil on the paper and include the sole outline, heel curve, and one lace edge. Then write one sentence naming the edge that was hardest to follow.
Show answer and check
A completed slow contour with a continuous sole line, a heel curve, and one lace edge, plus a sentence naming a specific edge such as the top lace edge.
Why: The task checks whether the drawer followed visible edges without lifting the pencil and can identify a specific difficulty.
Check: Point to the sole line, heel curve, and lace edge on the drawing. Confirm the pencil line is continuous and the sentence names one of those three edges.
Exercise 2
Draw a quick contour of the same shoe in about 30 seconds using one continuous line for the main outline. Add one lace edge. Place it beside the slow contour and answer: which drawing shows the heel curve more accurately?
Show answer and check
A quick contour with one continuous main outline and one lace edge, plus a comparison sentence choosing either drawing and naming the heel curve.
Why: The exercise tests quick edge recall and direct side-by-side comparison of a specific edge.
Check: Verify the quick contour has one continuous main line and one lace edge. Read the comparison sentence and confirm it mentions the heel curve.
Exercise 3
On a sheet, draw two equal boxes labeled Slow and Quick. Sketch a simple shoe outline above them as a reference. In the Slow box, trace only the sole edge and heel edge. In the Quick box, trace only the sole edge. Write one sentence comparing the sole edge in both boxes.
Show answer and check
Two labeled boxes with the specified edges traced and a sentence comparing the sole edge, such as the slow sole edge is more detailed or the quick sole edge is simpler.
Why: This isolates edge-tracing prompts and checks whether the drawer can compare the same edge across two conditions.
Check: Confirm both boxes are labeled and contain only the requested edges. Read the sentence and check it names the sole edge.
Exercise 4
Choose a different shoe, such as a boot or sandal. Draw a slow contour including the sole outline and heel curve. Then list two visible edges that are present on this shoe but were not present on the first shoe.
Show answer and check
A slow contour of the second shoe with sole and heel edges, plus a list of two shoe-specific edges such as a boot shaft edge and a buckle edge, or a sandal strap edge and an open toe edge.
Why: The task checks transfer to a new shoe shape and recognition that valid contours vary by shoe type.
Check: Point to the sole and heel lines on the new drawing. Read the two listed edges and confirm they are visible on the chosen shoe.
Common mistakes
- Looking mostly at the paper instead of the shoe. Say the edge name aloud, such as heel curve, and look at the shoe until your pencil reaches the next corner.
- Lifting the pencil to fix a line during slow contour. Keep the pencil down and continue from the new visible edge; note the drift instead of erasing.
- Shading or filling in the shoe. Use only single contour lines; leave the interior blank.
- Comparing slow and quick contours by overall prettiness. Compare three specific edges: toe curve, heel curve, and top lace edge.
Self-check rubric
- Slow contour keeps the pencil on the paper for the full drawing.
- Slow contour includes the sole outline, heel curve, and at least one lace edge.
- Quick contour uses one continuous line for the main shoe outline.
- Quick contour includes at least one visible lace edge.
- Comparison names three specific edges: toe curve, heel curve, and top lace edge.
- Valid alternatives are accepted: different shoe types, left or right side, and different lace styles, as long as visible edges are recorded.
Questions and answers
Do I need a special shoe?
No. Any shoe with a visible sole, heel, and lace or strap edge works. A sneaker is convenient because lace edges are clear.
How long should each contour take?
Choose your own values and label them as hypothetical examples. A common practice choice is 3 minutes for slow and 30 seconds for quick, but measure your own pace.
Can I draw the other side of the shoe?
Yes, if it is visible. Contour drawing records visible edges, so draw only what you can see from your viewpoint.
What if my quick contour looks messy?
Messiness is not the criterion. Check whether the heel curve and sole edge are recognizable and whether one lace edge is present.