Free original lessons
Dog Contour Drawing: Single-Line Edge Practice
Learn to draw a dog using contour lines only. Practice ear, muzzle, and leg edges with blind-contour drills and a printable plate plan.
Free lesson
Four exercises
Worked answers
Object Drawing Lessons
Contour drawing captures the visible edge of a subject with a single, continuous line. For a dog, the key edges are the ear flap, the muzzle profile, and the leg outline where fur meets air. This lesson builds those edges through slow looking and simple checkable steps. You will use a defined convention: x-height is measured from baseline to midline of a letter, and letter styles vary, so any consistent handwriting scale is acceptable. All resources are planned and free; none are built yet. Measure your own paper and pencil, and treat any numbers here as hypothetical examples.
Practice materials: Printable downloads are not available for this lesson yet. Use the instructions and four exercises below.
Reference illustration
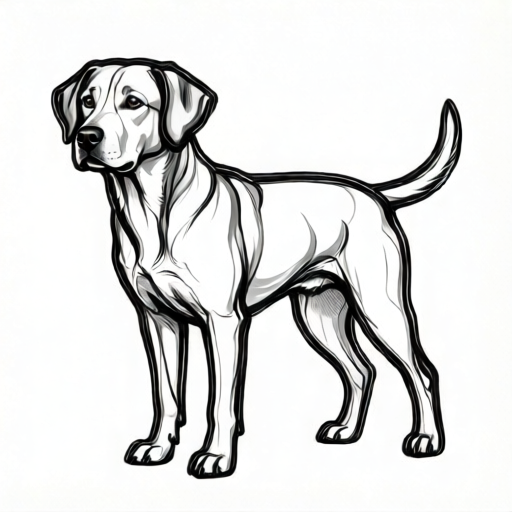
Use the stated measurements and conventions for each exercise.
Seeing the Dog as Edges
A contour line is not an outline of everything you know about a dog. It is the boundary you actually see between the dog and the space around it. Start by choosing one clear edge: the top of the ear, the curve of the muzzle, or the front of a leg. Keep your eye on that edge while your pencil moves slowly.
Use a single line without lifting the pencil for each practice pass. If the line drifts, keep going; the goal is sustained attention, not perfection. Work on plain paper with a soft pencil. Measure your paper first and note its size in your own units, such as centimeters or inches.
- Place the dog reference or your own dog in front of you at a comfortable distance.
- Choose one edge, such as the ear flap, and rest your pencil on the paper.
- Move the pencil at the same slow speed as your eye traces the edge.
- Do not lift the pencil until the edge is complete or you reach a natural stop.
- Label the edge you drew so you can compare it later.
Blind-Contour Practice Box
Blind contour means you look only at the dog, not at your paper, while drawing. This trains your hand to follow your eye. Draw a box on your paper, measure its sides, and write the dimensions at the top. Inside the box, draw one dog edge without looking down. The result may look strange; that is expected and useful.
After one blind pass, draw the same edge again while looking at your paper. Compare the two lines. The second pass is not a correction but a record of what changed when you allowed yourself to see the paper.
- Draw a rectangular box and measure its width and height with a ruler.
- Write the measurements inside the box margin.
- Pick one edge, such as the muzzle profile.
- Draw that edge without looking at the paper until you finish.
- Draw the same edge again while looking, then note one difference between the two lines.
Edge-Tracing Prompts for Ear, Muzzle, and Leg
Each prompt isolates one edge so you can practice without managing the whole dog. For the ear, trace the outer flap from base to tip and back to the head. For the muzzle, trace the bridge of the nose to the front of the lips. For the leg, trace the front edge from body to paw. Keep each line continuous and slow.
Use the same convention for any written labels: x-height is baseline to midline, and letter styles vary, so write labels in your normal handwriting at a consistent size. If you measure a line length, record the unit you used.
- Trace the ear edge in one continuous line, starting at the base.
- Trace the muzzle edge from the nose bridge to the lip front.
- Trace the front leg edge from the body to the paw.
- Repeat each edge once more without lifting the pencil.
- Write a short label beside each edge using consistent letter size.
Checking Your Contour Line
A useful check is to compare the drawn edge with the seen edge at three points: start, middle, and end. Place your pencil point on the start of the drawn line and look at the dog. Does the line begin where the edge begins? Repeat at the middle and end. This is a simple visual check, not a measurement of printer tolerance.
You can also measure the length of a straight-ish edge on your drawing and on the reference using the same unit. If the drawn edge is much shorter or longer, note the difference and redraw slowly. Keep arithmetic simple and units consistent.
- Mark the start, middle, and end of the drawn edge.
- Compare each mark with the corresponding point on the dog.
- Measure one edge length on the drawing and on the reference in the same unit.
- Record the difference, if any, and redraw the edge once.
- Check that the line is continuous and does not lift unnecessarily.
Worked example
Draw the outer edge of a dog's ear in one continuous line, then check start, middle, and end against the reference.
Worked answer
The line begins at the ear base, curves up to the tip, and returns to the head without lifting. At the start, the line meets the head edge; at the middle, it follows the widest part of the flap; at the end, it returns to the base. A measured edge length of 6 cm on the drawing and 6 cm on the reference, using the same ruler, shows a close match as a hypothetical example.
Four practice exercises
Exercise 1
Draw the muzzle profile of a dog in one continuous line from the bridge of the nose to the front of the lips. Do not lift the pencil.
Show answer and check
A single line that starts at the nose bridge, follows the visible profile curve, and ends at the lip front without lifting.
Why: The muzzle edge is a short, clear boundary that trains slow eye-hand tracking. Keeping the line continuous forces attention on the seen edge.
Check: Compare the start, middle, and end of your line with the reference. Confirm the pencil did not lift and no interior fur marks were added.
Exercise 2
In a measured box, draw the outer ear edge blind (without looking at the paper), then draw it again while looking. Note one difference.
Show answer and check
Two lines of the same ear edge, one drawn blind and one drawn while looking, with a written note describing one difference such as length or curve.
Why: Blind contour separates looking from drawing. The second pass shows how seeing the paper changes the line.
Check: Verify the box has measured sides written inside. Confirm both lines are present and the note names a specific difference.
Exercise 3
Trace the front leg edge of a dog from body to paw in one line. Measure the drawn edge and the reference edge with the same ruler and record both lengths.
Show answer and check
A continuous leg edge line plus two recorded lengths in the same unit, such as 8 cm and 8 cm as a hypothetical example.
Why: The leg edge is longer and tests sustained attention. Measuring with one unit gives a simple checkable comparison.
Check: Check that the line is continuous, both measurements use the same unit, and the recorded numbers match the ruler readings.
Exercise 4
Choose one dog edge, draw it once from memory, then draw it again while looking at the reference. Label both lines with consistent handwriting.
Show answer and check
Two labeled lines of the same edge, one from memory and one from looking, with labels written at a consistent size.
Why: Comparing memory and observation reveals what the eye notices. Consistent labels make the comparison easy to review.
Check: Confirm both lines are labeled, the labels use a consistent letter size, and the looking line matches the reference at start, middle, and end.
Common mistakes
- Drawing from memory instead of looking at the edge. Return your eye to the dog and trace one small segment before moving the pencil.
- Lifting the pencil often, creating broken outlines. Choose a shorter edge and complete it in one continuous pass.
- Adding fur texture inside the contour. Keep only the boundary line; leave the interior blank for this exercise.
- Using inconsistent units when measuring edge lengths. Pick one unit, such as centimeters, and write it beside every measurement.
Self-check rubric
- The contour line is continuous for the chosen edge.
- The line follows the visible boundary rather than an imagined outline.
- No fur texture is added inside the contour.
- Start, middle, and end points are compared with the reference.
- Any measurements use one consistent unit and are labeled.
- Written labels use a consistent handwriting scale; x-height is baseline to midline and letter styles may vary.
Questions and answers
Do I need a real dog to practice?
No. You can use a clear photograph or a simple line reference. The key is to trace the visible edge slowly.
How long should one contour pass take?
There is no fixed time. Move at the speed your eye traces the edge. A slow pass of one ear edge might take one to three minutes as a hypothetical example.
Can I erase?
Yes, but try one pass without erasing first. The unerased line shows what your eye and hand did together.
What if my blind contour looks nothing like a dog?
That is normal. Blind contour trains attention, not likeness. Compare it with a looking pass to see what changed.