Free original lessons
Knee-Tuck Pose Drawing: Joint Landmarks and Limb Angles
Learn to draw a knee-tuck exercise pose using joint landmarks, limb-angle guides, and a simple convention for checking proportions and alignment.
Free lesson
Four exercises
Worked answers
Object Drawing Lessons
This lesson teaches a repeatable method for drawing a knee-tuck exercise pose. You will place joint landmarks first, then use limb-angle guides to position the tucked knee and supporting leg. The convention is simple: draw a faint vertical midline and a horizontal baseline, then mark each joint with a small cross. X-height means the distance from baseline to midline for lettering labels, not a body measurement. Letter styles vary, so labels may be printed or cursive as long as they are legible. All numerical values below are hypothetical examples for practice, not equipment standards. Measure your own paper and tools if you adapt the exercise.
Practice materials: Printable downloads are not available for this lesson yet. Use the instructions and four exercises below.
Reference illustration
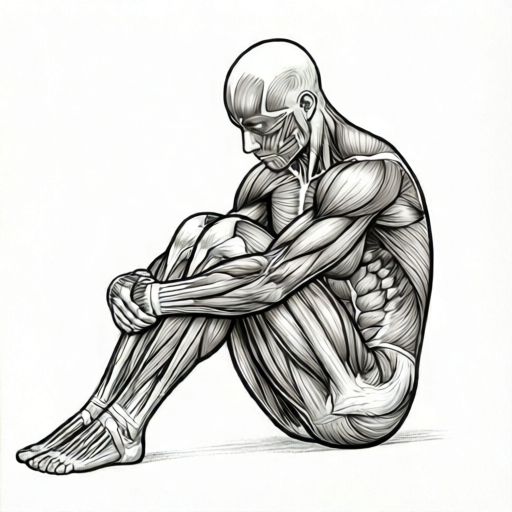
Use the stated measurements and conventions for each exercise.
Set the page convention and joint landmarks
Begin by drawing a faint vertical midline and a horizontal baseline on your page. These are construction guides, not part of the final pose. Mark the hip joint, knee joint, ankle joint, shoulder joint, and elbow joint with small crosses. Keep the crosses light so they can be adjusted. The knee-tuck pose is built around a folded leg: the hip and knee are close, and the supporting leg carries the body weight.
Use a consistent unit for all measurements. For example, let one head-height equal 3 cm on your paper. This is a hypothetical example; choose a unit that fits your page. Measure the distance from the hip cross to the knee cross and from the knee cross to the ankle cross. Record these distances beside the crosses so you can check them later.
- Draw a faint vertical midline and a horizontal baseline.
- Mark hip, knee, ankle, shoulder, and elbow crosses.
- Choose one unit, such as 3 cm per head-height, and write it in the margin.
- Measure hip-to-knee and knee-to-ankle distances and label them.
Build the tucked knee with angle guides
The tucked knee is the folded leg. Place the hip cross above the knee cross, then draw a short line from hip to knee. From the knee cross, draw a second line toward the ankle cross. The angle between these two lines is the knee angle. A sharp angle means a tight tuck; a wider angle means a looser tuck. Use a protractor or estimate the angle by comparing it to a right angle drawn in the corner of your page.
Add a limb-angle guide by drawing a dashed line from the hip cross to the ankle cross. This dashed line shows the overall direction of the folded leg. The knee cross should sit off the dashed line, creating a triangle. Check that the knee cross is not collinear with hip and ankle; a folded leg needs a visible bend. Label the knee angle in degrees if you measured it, or write sharp, medium, or wide.
- Draw a line from hip cross to knee cross.
- Draw a line from knee cross to ankle cross.
- Measure or estimate the knee angle and label it.
- Draw a dashed hip-to-ankle guide and confirm the knee sits off the line.
Place the supporting leg and check balance
The supporting leg carries the body. Mark its hip, knee, and ankle crosses on the opposite side of the midline. Draw a line from hip to knee and from knee to ankle. The supporting leg is usually straighter than the tucked leg, but it may still have a slight bend. Check that the supporting ankle cross is below the hip cross and that the body weight line, a faint vertical line from the shoulder area, falls between the supporting foot and the tucked foot.
Use the same unit for both legs. Compare the supporting leg length to the tucked leg length. They do not need to be identical because perspective and pose change apparent length, but the difference should be explainable. If the supporting leg is much shorter, check whether the ankle cross is too high or the knee cross is misplaced.
- Mark supporting hip, knee, and ankle crosses.
- Draw supporting leg lines and label any bend.
- Draw a faint body weight line from the shoulder area.
- Confirm the weight line falls between the two feet.
Refine the pose and label the plate
Once the joint crosses and angle guides are consistent, darken the final pose lines. Keep the construction lines faint or erase them after checking. Add simple labels using the x-height convention: the baseline-to-midline distance for your lettering. For example, if your x-height is 5 mm, keep all lowercase letters between baseline and midline. This is a hypothetical example; measure your own lettering if you use a different size.
Finally, check the whole pose against the rubric. The tucked knee should be visibly folded, the supporting leg should carry weight, and the joint landmarks should remain in plausible positions. Valid alternatives include a tighter or looser tuck, a slight supporting-leg bend, and different label styles, as long as the landmarks and angle guides remain checkable.
- Darken final pose lines and erase or lighten construction lines.
- Add labels using a consistent x-height convention.
- Check the pose against the rubric.
- Record any changes to joint crosses or angle labels.
Worked example
Draw a knee-tuck pose on a page with a vertical midline and horizontal baseline. Use a hypothetical unit of 3 cm per head-height. Place the tucked hip cross 9 cm above the baseline and the tucked knee cross 6 cm above the baseline, 4 cm to the left of the midline. Place the tucked ankle cross 3 cm above the baseline, 2 cm to the left of the midline. Mark the supporting hip cross 9 cm above the baseline, 3 cm to the right of the midline; supporting knee cross 5 cm above the baseline, 4 cm to the right; supporting ankle cross 1 cm above the baseline, 5 cm to the right. Draw joint lines and label the knee angle as sharp or medium.
Worked answer
The tucked leg forms a triangle: hip to knee is a short line down and left, knee to ankle is a shorter line down and right. The knee cross sits off the hip-to-ankle guide, so the tuck is visible. The supporting leg is longer and straighter, with its ankle below the hip. A faint weight line from the shoulder area falls between the two ankle crosses. The knee angle can be labeled sharp if the bend is tight, or medium if wider; either is valid if the knee cross remains off the guide line.
Four practice exercises
Exercise 1
On a page with a vertical midline and horizontal baseline, place a tucked hip cross 8 cm above the baseline and 1 cm left of the midline. Place the tucked knee cross 5 cm above the baseline and 4 cm left of the midline. Place the tucked ankle cross 2 cm above the baseline and 2 cm left of the midline. Draw the joint lines and state whether the knee cross is off the hip-to-ankle guide.
Show answer and check
The knee cross is off the hip-to-ankle guide because the knee at 4 cm left is farther from the midline than both the hip (1 cm left) and ankle (2 cm left); the straight hip-to-ankle line stays between 1 and 2 cm left, so the knee cannot lie on it. The tucked leg shows a bend.
Why: Compare the horizontal positions: hip is 1 cm left, ankle is 2 cm left, but knee is 4 cm left. The knee is farther left than both endpoints, so it cannot lie on the straight hip-to-ankle line.
Check: Draw a dashed line from hip cross to ankle cross. Confirm the knee cross is visibly to the left of that dashed line.
Exercise 2
A supporting leg has hip cross 10 cm above baseline and 2 cm right of midline, knee cross 6 cm above baseline and 3 cm right, ankle cross 2 cm above baseline and 4 cm right. A weight line from the shoulder area falls 1 cm right of midline. Is the weight line between the supporting ankle and a tucked ankle placed 2 cm left of midline? Explain.
Show answer and check
Yes. The weight line at 1 cm right of midline lies between the tucked ankle at 2 cm left and the supporting ankle at 4 cm right.
Why: The two ankle positions span from 2 cm left to 4 cm right. The weight line at 1 cm right is inside that span.
Check: Mark all three horizontal positions on the baseline: left 2, right 1, right 4. Confirm the middle value lies between the outer two.
Exercise 3
Using a hypothetical unit of 2 cm per head-height, a tucked leg has hip-to-knee distance 4 cm and knee-to-ankle distance 3 cm. A supporting leg has hip-to-knee distance 6 cm and knee-to-ankle distance 5 cm. Are both legs measured with the same unit? What is the total length of each leg in the stated unit?
Show answer and check
Yes, both use 2 cm per head-height. The tucked leg totals 7 cm, and the supporting leg totals 11 cm.
Why: Add hip-to-knee and knee-to-ankle for each leg: 4 + 3 = 7, and 6 + 5 = 11. Both sums use the same 2 cm unit.
Check: Re-add each pair and confirm the unit is written once in the margin and applied to both legs.
Exercise 4
A student labels a drawing with lowercase letters that rise 7 mm above the baseline while the stated x-height is 5 mm. The knee cross is correctly off the hip-to-ankle guide, and the weight line falls between the feet. Does the label size alone fail the rubric? What should the student do?
Show answer and check
The label size alone does not fail the pose checks, but it fails the consistent x-height convention. The student should either measure and state a 7 mm x-height or resize the letters to the stated 5 mm.
Why: The rubric requires a consistent x-height convention and legible labels. The pose checks pass, but the label convention is inconsistent with the stated value.
Check: Measure several lowercase letters from baseline to midline. Confirm they match the stated x-height, then recheck the knee guide and weight line.
Common mistakes
- Drawing the tucked knee as a straight line from hip to ankle. Place the knee cross off the hip-to-ankle guide so the leg shows a clear bend.
- Using different units for the two legs. Write one unit in the margin and measure both legs with that same unit.
- Letting the body weight line fall outside both feet. Move the supporting ankle cross or adjust the shoulder area until the weight line falls between the feet.
- Making labels illegible by mixing letter sizes. Use the x-height convention: keep lowercase letters between baseline and midline, and measure your own x-height.
Self-check rubric
- Joint landmarks are marked with crosses and remain visible or clearly recorded.
- The tucked knee shows a visible bend; the knee cross is not collinear with hip and ankle.
- Both legs use the same stated unit, and measured distances are labeled.
- The supporting ankle is below the supporting hip, and the weight line falls between the feet.
- Labels follow a consistent x-height convention and are legible.
- Valid alternatives such as a tighter tuck, slight supporting-leg bend, or different label style are accepted if the checks above pass.
Questions and answers
Do I need a protractor to measure the knee angle?
No. You can estimate by comparing the angle to a right angle drawn in the page corner, or label it sharp, medium, or wide. A protractor gives a numerical check if you have one.
Can the supporting leg be bent?
Yes. A slight bend is a valid alternative. Check that the supporting ankle remains below the hip and that the weight line falls between the feet.
What does x-height mean here?
X-height is the distance from baseline to midline for lettering labels. It is a convention for keeping labels legible, not a body measurement. Letter styles vary, so printed or cursive labels are acceptable if consistent.
Are the numerical values in this lesson standard measurements?
No. Values such as 3 cm per head-height or 5 mm x-height are hypothetical examples. Measure your own paper and tools if you adapt the exercise.