Free original lessons
Cross-Contour Shoe Drawing: Surface Lines Practice
Learn to draw a shoe using cross-contour lines that wrap around the sole and upper, with guided tracing, independent practice, and a spacing check.
Free lesson
Four exercises
Worked answers
Object Drawing Lessons
Cross-contour lines describe form by wrapping around a surface, like lines of latitude on a globe. In this lesson you will draw a shoe by following the sole and upper surface with evenly spaced cross-contour lines. You will trace a guide, then draw independently, checking line spacing and direction. The goal is accurate surface description, not shading, lacing detail, or shoe design. All measurements use centimeters; any numerical values are hypothetical examples to be replaced by your own equipment measurements.
Practice materials: Printable downloads are not available for this lesson yet. Use the instructions and four exercises below.
Reference illustration
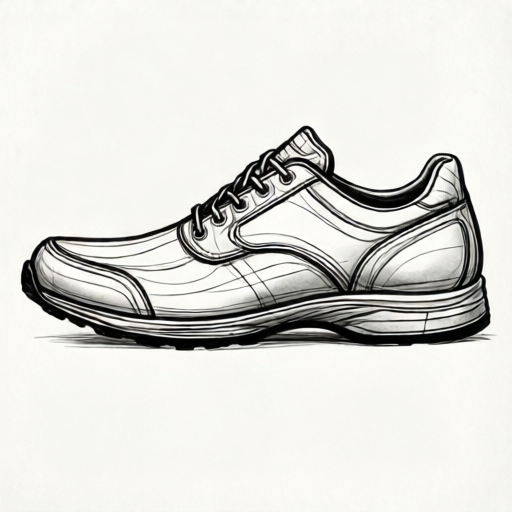
Use the stated measurements and conventions for each exercise.
Understanding cross-contour lines on a shoe
A cross-contour line crosses the main axis of a form. On a shoe, the main axis runs from heel to toe. Cross-contour lines therefore run roughly across the shoe, wrapping over the toe box, along the sides, and around the heel. They follow the surface, so they curve where the surface curves and bunch where the surface compresses.
The sole provides a stable reference: its top edge and bottom edge are natural cross-contour boundaries. The upper provides curved surfaces: the toe box, the instep, and the heel counter. Draw lines that connect these boundaries while respecting the volume between them.
Use a simple convention: draw only surface lines, no shading. Line spacing should be even in flat areas and closer together where the surface turns away sharply. This convention allows valid alternatives: you may start lines from the sole edge or from the upper edge, and you may vary line weight slightly, as long as spacing and direction describe the form.
- Place the shoe on a table with the side facing you and the toe pointing left.
- Mark the sole top edge and bottom edge lightly; these are your boundary lines.
- Draw one cross-contour line from the sole top edge over the toe box to the other side, following the surface curve.
- Add more lines at even spacing, adjusting spacing where the surface turns away.
- Check that each line crosses the shoe's main axis at roughly a right angle and that spacing is consistent.
Tracing the guide and checking spacing
A tracing box contains a simplified shoe outline with a few guide cross-contour lines. Place tracing paper over the box and trace the outline and the guide lines. This builds hand memory for direction and spacing before independent drawing.
After tracing, measure the spacing between adjacent lines at three points: near the toe, at the instep, and near the heel. Use a ruler in centimeters. If spacing varies by more than about one third of the average spacing in a flat area, adjust the lines. In curved areas, closer spacing is expected and valid.
The spacing check is a simple arithmetic comparison: average spacing equals total distance across the lines divided by the number of gaps. For example, if five lines span 10 cm with four gaps, average spacing is 2.5 cm. A hypothetical tolerance of plus or minus 0.8 cm is acceptable for this exercise; measure your own equipment and choose values that suit your paper and pencil.
- Trace the outline and guide lines from the tracing box onto tracing paper.
- Measure three gaps near the toe and record them in centimeters.
- Calculate the average gap: sum the gaps and divide by the number of gaps.
- Compare each gap to the average; adjust lines that differ by more than your chosen tolerance.
- Transfer the corrected spacing habit to the blank frame for independent drawing.
Drawing independently in the blank frame
In the blank frame, draw a shoe from observation or from the reference, using cross-contour lines only. Begin with the sole boundaries and the main axis. Then add cross-contour lines from heel to toe, wrapping over the upper. Keep the lines continuous where possible; breaks are acceptable at sharp edges.
Valid alternatives include starting at the heel and working toward the toe, or drawing every second line first and filling in between. The rubric rewards consistent spacing, correct direction relative to the surface, and clear description of volume. It does not require a single universal line pattern.
Avoid shading, lacing detail, and design changes. The boundary of this task is cross-contour practice on the shoe's sole and upper surfaces.
- Draw the sole top and bottom edges and the heel-to-toe axis lightly.
- Add cross-contour lines at even spacing, starting from the heel and moving to the toe.
- Check direction: each line should cross the axis at about a right angle and follow the surface curve.
- Measure spacing at three points and adjust any line that is too far from the average.
- Erase construction marks and review against the rubric.
Worked example
A simplified shoe side view is 12 cm long from heel to toe. You draw five cross-contour lines, creating four gaps. The gaps near the toe measure 2.0 cm, 2.2 cm, 2.4 cm, and 2.6 cm. Calculate the average gap and state whether the spacing is consistent within a hypothetical tolerance of plus or minus 0.5 cm.
Worked answer
Sum the gaps: 2.0 + 2.2 + 2.4 + 2.6 = 9.2 cm. Average gap = 9.2 divided by 4 = 2.3 cm. Tolerance range: 2.3 minus 0.5 = 1.8 cm to 2.3 plus 0.5 = 2.8 cm. All gaps (2.0, 2.2, 2.4, 2.6) fall within 1.8 to 2.8 cm, so the spacing is consistent within the stated tolerance.
Four practice exercises
Exercise 1
A shoe side view is 15 cm long. You draw six cross-contour lines, creating five gaps. The gaps are 2.8 cm, 3.0 cm, 3.2 cm, 3.0 cm, and 3.0 cm. Calculate the average gap and state whether all gaps are within a hypothetical tolerance of plus or minus 0.4 cm.
Show answer and check
Average gap = (2.8 + 3.0 + 3.2 + 3.0 + 3.0) divided by 5 = 15.0 divided by 5 = 3.0 cm. Tolerance range: 2.6 cm to 3.4 cm. All gaps fall within this range, so spacing is consistent.
Why: Sum the five gaps to get 15.0 cm, divide by five gaps to find the average, then compare each gap to the tolerance range around the average.
Check: Re-add the gaps and confirm the sum equals 15.0 cm; verify each gap lies between 2.6 and 3.4 cm.
Exercise 2
In a tracing exercise, four gaps near the heel measure 1.5 cm, 1.8 cm, 2.1 cm, and 2.4 cm. The average is 1.95 cm. Using a hypothetical tolerance of plus or minus 0.3 cm, identify which gaps are outside the tolerance and suggest a correction.
Show answer and check
Tolerance range: 1.65 cm to 2.25 cm. The 1.5 cm gap is below 1.65 cm and the 2.4 cm gap is above 2.25 cm. Correction: move the line bounding the 1.5 cm gap slightly to increase it toward 1.95 cm, and move the line bounding the 2.4 cm gap to decrease it toward 1.95 cm.
Why: Calculate the lower and upper tolerance limits, compare each gap, then adjust the lines that create the out-of-range gaps.
Check: Recalculate the average after adjustment and confirm all gaps fall within 1.65 to 2.25 cm.
Exercise 3
A blank-frame drawing has eight cross-contour lines across a 20 cm shoe side, creating seven gaps. The total measured distance across the lines is 18.9 cm. Calculate the average gap. If one gap measures 3.5 cm and the hypothetical tolerance is plus or minus 0.5 cm, is that gap acceptable?
Show answer and check
Average gap = 18.9 divided by 7 = 2.7 cm. Tolerance range: 2.2 cm to 3.2 cm. The 3.5 cm gap is above 3.2 cm, so it is not acceptable; reduce it by moving the adjacent line closer.
Why: Divide total distance by number of gaps to find the average, then compare the specific gap to the tolerance range.
Check: Multiply the average by seven to confirm 18.9 cm, and recheck the adjusted gap against 2.2 to 3.2 cm.
Exercise 4
You draw a shoe with cross-contour lines starting at the sole edge. Three gaps near the toe are 1.2 cm, 1.4 cm, and 1.6 cm. The average is 1.4 cm. A classmate starts lines at the upper edge and gets gaps of 1.3 cm, 1.5 cm, and 1.5 cm, average 1.43 cm. Using a hypothetical tolerance of plus or minus 0.2 cm, are both sets consistent? Explain why both are valid alternatives.
Show answer and check
First set tolerance: 1.2 to 1.6 cm; all gaps fall within, so consistent. Second set tolerance: 1.23 to 1.63 cm; all gaps fall within, so consistent. Both are valid because starting from either boundary is an accepted alternative when spacing and direction describe the form.
Why: Calculate each average and tolerance range separately, compare gaps, then apply the convention that starting point may vary.
Check: Recompute each average from the listed gaps and confirm every gap lies within its own tolerance range.
Common mistakes
- Drawing lines parallel to the shoe's main axis instead of across it. Reorient each line to cross the heel-to-toe axis at roughly a right angle, wrapping over the surface.
- Using equal spacing everywhere, including where the surface turns away sharply. Reduce spacing where the surface curves away and increase it on flatter areas, then recheck the average.
- Adding shading or lacing detail that obscures the surface lines. Remove non-contour marks and keep only cross-contour lines that describe the sole and upper.
- Stopping lines at the shoe outline instead of wrapping around the volume. Continue each line from one boundary to the other, following the surface over the toe box or heel.
Self-check rubric
- Cross-contour lines cross the shoe's main axis at roughly a right angle.
- Lines follow the surface of the sole and upper, wrapping around volume.
- Spacing is even in flat areas and closer where the surface turns away.
- Spacing check is performed and recorded with consistent units.
- No shading, lacing detail, or design changes are included.
- Valid alternatives in starting point and line weight are accepted if form is described.
Questions and answers
Do cross-contour lines have to be perfectly even?
No. Even spacing is a guide for flat areas. Where the surface turns away, closer spacing is correct. Check the average and allow a tolerance you measure on your own paper.
Can I start lines from the sole edge instead of the upper edge?
Yes. Starting from either boundary is a valid alternative as long as the lines wrap around the surface and cross the main axis.
How many lines should I draw?
Enough to describe the volume without crowding. A practical range is five to nine lines across the visible side, but adjust to shoe size and paper size.
What if my shoe has a complex toe box?
Simplify the toe box into two or three curved surfaces and draw lines that follow those curves. Complexity is acceptable if spacing and direction remain consistent.