Free original lessons
Draw a Push-Up Pose Using Arm and Torso Landmarks
Learn to construct a push-up figure by placing shoulder, elbow, wrist, hip, and knee landmarks, then checking joint angles for believable arm and torso alignment.
Free lesson
Four exercises
Worked answers
Object Drawing Lessons
This guide teaches a landmark-first method for drawing a push-up pose. You will place the shoulder, elbow, wrist, hip, and knee before drawing any outline, then use simple joint-angle checks to keep the arm and torso believable. The approach works for side views and three-quarter views and leaves room for different body types and drawing styles. All measurements are hypothetical examples; measure your own reference or model to set your own values.
Practice materials: Printable downloads are not available for this lesson yet. Use the instructions and four exercises below.
Reference illustration
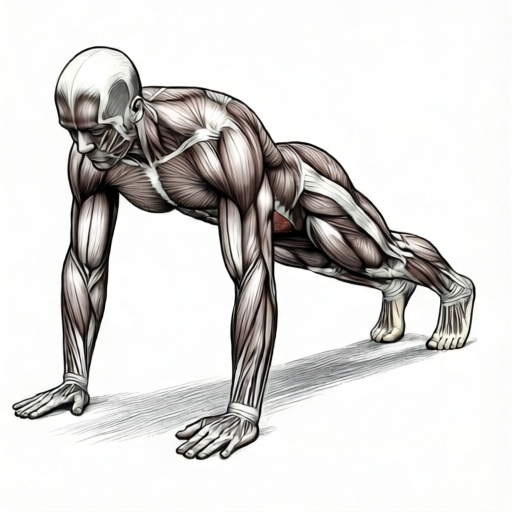
Use the stated measurements and conventions for each exercise.
Place the torso and arm landmarks first
Begin with a light construction line for the torso from the hip landmark to the shoulder landmark. In a push-up, the torso is roughly straight from hip to shoulder, so this line sets the overall body angle. Next mark the elbow and wrist. The upper arm runs from shoulder to elbow, and the forearm runs from elbow to wrist. Keep these as straight segments until the landmarks are placed.
Use a consistent convention: treat the shoulder-to-hip torso length as your main unit for figure drawing. Body shapes and drawing styles vary, so do not force a single proportion; instead, measure your own reference and record the ratio you observe. For example, a hypothetical side-view reference might show the torso length as 1.0 unit and the upper arm as 0.45 unit. Label such numbers as examples only.
- Mark the hip landmark and the shoulder landmark, then connect them with a light torso line.
- Mark the elbow so the upper arm length matches your measured reference ratio.
- Mark the wrist so the forearm length matches your measured reference ratio.
- Mark the knee and ankle to complete the lower-body landmarks before adding any outline.
Check the elbow and shoulder angles
A push-up pose is defined by the bend at the elbow and the relationship between the upper arm and torso. Measure the elbow angle as the angle between the upper arm and forearm at the elbow landmark. In a mid push-up, this angle is often around 90 degrees, but it varies with the person and the phase of the movement. Treat 90 degrees as a hypothetical example, not a rule.
Also check the shoulder angle between the torso line and the upper arm. A common side-view push-up shows the upper arm angled down and slightly forward from the shoulder. If your shoulder-to-elbow segment crosses the torso line, the arm may look twisted. Adjust the elbow landmark until the arm reads clearly from the chosen view.
- Draw a small arc at the elbow and label the measured angle.
- Compare the elbow angle to your reference; if it differs by more than about 10 degrees, move the wrist landmark.
- Check that the upper arm does not overlap the torso line in a way that hides the shoulder.
- Re-measure after any change and record the final angle next to the landmark.
Build the torso line and hip relationship
The torso line from hip to shoulder should stay close to straight in a standard push-up. To check the body axis, draw a light guide line from the shoulder toward the knee. If the hip landmark sits far above or below that shoulder-to-knee axis, the pose will read as a different exercise. Keep the hip close to the guide line unless your reference clearly shows a different pose. The knee and ankle landmarks then extend from the hip to show the legs.
For a three-quarter view, the torso line shortens visually. Measure the apparent torso length on your reference and use that shorter length for the construction. Do not assume the same ratio as the side view. Record both ratios separately so your checks stay consistent.
- Draw the shoulder-to-knee guide line and mark any deviation of the hip from that line.
- Place the knee landmark so the thigh follows the torso direction in a side view.
- For a three-quarter view, shorten the torso line according to your measured reference.
- Confirm the hip, shoulder, and knee landmarks form a readable body axis before outlining.
Refine the arm and torso outline
Only after the landmarks and angle checks are satisfactory should you add the outline. Draw the upper arm as a tapered shape around the shoulder-to-elbow segment, and the forearm around the elbow-to-wrist segment. Keep the elbow landmark visible as a subtle bend. For the torso, wrap the outline around the hip-to-shoulder line, allowing the chest and back to curve slightly without breaking the overall axis.
Body shapes and drawing styles vary, so allow valid alternatives: a rounder elbow, a narrower torso, or a slightly different wrist angle can all be correct if the landmarks and measured angles remain consistent. Use your rubric to judge whether the construction is readable, not whether it matches one ideal shape.
- Outline the upper arm and forearm using the landmark segments as center lines.
- Add the torso outline around the hip-to-shoulder guide, keeping the axis visible.
- Check that the elbow bend is clear and the wrist landmark is not hidden.
- Erase construction lines only after the outline reads correctly at a glance.
Worked example
A side-view reference shows a torso length of 1.0 unit, an upper arm of 0.45 unit, and a forearm of 0.40 unit. The elbow angle measures 95 degrees. Place the landmarks and state the check you would perform.
Worked answer
Mark the hip and shoulder 1.0 unit apart. Place the elbow 0.45 unit from the shoulder and the wrist 0.40 unit from the elbow. Draw an arc at the elbow and label it 95 degrees. Check that the upper arm does not cross the torso line and that the wrist landmark is visible. If the angle differs from your reference by more than about 10 degrees, move the wrist landmark and re-measure.
Four practice exercises
Exercise 1
A side-view reference gives torso 1.0 unit, upper arm 0.50 unit, forearm 0.45 unit, and elbow angle 85 degrees. Place the landmarks and describe the elbow check.
Show answer and check
Hip and shoulder are 1.0 unit apart. Elbow is 0.50 unit from shoulder; wrist is 0.45 unit from elbow. Label the elbow arc 85 degrees. Check that the upper arm does not cross the torso line and that the wrist is visible.
Why: The landmarks set the arm segments, and the elbow arc makes the bend checkable. The 85-degree value is a hypothetical example from the prompt.
Check: Measure the elbow angle with a protractor or angle gauge. If it differs from 85 degrees by more than about 10 degrees, move the wrist landmark and re-measure.
Exercise 2
A three-quarter reference shows an apparent torso length of 0.80 unit, upper arm 0.40 unit, and forearm 0.35 unit. The shoulder angle between torso and upper arm is 40 degrees. Place the landmarks and state one consistency check.
Show answer and check
Mark hip and shoulder 0.80 unit apart. Elbow is 0.40 unit from shoulder; wrist is 0.35 unit from elbow. Label the shoulder angle 40 degrees. Check that the shortened torso line matches the three-quarter view and that the upper arm reads clearly.
Why: The three-quarter view shortens the torso, so the apparent length is used instead of the side-view length. The shoulder angle is measured at the shoulder landmark.
Check: Compare the drawn torso length to 0.80 unit and the shoulder angle to 40 degrees. If either differs noticeably, adjust the shoulder or elbow landmark and re-check.
Exercise 3
A side-view sketch has the shoulder and knee landmarks placed, with a guide line running from the shoulder toward the knee. The hip landmark sits 0.15 unit above that guide line. The elbow angle is 100 degrees. Describe how to correct the torso line and what to record.
Show answer and check
Redraw the hip landmark closer to the shoulder-to-knee guide line, reducing the 0.15-unit deviation. Keep the elbow angle at 100 degrees and re-check that the upper arm does not cross the torso line. Record the final hip deviation and elbow angle.
Why: A large hip deviation from the shoulder-to-knee guide changes the pose from a standard push-up. Moving the hip toward the guide line restores the torso axis while keeping the measured elbow angle.
Check: Measure the new hip deviation from the shoulder-to-knee guide line and confirm it is smaller than 0.15 unit. Re-measure the elbow angle to confirm it remains 100 degrees.
Exercise 4
A reference shows torso 1.0 unit, upper arm 0.45 unit, forearm 0.40 unit, and elbow angle 90 degrees. After outlining, the elbow bend is hidden by the torso outline. State the fix and the check.
Show answer and check
Move the elbow landmark slightly away from the torso line or adjust the torso outline so the elbow bend remains visible. Keep the segment lengths at 0.45 and 0.40 unit and the elbow angle at 90 degrees. Re-check that the elbow arc is visible.
Why: The landmarks are correct, but the outline hides the bend. Adjusting the outline or elbow position preserves the measured construction while improving readability.
Check: Look at the drawing at arm's length and confirm the elbow bend is visible. Measure the elbow angle again to confirm it is still 90 degrees.
Common mistakes
- Drawing the outline before placing the shoulder, elbow, and wrist landmarks. Place all five landmarks first, then outline. This keeps the arm and torso proportions checkable.
- Assuming a fixed 90-degree elbow angle for every push-up drawing. Measure the angle on your own reference and label any chosen value as a hypothetical example. Adjust the wrist landmark to match your measurement.
- Letting the hip landmark drift far off the shoulder-to-knee body axis. Draw a light shoulder-to-knee guide line and keep the hip close to it unless your reference clearly shows a different pose.
- Using the same torso ratio for side and three-quarter views. Measure the apparent torso length separately for each view and record both ratios.
Self-check rubric
- All five landmarks (shoulder, elbow, wrist, hip, knee) are placed before outlining.
- The torso line from hip to shoulder is drawn and the hip deviation is noted.
- The elbow angle is measured and labeled, with any numerical value marked as an example.
- The upper arm and forearm lengths follow the measured reference ratios.
- The outline wraps the landmark segments without hiding the elbow bend.
- Valid alternatives in body shape or drawing style are accepted if the landmarks and angles remain consistent.
Questions and answers
Do I need a live model to use this method?
No. You can measure a photo or your own sketch reference. Record the ratios you observe and label any numerical values as examples.
What if my elbow angle is not 90 degrees?
That is acceptable. The 90-degree value is a hypothetical example. Use the angle you measure and keep it consistent with your wrist landmark.
How do I check the torso line without a ruler?
Use a straight edge or the edge of your paper. Compare the hip and shoulder landmarks to that edge and note any deviation.
Can I use this for a three-quarter view?
Yes. Shorten the torso line according to your measured reference and re-check the elbow and shoulder angles for that view.