Free original lessons
Draw a Treble Clef: Spiral Construction and Staff Placement
Learn to draw a treble clef using a spiral curve and precise staff placement. Includes stroke order, common fixes, and four practice tasks.
Free lesson
Four exercises
Worked answers
Object Drawing Lessons
The treble clef is a single continuous stroke that begins with a small loop, spirals outward, rises into a tall curve, and finishes with a hook. This guide breaks the shape into a spiral construction and shows how to place it on a five-line staff so the spiral circles the second line from the bottom. You will use a simple convention: the staff has five horizontal lines; the bottom line is line 1 and the top is line 5. The spiral's center sits on line 2. Letter styles vary, so the rubric accepts any clean, legible clef that meets the structural checks. All measurements below are hypothetical examples; measure your own paper and tools before drawing.
Practice materials: Printable downloads are not available for this lesson yet. Use the instructions and four exercises below.
Reference illustration
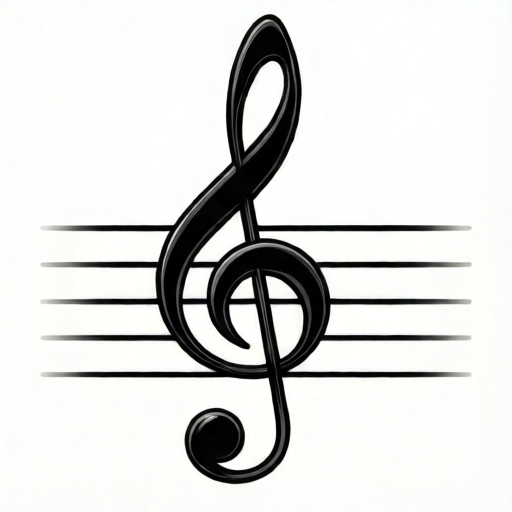
Use the stated measurements and conventions for each exercise.
Understand the spiral and staff geometry
A treble clef is built around a spiral that coils inward to a center point. That center is the anchor: on a standard five-line staff, it sits on the second line from the bottom. The spiral opens outward, then the stroke sweeps upward into a tall loop that crosses the staff, and finally descends into a small hook below the staff.
Before drawing, mark the staff lines lightly. Label line 2 as your anchor line. Decide a scale: for example, if your staff lines are 8 mm apart, the spiral's outer diameter might be about 16 mm. These numbers are hypothetical; use your own staff spacing and keep the spiral proportional to it.
- Draw five evenly spaced horizontal lines and label them 1 to 5 from bottom to top.
- Mark a point on line 2 where the spiral center will sit.
- Lightly sketch a small circle around that point, then a larger arc around it to suggest the spiral.
- Check that the spiral center is exactly on line 2 before adding the tall curve.
Draw the continuous stroke in order
Treat the clef as one stroke, even if you lift the pencil to reposition. Start at the spiral center, coil outward counterclockwise, then sweep upward into a tall loop that rises above the staff. The loop should cross the staff lines cleanly, not wobble. Finish with a hook that curves down and to the left below the staff.
Keep the stroke width consistent. If your pencil is soft, use light pressure so you can adjust the spiral before committing. The tall loop should be roughly twice the height of the spiral, but exact proportions are a style choice; the rubric checks structure, not a single universal shape.
- Place the pencil at the spiral center on line 2.
- Coil outward counterclockwise for about one and a half turns.
- Sweep upward into a tall loop that rises above line 5.
- Cross back down through the staff and finish with a small hook below line 1.
- Retrace lightly to smooth any flat spots, keeping the stroke continuous.
Place the clef on the staff correctly
The spiral center must sit on line 2. The tall loop should extend above the staff, and the hook should fall below it. The clef should not lean so far that the spiral center drifts off line 2. A useful check: draw a faint horizontal line through the spiral center and confirm it coincides with line 2.
If your staff is hand-drawn, line spacing may vary. Measure the actual gap between lines 1 and 2 and use that as your reference. Do not assume a standard spacing; measure your own paper. Any numerical example here is illustrative only.
- Draw a faint guide line through the spiral center.
- Align that guide with line 2 of your staff.
- Check that the tall loop clears line 5 and the hook clears line 1.
- Erase guides gently after the ink or pencil stroke is stable.
Refine and self-check
A good treble clef reads clearly at a glance: the spiral is visible, the tall loop is smooth, and the hook is distinct. Compare your drawing to the structural checklist in the rubric. If the spiral looks like a closed circle, open it slightly. If the tall loop is too narrow, widen it without moving the spiral center.
Remember that handwriting and art styles differ. A slightly slanted clef or a wider spiral can still be correct if the spiral center is on line 2 and the stroke order is logical. Use the rubric to judge structure, not exact resemblance to one model.
- Trace the spiral with your finger to confirm it coils inward to the center.
- Check that the tall loop does not collapse into a straight line.
- Confirm the hook is below the staff and curves left.
- Make one adjustment at a time and re-check the spiral center.
Worked example
On a staff with lines 6 mm apart, describe where to place the spiral center and how tall to make the tall loop, using hypothetical values.
Worked answer
Mark line 2 as the anchor. Place the spiral center exactly on line 2. For a 6 mm line spacing, a hypothetical spiral diameter of 12 mm keeps the spiral proportional. The tall loop should rise about 12 mm above line 5 and the hook should fall about 6 mm below line 1. Check by drawing a faint guide through the spiral center and confirming it lies on line 2.
Four practice exercises
Exercise 1
A staff has lines 5 mm apart. Where should the spiral center sit, and what is a hypothetical spiral diameter that keeps the spiral about twice the line spacing?
Show answer and check
The spiral center sits on line 2. A hypothetical spiral diameter of 10 mm is about twice the 5 mm line spacing.
Why: The anchor is always line 2. Doubling the measured line spacing gives a proportional spiral size; 5 mm doubled is 10 mm.
Check: Measure the gap between lines 1 and 2, confirm it is 5 mm, then measure the spiral diameter and compare it to 10 mm.
Exercise 2
Your tall loop stops at line 5 and does not rise above the staff. Describe one adjustment and how to check it.
Show answer and check
Extend the upward sweep so it rises above line 5, then bring it back down. Check by holding a straight edge above line 5 to confirm the loop clears it.
Why: The tall loop must extend above the staff to read as a treble clef. Extending the sweep without moving the spiral center preserves the anchor.
Check: Place a ruler parallel to line 5 and above it; the top of the loop should be visible above the ruler.
Exercise 3
You draw the spiral as a closed circle centered on line 2. What is the structural problem, and how do you fix it?
Show answer and check
The spiral lacks an inward coil. Fix it by starting at the center and coiling outward, leaving a visible opening so the shape reads as a spiral.
Why: A closed circle does not show the spiral construction. The center must remain visible as the inward end of the coil.
Check: Trace the stroke with a finger; it should wind inward to a center point rather than loop back on itself as a closed ring.
Exercise 4
On a staff with 7 mm line spacing, the hook ends 3 mm above line 1. Describe the correction and a check using hypothetical values.
Show answer and check
Continue the final stroke downward until it passes below line 1, for example about 7 mm below line 1, then curve left. Check by measuring from line 1 to the hook's lowest point.
Why: The hook must fall below the staff. Using the measured line spacing as a guide keeps the correction proportional.
Check: Measure the distance from line 1 to the hook's lowest point; it should be below line 1, such as the hypothetical 7 mm.
Common mistakes
- Placing the spiral center on line 1 or line 3 instead of line 2. Mark line 2 clearly and draw a faint guide through the spiral center before starting the stroke.
- Drawing the spiral as a closed circle with no inward coil. Start at the center and coil outward; leave a visible opening so the spiral reads as a spiral.
- Making the tall loop too short so it does not clear the staff. Extend the upward sweep until it rises above line 5, then bring it back down smoothly.
- Letting the hook end above line 1. Continue the final stroke downward until it passes below line 1, then curve left.
Self-check rubric
- Spiral center is on line 2 of the staff.
- Spiral coils inward to a visible center rather than forming a closed circle.
- Tall loop rises above the top staff line and returns smoothly.
- Hook extends below the bottom staff line and curves left.
- Stroke reads as one continuous clef with consistent width.
- Clef is legible and proportional to the staff; valid stylistic variations are accepted.
Questions and answers
Does the spiral have to be perfectly round?
No. The spiral can be slightly oval or uneven. The key check is that it coils inward to a center on line 2 and remains legible.
Can I lift my pencil during the stroke?
Yes, for practice. The final clef should look continuous, but lifting to reposition is acceptable while learning.
How large should the clef be?
Scale it to your staff. If your lines are 8 mm apart, a spiral about 16 mm across is a hypothetical example. Measure your own staff and keep proportions consistent.
What if my staff lines are not evenly spaced?
Measure the actual gap between lines 1 and 2 and use that as your anchor. Adjust the spiral size to match your measured spacing.