Free original lessons
Upside-Down Bird Drawing: Orientation Practice from an Inverted Contour
Copy an inverted bird contour to train orientation control. Includes tracing box, rotation guide, blank frame, rubric, and four self-contained exercises.
Free lesson
Four exercises
Worked answers
Object Drawing Lessons
Drawing an upside-down bird is an orientation exercise, not an anatomy lesson. The goal is to copy a contour exactly as it appears when rotated 180 degrees, resisting the urge to mentally right the bird. This resource provides a planned printable with an upside-down reference, an inverted tracing box, a rotation guide, and a blank frame for independent work. All measurements are hypothetical examples; measure your own paper and reference before use. The convention for judging placement is simple: x-height is measured from baseline to midline of each letter or shape, and letter styles may vary. Valid alternatives are allowed where the contour remains faithful to the inverted reference.
Practice materials: Printable downloads are not available for this lesson yet. Use the instructions and four exercises below.
Reference illustration
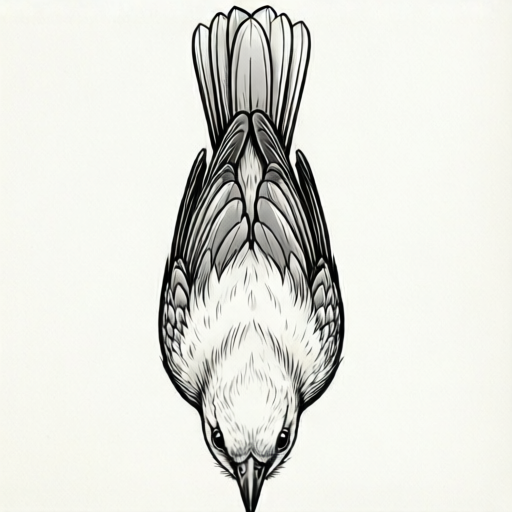
Use the stated measurements and conventions for each exercise.
Reading the Inverted Contour
Place the reference so the bird's feet point toward the top edge of your paper and the head points toward the bottom. Treat every curve as a shape on the page, not as a body part. Trace the outer contour first, then the inner lines such as the wing edge and tail notch. Keep your eye on the gap between lines rather than naming the parts.
Use a light pencil for the first pass. The tracing box is planned as a rectangle with the same proportions as the reference; if you build it yourself, measure the reference and mark a box with matching width and height. A hypothetical example is a reference 12 cm wide and 9 cm tall, so the tracing box is also 12 cm by 9 cm. Label these numbers as examples only.
- Measure the reference width and height; record the values in centimetres.
- Draw a tracing box with the same width and height on your paper.
- Trace the outer contour from one endpoint to the other without lifting the pencil.
- Add inner contour lines only where the reference shows a clear edge.
- Compare your tracing to the reference by rotating your paper 180 degrees and checking the silhouette.
Using the Rotation Guide
The rotation guide is a planned strip with two arrows: one showing the reference orientation and one showing the drawing orientation. Place the guide beside your paper so the arrows match. When you check your work, rotate the drawing 180 degrees and compare it to the upright reference; the silhouette should match the original bird shape, not a mirrored or stretched version.
Keep the guide visible during the first two exercises. In the later exercises, remove it and rely on the orientation check described in the rubric. The guide does not replace measurement; it only reminds you which way is up.
- Place the rotation guide beside the tracing box with arrows aligned.
- Trace the contour while keeping the guide in view.
- Rotate the tracing 180 degrees and compare the silhouette to the upright reference.
- Mark any mismatch with a small cross and redraw that segment.
Independent Drawing in the Blank Frame
The blank frame is planned as a rectangle slightly larger than the tracing box, for example 14 cm by 11 cm if the tracing box is 12 cm by 9 cm. These are hypothetical values; measure your own frame. Draw the inverted bird contour inside the frame without tracing. Start with the longest continuous curve, then add the tail notch and wing edge. Leave the frame border visible so you can judge placement.
Use the orientation check: after drawing, rotate the page 180 degrees and ask whether the silhouette reads as the original bird. If the head and tail swap positions incorrectly, the contour is not faithful. Adjust only the mismatched segment.
- Measure and draw the blank frame.
- Draw the longest outer curve first, from tail to head as seen in the inverted reference.
- Add the second outer curve and close the contour.
- Add one inner line for the wing edge.
- Rotate 180 degrees and compare the silhouette to the upright reference.
Checking Orientation and Proportion
Orientation checking is separate from proportion checking. Orientation asks whether the inverted contour matches the reference when both are viewed in the same direction. Proportion asks whether the width-to-height ratio is close. Measure your drawing's widest point and tallest point in centimetres, then divide width by height. Compare that ratio to the reference ratio. A difference of about 0.1 is acceptable for this exercise; label any numerical tolerance as a hypothetical example.
The rubric below allows valid alternatives: a slightly different curve tension or a simplified wing edge is acceptable if the silhouette and orientation remain faithful. Do not penalize letter-style variation in labels; x-height is baseline to midline, and styles vary.
- Measure the drawing width and height in centimetres.
- Calculate width divided by height for both drawing and reference.
- Compare the two ratios; note the difference.
- Rotate the drawing 180 degrees and compare the silhouette to the upright reference.
- Record one strength and one adjustment.
Worked example
A reference is 12 cm wide and 9 cm tall. You draw an inverted contour in a 14 cm by 11 cm frame. Your drawing measures 11.5 cm wide and 8.8 cm tall. Check the width-to-height ratio and state whether the orientation check passes if the silhouette matches the upright reference after a 180-degree rotation.
Worked answer
Reference ratio: 12 divided by 9 equals about 1.33. Drawing ratio: 11.5 divided by 8.8 equals about 1.31. The difference is about 0.02, which is within the hypothetical 0.1 tolerance. The orientation check passes because the silhouette matches the upright reference after rotation. Record one strength: ratio close; one adjustment: none required for this check.
Four practice exercises
Exercise 1
A reference contour is 10 cm wide and 8 cm tall. Draw a tracing box with the same proportions. After tracing, your drawing measures 9.6 cm wide and 7.8 cm tall. Calculate both width-to-height ratios and state whether the difference is within a hypothetical 0.1 tolerance.
Show answer and check
Reference ratio: 10 divided by 8 equals 1.25. Drawing ratio: 9.6 divided by 7.8 equals about 1.23. Difference is about 0.02, within the hypothetical 0.1 tolerance.
Why: Divide width by height for each. Compare the two ratios by subtraction. The small difference indicates the proportions are close.
Check: Recalculate both divisions and subtract the smaller ratio from the larger. Confirm the result is less than 0.1.
Exercise 2
An inverted reference shows the tail notch on the left side of the page and the head curve on the right. You draw the tail notch on the right and the head curve on the left. Describe the orientation error and one correction using the rotation guide.
Show answer and check
The drawing is mirrored horizontally. Correction: rotate the drawing 180 degrees, compare the silhouette to the upright reference, and redraw the mismatched outer curve so the tail notch returns to the left side of the inverted view.
Why: Orientation checking compares the inverted drawing to the reference in the same viewing direction. A left-right swap is a mirror error, not a proportion error.
Check: Place the rotation guide beside the drawing with arrows aligned. Rotate the drawing 180 degrees and confirm the tail notch and head curve match the reference positions.
Exercise 3
A blank frame is 14 cm by 11 cm. You draw an inverted bird contour that measures 13 cm wide and 9 cm tall. The reference ratio is 1.4. Calculate your drawing ratio and state whether the drawing is too wide, too tall, or close to the reference.
Show answer and check
Drawing ratio: 13 divided by 9 equals about 1.44. Reference ratio is 1.4. Difference is about 0.04, so the drawing is close to the reference and within a hypothetical 0.1 tolerance.
Why: A ratio above the reference means the drawing is relatively wider; a ratio below means relatively taller. Here the difference is small.
Check: Divide 13 by 9, subtract 1.4, and confirm the absolute difference is less than 0.1.
Exercise 4
You trace an inverted contour and add one inner wing line. After rotating the page 180 degrees, the silhouette matches the upright reference, but the wing line crosses outside the outer contour. State the mistake and the fix.
Show answer and check
Mistake: the inner wing line extends outside the outer contour. Fix: redraw only the wing line so it stays inside the outer contour and connects at the correct point shown in the reference.
Why: Inner contour lines must remain inside the silhouette. The orientation check passed, so only the inner line needs adjustment.
Check: Rotate the page 180 degrees and trace the wing line with your eye. Confirm it does not cross the outer contour and that both endpoints match the reference.
Common mistakes
- Mentally righting the bird and drawing it upright. Keep the reference inverted and trace the shape as a contour, not as a bird. Use the rotation guide to confirm orientation before drawing.
- Tracing only the outer silhouette and ignoring the wing edge. Add one inner contour line where the reference shows a clear edge, then check that the line connects to the outer contour at the correct point.
- Changing the width-to-height ratio by stretching the drawing to fill the frame. Measure the reference ratio first, then measure your drawing. Adjust the longest curve rather than the frame border.
- Erasing repeatedly and losing the contour path. Use light pencil for the first pass and redraw only the mismatched segment after the orientation check.
Self-check rubric
- Contour is continuous and closed where the reference is closed.
- Inverted orientation matches the reference when both are viewed in the same direction.
- Width-to-height ratio differs from the reference by no more than a hypothetical 0.1.
- One inner contour line is placed where the reference shows a clear edge.
- Valid alternatives are accepted if silhouette and orientation remain faithful.
- Labels use x-height from baseline to midline; letter styles may vary.
Questions and answers
Do I need to know bird anatomy for this exercise?
No. The task is orientation practice from an inverted contour. Anatomy, shading, and habitat composition are outside the boundary.
What if my drawing is slightly different from the reference?
Valid alternatives are allowed if the silhouette and orientation remain faithful. A slightly different curve tension or a simplified wing edge is acceptable.
How do I measure x-height for labels?
Measure from baseline to midline of each letter. Letter styles vary, so do not compare different styles as if they were the same.
Are the numerical values in this resource fixed standards?
No. All numerical values are hypothetical examples. Measure your own paper, reference, and frame before use.