Free original lessons
Draw an Upside-Down Person: Inverted Proportion and Balance Checks
Learn to draw a person upside down using a defined convention, proportion checks, and balance arrows. Includes worked example, four exercises, and a planned printable.
Free lesson
Four exercises
Worked answers
Object Drawing Lessons
Drawing a person upside down is an orientation exercise, not a test of artistic talent. The goal is to place the figure so that the head is at the bottom of the page and the feet at the top, while keeping head-to-foot proportion and left-right balance checkable. This lesson defines a simple convention: the figure is drawn as a front-facing standing person rotated 180 degrees on the page. The head sits near the lower edge, the feet near the upper edge, and the body's midline runs vertically through the page center. Because letter styles and body shapes vary, the rubric accepts any consistent, measurable interpretation rather than one universal answer. All measurements below are hypothetical examples chosen for arithmetic clarity; measure your own paper and drawing space before applying them.
Practice materials: Printable downloads are not available for this lesson yet. Use the instructions and four exercises below.
Reference illustration
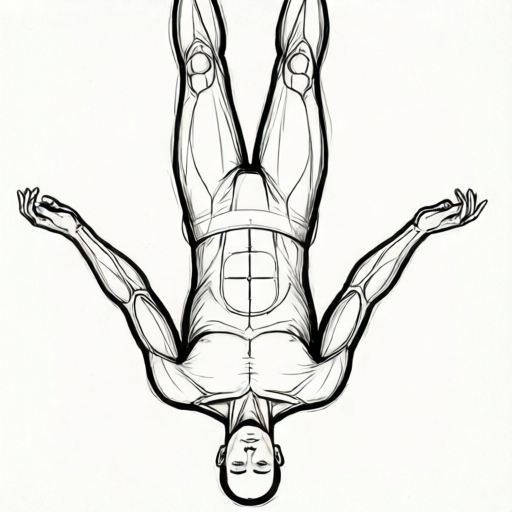
Use the stated measurements and conventions for each exercise.
Orientation convention and page setup
Use a plain sheet and mark a vertical center line. Decide a drawing zone: for example, a 12 cm tall by 8 cm wide box centered on the page. Label the top edge 'feet zone' and the bottom edge 'head zone'. This labeling is the orientation check: if the head is near the bottom label and the feet near the top label, the figure is inverted as intended.
Draw two light horizontal guide lines inside the zone: one at the head zone (bottom) and one at the feet zone (top). The distance between them is the figure's total height. In this lesson's hypothetical example, that distance is 10 cm. Keep all proportion checks as fractions of this total height so the method works at any size.
- Mark a vertical center line and a rectangular drawing zone.
- Label the top edge 'feet zone' and the bottom edge 'head zone'.
- Draw horizontal guides at the head and feet zones and measure the total height.
- Add two orientation arrows: one pointing from head zone toward feet zone, one pointing left-to-right across the center line.
Inverted proportion checks
Use a simple proportional convention: divide the total height into eight equal parts. In the hypothetical 10 cm example, each part is 1.25 cm. Place the head in the bottom two parts (2.5 cm), the torso in the next three parts (3.75 cm), and the legs in the top three parts (3.75 cm). These divisions are checkable arithmetic, not a claim about real bodies.
Because the figure is upside down, count parts from the head zone upward. Mark each division lightly. The shoulder line sits at the top of the head section, the hip line at the top of the torso section, and the feet at the top guide. Check that head parts plus torso parts plus leg parts equal eight parts, and that the sum equals the measured total height.
- Divide total height by eight and record the part length.
- Mark divisions from the head zone upward.
- Place head, shoulder, hip, and feet landmarks on the correct divisions.
- Verify that the part counts sum to eight and match the measured height.
Balance and orientation arrows
Balance is checked with a left-right symmetry test around the center line. Draw small orientation arrows at the shoulders, hips, and feet. Each pair of arrows should point outward equally from the center line. If one arrow is longer or farther from the line, adjust the landmark until the distances match within your chosen tolerance.
Choose a tolerance and label it as hypothetical: for example, allow 0.5 cm difference between left and right distances. Measure actual distances with a ruler rather than estimating. The orientation arrows also confirm inversion: the head arrow points down toward the head zone, and the feet arrow points up toward the feet zone.
- Draw paired arrows at shoulders, hips, and feet.
- Measure left and right distances from the center line.
- Adjust landmarks until differences are within the chosen tolerance.
- Confirm head and feet arrows point toward their labeled zones.
Line quality and finishing checks
Keep construction lines light and final lines darker. This is a convention, not a universal rule: any consistent line-weight scheme is acceptable if it separates guides from the final figure. Check that no final line crosses the center line without a matching landmark on the opposite side.
Finish by re-measuring total height, part divisions, and left-right distances. Record the three checks on the page margin. A drawing passes when the orientation labels match the figure, the eight-part sum matches the measured height, and all paired distances are within tolerance.
- Separate light guides from darker final lines.
- Check that final lines pair across the center line.
- Re-measure height, divisions, and symmetry distances.
- Record pass or adjust results in the margin.
Worked example
A drawing zone is 10 cm tall. Using the eight-part convention, find the part length and the head, torso, and leg section heights. Then state one balance check with a hypothetical tolerance of 0.5 cm.
Worked answer
Part length = 10 cm divided by 8 = 1.25 cm. Head section = 2 parts = 2.5 cm. Torso section = 3 parts = 3.75 cm. Leg section = 3 parts = 3.75 cm. Sum check: 2.5 + 3.75 + 3.75 = 10 cm. Balance check: measure left and right shoulder distances from the center line; both should differ by no more than 0.5 cm.
Four practice exercises
Exercise 1
A drawing zone is 12 cm tall. Using the eight-part convention, calculate the part length and the head, torso, and leg section heights. State whether the sum matches the total height.
Show answer and check
Part length = 12 divided by 8 = 1.5 cm. Head = 2 parts = 3 cm. Torso = 3 parts = 4.5 cm. Legs = 3 parts = 4.5 cm. Sum = 3 + 4.5 + 4.5 = 12 cm, which matches.
Why: Divide total height by eight, multiply by the part counts for each section, then add the sections to verify the total.
Check: Re-add the three section heights and compare with the measured total height; also confirm 1.5 cm times 8 equals 12 cm.
Exercise 2
An upside-down figure has shoulder distances of 2.8 cm left and 3.1 cm right from the center line. The chosen tolerance is 0.5 cm. Does the shoulder balance check pass, and what is the difference?
Show answer and check
Difference = 3.1 minus 2.8 = 0.3 cm. Since 0.3 cm is less than or equal to 0.5 cm, the check passes.
Why: Subtract the smaller distance from the larger, then compare the result with the stated tolerance.
Check: Re-measure both distances and recompute the difference; confirm the tolerance value is written on the page.
Exercise 3
A student labels the top edge 'head zone' and the bottom edge 'feet zone', then draws the head near the top. Using the lesson convention, identify the orientation error and state the correction.
Show answer and check
The labels are reversed relative to the convention. The head should be near the bottom head zone and the feet near the top feet zone. Correction: swap the labels so the top is 'feet zone' and the bottom is 'head zone', then move the head to the bottom guide.
Why: The convention defines inversion by head at the bottom and feet at the top; reversed labels contradict the figure placement.
Check: Compare the head position with the labeled head zone and confirm the orientation arrows point toward the correct zones.
Exercise 4
A figure is drawn in a 9 cm tall zone. The student marks head as 2 parts, torso as 3 parts, and legs as 2 parts. Find the part length, the section heights, and the missing part count needed to reach eight parts.
Show answer and check
Part length = 9 divided by 8 = 1.125 cm. Head = 2 parts = 2.25 cm. Torso = 3 parts = 3.375 cm. Legs = 2 parts = 2.25 cm. Current parts = 2 + 3 + 2 = 7, so one part is missing. Adding one part (1.125 cm) gives eight parts and a total of 9 cm.
Why: Compute the part length, multiply by each part count, sum the parts, and compare with eight.
Check: Add the section heights plus the missing part and confirm the result equals 9 cm; also confirm the part counts sum to eight.
Common mistakes
- Drawing the head near the top because normal orientation feels familiar. Re-label the top edge 'feet zone' and the bottom edge 'head zone', then place the head on the bottom guide before adding any other part.
- Estimating left-right balance by eye instead of measuring. Use a ruler to measure each paired distance from the center line and write the values beside the arrows.
- Using unequal part lengths without recording them. Divide total height by eight, write the part length on the page, and mark all divisions before drawing the figure.
- Treating one body shape or letter style as the only correct answer. State your convention on the page and check consistency against it; the rubric accepts any measurable, consistent interpretation.
Self-check rubric
- Orientation: head near the labeled head zone at the bottom and feet near the labeled feet zone at the top.
- Proportion: eight-part divisions marked and the head, torso, and leg part counts sum to eight.
- Arithmetic: recorded part length times eight equals the measured total height.
- Balance: paired left-right distances at shoulders, hips, and feet are within the stated tolerance.
- Consistency: the chosen convention is stated on the page and applied throughout.
- Line clarity: guides and final lines are distinguishable by a consistent scheme.
Questions and answers
Do I need special paper or tools?
No. A plain sheet, pencil, and ruler are enough. Measure your actual paper and label any chosen numerical values as hypothetical examples.
Is there one correct upside-down person?
No. The lesson uses a defined convention and a rubric that accepts valid alternatives, provided orientation, proportion, and balance checks are measurable and consistent.
How do I know the figure is truly inverted?
The head must sit near the labeled head zone at the bottom and the feet near the labeled feet zone at the top, with orientation arrows pointing toward those zones.
What if my measurements differ from the example?
Use your own measured total height and divide by eight. The example values are hypothetical and only illustrate the arithmetic.