Free original lessons
Draw an Upside-Down Umbrella: Canopy Down, Handle Up
Learn to draw an inverted umbrella with the canopy ribs pointing down and the handle rising up. Includes orientation checks, a worked example, and four practice tasks.
Free lesson
Four exercises
Worked answers
Object Drawing Lessons
An upside-down umbrella flips the familiar silhouette: the canopy opens downward like a bowl, the ribs point toward the ground, and the handle rises from the canopy's center. This lesson teaches a clear drawing convention for that inverted orientation, then gives you checkable steps to keep canopy and handle consistent. You will use simple shapes, a defined midline convention for lettering, and arithmetic checks so your drawing can be verified without guessing. All practice tasks are self-contained; where a diagram would help, the text describes it precisely.
Practice materials: Printable downloads are not available for this lesson yet. Use the instructions and four exercises below.
Reference illustration
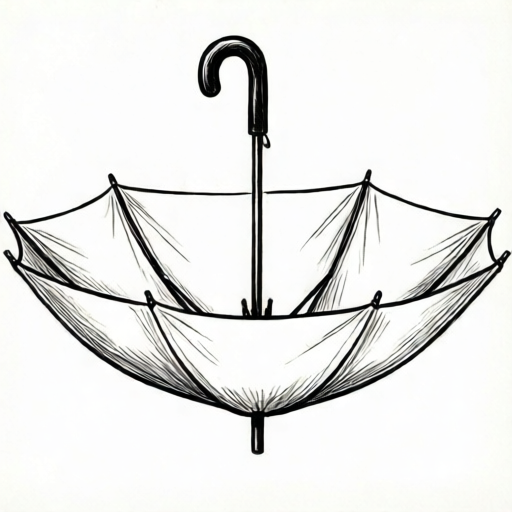
Use the stated measurements and conventions for each exercise.
Establish the inverted orientation before drawing
Start by deciding which way is up on your page. For an upside-down umbrella, the canopy's outer curve sits low and the ribs point downward, while the handle extends upward from the canopy's center. A useful convention: draw a faint horizontal baseline near the bottom of your page and a faint midline above it. The canopy's lowest rib tips should sit near the baseline, and the handle should cross the midline going up.
Lettering on the drawing, if any, follows an x-height convention: lowercase letters sit between the baseline and the midline, with ascenders rising above the midline. Letter styles vary, so accept any legible style that respects this height relationship. This convention lets you check orientation without relying on a single universal letterform.
- Draw a faint baseline near the bottom and a faint midline above it.
- Mark a center point on the midline for the handle's top.
- Sketch the canopy as a wide downward bowl whose lowest points approach the baseline.
- Add ribs as lines radiating from the canopy center toward the downward rim.
- Draw the handle upward from the canopy center, crossing the midline.
Build the canopy as a downward bowl
The canopy is the largest shape. Think of it as a shallow bowl turned upside down: the rim is low and the center is higher. Draw a wide arc for the rim, then a second arc above it for the canopy's upper surface. Keep the two arcs roughly parallel; the gap between them is the canopy's thickness. Ribs are short lines from the center toward the rim, and their tips should point down, not up.
Use consistent units for any measurements you choose. For example, if you decide the canopy width is 12 cm, mark 6 cm on each side of the center. These numbers are hypothetical examples, not standards; measure your own paper and tools.
- Mark the canopy center on the midline.
- Draw the lower rim arc, keeping its lowest points near the baseline.
- Draw the upper arc above the rim to show thickness.
- Add four to eight ribs from the center toward the rim, tips pointing down.
- Check that no rib tip points above the canopy center.
Attach the handle and check orientation
The handle rises from the canopy's center. Draw a straight or slightly curved line upward, crossing the midline, and finish with a small hook or grip. The handle should not pass through the canopy's rim; it starts at the center and goes up. A quick orientation check: the canopy's ribs point down, the handle points up, and the handle's top is the highest drawn point.
If you add a label, place it so lowercase letters sit between baseline and midline. Accept any legible style that keeps this height relationship. This makes the drawing checkable without demanding one exact handwriting.
- Start the handle at the canopy center.
- Draw upward, crossing the midline.
- Add a small grip or hook at the top.
- Verify the handle top is higher than every rib tip.
- Verify the canopy rim is lower than the canopy center.
Worked example
Describe how to draw an upside-down umbrella with a 10 cm canopy width, ribs pointing down, and a handle rising 8 cm above the canopy center. Use a baseline and midline.
Worked answer
Draw a baseline near the bottom and a midline above it. Mark the canopy center on the midline. Mark 5 cm left and 5 cm right of center for the rim width. Draw the lower rim arc so its lowest points are near the baseline. Draw an upper arc above it for thickness. Add six ribs from the center to the rim, tips pointing down. From the center, draw the handle upward 8 cm, crossing the midline, and add a small grip. Check: handle top is highest; rib tips are lowest; canopy center is above the rim.
Four practice exercises
Exercise 1
Draw an upside-down umbrella with a canopy width of 8 cm and a handle rising 6 cm above the canopy center. Use a baseline and midline. Describe your orientation checks.
Show answer and check
A downward bowl canopy 8 cm wide, ribs pointing down, handle rising 6 cm from the center, handle top highest.
Why: The canopy rim is low and center high; ribs point down; the handle starts at center and goes up, so the top is highest.
Check: Measure canopy width as 8 cm total (4 cm each side of center). Confirm handle top is higher than every rib tip and canopy center is above the rim.
Exercise 2
A student draws an umbrella with the canopy center 3 cm above the rim and the handle top 2 cm above the canopy center. Is the orientation correct? Explain.
Show answer and check
Yes, the orientation is correct: canopy center is above rim, and handle top is above canopy center.
Why: An upside-down umbrella needs the rim lower than the center and the handle rising above the center. Both conditions hold.
Check: Compare heights: rim lowest, center higher, handle top highest. The 3 cm and 2 cm values are hypothetical examples; measure your own drawing.
Exercise 3
Draw an upside-down umbrella and add a label using the x-height convention. Describe where lowercase letters sit and how you would accept alternative letter styles.
Show answer and check
Lowercase letters sit between baseline and midline; ascenders rise above the midline. Any legible style respecting this height relationship is accepted.
Why: The convention checks orientation and height without demanding one universal handwriting style.
Check: Verify lowercase bodies stay between baseline and midline; accept any legible style that keeps this relationship.
Exercise 4
Draw an upside-down umbrella with six ribs. Check that no rib tip is above the canopy center and that the handle crosses the midline. Describe your verification.
Show answer and check
Six ribs radiate from center to rim, all tips below the center; handle starts at center and crosses the midline upward.
Why: Ribs pointing down and a handle rising from center define the inverted orientation.
Check: Count six ribs; compare each tip height to the center; confirm the handle crosses the midline and its top is highest.
Common mistakes
- Drawing the canopy as an upward dome, like a normal umbrella. Flip the arcs so the rim is low and the center is high; ribs must point down.
- Attaching the handle to the rim instead of the canopy center. Start the handle at the center point on the midline and draw upward.
- Letting rib tips point above the canopy center. Redraw ribs so every tip is lower than the center; check against the baseline.
- Making the handle shorter than the canopy depth. Extend the handle upward until its top is the highest drawn point.
Self-check rubric
- Canopy is a downward bowl with rim lower than center.
- Ribs point downward and do not rise above the canopy center.
- Handle starts at canopy center and rises upward, crossing the midline.
- Handle top is the highest drawn point.
- Lettering, if present, keeps lowercase letters between baseline and midline; any legible style is accepted.
- Measurements use consistent units and are labeled as hypothetical examples when numerical.
Questions and answers
How do I know the umbrella is upside down?
The canopy's ribs point downward and the handle rises upward from the canopy center. The handle top should be the highest point.
Do I need exact measurements?
No. Use consistent units and label any chosen numbers as hypothetical examples. Measure your own paper and tools.
What lettering convention should I use?
Lowercase letters sit between baseline and midline; ascenders rise above the midline. Any legible style that respects this relationship is acceptable.
Can the handle be curved?
Yes. A straight or slightly curved handle is fine as long as it starts at the canopy center and points upward.