Free original lessons
Realistic Libra Scale Drawing: Beam, Pans, and Chains
Learn to draw a realistic Libra scale with a balanced beam, hanging pans, and chains. Practice proportion, shading, and checkable steps for original artwork.
Free lesson
Four exercises
Worked answers
Object Drawing Lessons
This lesson teaches a realistic drawing of a Libra scale: a central pillar, a horizontal balance beam, two hanging pans, and chains connecting beam to pans. You will use a simple convention for line and shading, measure proportions with a ruler or grid, and check your work with arithmetic. The goal is a believable object, not a tattoo-style symbol. All measurements below are hypothetical examples; measure your own paper and tools. Work in pencil so you can adjust. Keep units consistent (centimeters or inches) and label your chosen scale on the page.
Practice materials: Printable downloads are not available for this lesson yet. Use the instructions and four exercises below.
Reference illustration
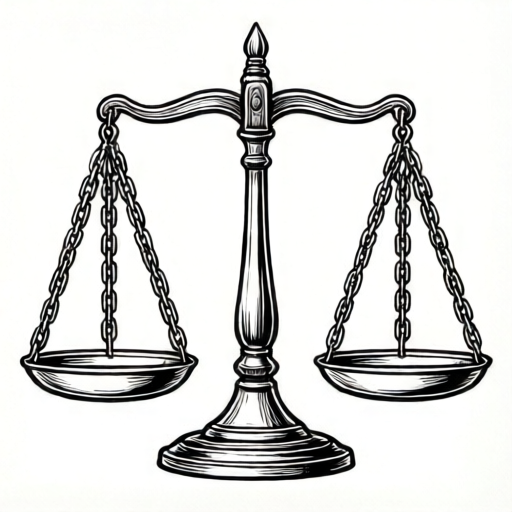
Use the stated measurements and conventions for each exercise.
Set the frame and central axis
Choose a drawing area. For example, on a 20 cm by 25 cm sheet, plan the scale to occupy about 14 cm wide and 18 cm tall. Mark a light vertical center line. This is the pillar axis. Mark a horizontal ground line near the bottom. Decide the total height from ground to the top of the pillar; for example, 16 cm. Mark the beam height at about 13 cm above ground. These numbers are hypothetical; adjust to your paper.
Draw the pillar as a tapered vertical form: wider at the base, narrower near the top. Use two light guide lines on either side of the center line. Check symmetry by measuring equal distances left and right at three heights. If the left width is 2.0 cm at the base, the right width should also be 2.0 cm.
- Mark the vertical center line and ground line.
- Mark beam height and pillar top with light horizontal ticks.
- Draw the pillar outline with equal left and right widths at each height.
- Check symmetry with a ruler before adding detail.
Build the balance beam and pivot
The beam is a horizontal bar centered on the pillar top. Draw a light horizontal guide at beam height. Mark the pivot point at the center. Decide beam length; for example, 12 cm total, so 6 cm each side of center. Mark chain attachment points at 5 cm from center on each side, leaving 1 cm beyond each attachment for the beam end. Draw the beam as a slim rectangle with slightly rounded ends. Add a small triangular or rounded pivot cap at the center.
Check balance arithmetic: left attachment distance from center should equal right attachment distance. If left is 5.0 cm, right must be 5.0 cm. The beam ends should be equal distances from center. Measure and adjust before darkening lines.
- Draw the horizontal beam guide and mark the center pivot.
- Mark equal attachment points left and right.
- Draw the beam outline with equal overhang beyond each attachment.
- Add the pivot cap and check equal distances with a ruler.
Hang the pans and chains
Each pan hangs from three chains for a realistic look. Draw three chain lines from the beam attachment point down to the pan rim: one to the front rim center, one to the left rim, one to the right rim. Use a shallow pan shape: an ellipse for the rim and a curved lower edge for the bowl. Keep both pans the same size. For example, pan rim width 4 cm and depth 1.5 cm. The chain length from beam to rim can be 3 cm. These are hypothetical examples.
Check chain symmetry: the left and right chain lines should meet the pan rim at equal distances from the pan center. The front chain should meet the rim at the front center. Measure the vertical drop from beam to rim on both sides; they should match. If one side is 3.0 cm and the other is 2.7 cm, adjust the shorter chain line.
- Mark the pan center below each attachment point.
- Draw the pan rim ellipse and bowl curve.
- Draw three chain lines from attachment to rim points.
- Check equal chain drop and equal pan size on both sides.
Shade for realism with a defined convention
Use this shading convention: light source from upper left. Surfaces facing upper left get light tone; surfaces facing lower right get dark tone. Use three tone levels: light, medium, dark. Keep chain links as small alternating ovals; do not draw every link perfectly. For the beam, shade the lower edge medium and the top edge light. For pans, shade the inside bowl medium to dark and the outer rim light on the left, medium on the right. The pillar gets a light left edge and a dark right edge.
Valid alternatives: you may use cross-hatching, stippling, or smooth graphite blending, as long as the light source convention is consistent. You may vary chain link shapes slightly. The rubric rewards consistent tone direction and believable form, not a single universal style.
- Mark the light direction with a small arrow outside the drawing.
- Apply light tone to upper-left surfaces.
- Apply medium tone to side surfaces and dark tone to lower-right surfaces.
- Check that every part follows the same light direction.
Worked example
On a 20 cm by 25 cm sheet, draw a realistic Libra scale with a 16 cm pillar height, a 12 cm beam, attachment points 5 cm from center, and pans 4 cm wide. Describe the check for symmetry.
Worked answer
Mark the center line and ground line. Mark beam height at 13 cm above ground. Draw the pillar with equal left and right widths at three heights. Draw the beam 12 cm total, centered, with attachment points 5 cm left and 5 cm right of center. Draw pans 4 cm wide below each attachment, with three chains each. Check: left attachment distance 5.0 cm equals right 5.0 cm; left pan width 4.0 cm equals right 4.0 cm; chain drop 3.0 cm on both sides. Shade with light from upper left.
Four practice exercises
Exercise 1
Draw a scale with a 14 cm pillar, a 10 cm beam, and attachment points 4 cm from center. Check symmetry and state your measurements.
Show answer and check
Beam total 10 cm; each side 5 cm; attachments at 4 cm left and 4 cm right; overhang 1 cm each end. Pillar height 14 cm. Pans equal width, for example 3.5 cm each.
Why: The beam is centered, so half-length is 5 cm. Attachments at 4 cm leave 1 cm overhang. Equal left and right values create balance.
Check: Measure center to left attachment and center to right attachment; both should be 4.0 cm. Measure beam ends from center; both should be 5.0 cm.
Exercise 2
A drawing has a left chain drop of 3.2 cm and a right chain drop of 2.8 cm. What adjustment makes the pans level, and what is the new common drop if you average?
Show answer and check
Shorten the left chain by 0.4 cm or lengthen the right by 0.4 cm. The average drop is (3.2 + 2.8) / 2 = 3.0 cm.
Why: Level pans need equal vertical drops. Adjusting one side by the difference makes them equal. The average gives a common target.
Check: After adjustment, measure both drops; they should both read 3.0 cm if using the average.
Exercise 3
Draw two pans 4 cm wide with three chains each. The left pan rim points are at 0 cm, 2 cm, and 4 cm across the rim. Where should the right pan rim points be for symmetry?
Show answer and check
The right pan rim points should also be at 0 cm, 2 cm, and 4 cm across its own rim, measured from its left edge.
Why: Symmetry means each pan uses the same relative rim positions for its three chains.
Check: Measure each pan rim and confirm the three chain meeting points divide the rim into equal segments on both pans.
Exercise 4
Using light from upper left, describe the tone for the beam top edge, beam lower edge, and the inside of the right pan. Use light, medium, or dark.
Show answer and check
Beam top edge: light. Beam lower edge: medium. Inside of right pan: medium to dark.
Why: Upper-left light hits top and left surfaces; lower and right-facing surfaces receive less light.
Check: Check that every shaded surface follows the same upper-left light arrow; no surface facing upper left should be dark.
Common mistakes
- Making the beam attachments unequal distances from the center. Measure from the center pivot to each attachment point and adjust until they match.
- Drawing pans of different sizes. Use the same rim width and depth for both pans; check with a ruler.
- Shading with inconsistent light direction. Mark the light arrow first and shade every surface according to it.
- Chains that do not meet the pan rim at balanced points. Mark three rim points equally spaced and draw chains to them.
Self-check rubric
- Pillar is vertical and symmetric within 0.5 cm at three measured heights.
- Beam is horizontal and centered; left and right attachment distances match within 0.5 cm.
- Both pans have equal rim width and depth within 0.5 cm.
- Three chains per pan meet the rim at balanced points; chain drops match within 0.5 cm.
- Shading follows one stated light direction; three tone levels are visible.
- Valid alternative styles (cross-hatching, stippling, blending) are accepted if consistent.
Questions and answers
Do I need exact measurements?
No. Use the numbers as hypothetical examples and measure your own paper. Consistency matters more than exact values.
Can I use a different shading style?
Yes. Cross-hatching, stippling, or blending are valid if the light direction stays consistent.
How many chains should each pan have?
Three chains per pan gives a realistic look: front, left, and right. Two chains can work but look less stable.
How do I check balance without erasing much?
Use light guide lines and a ruler. Measure left and right distances from the center before darkening.