HomeTimed Skull Anatomy Drawing Practice: Landmarks and Quick Sketches Free original lessons
Timed Skull Anatomy Drawing Practice: Landmarks and Quick Sketches
Build speed and accuracy drawing the skull from memory. Learn cranium, mandible, and orbit landmarks, then practice timed sketches with clear self-checking.
Free lesson
Four exercises
Worked answers
Object Drawing Lessons
Drawing a skull quickly and accurately requires knowing which landmarks anchor the shape. This lesson teaches a repeatable timed practice method: identify key points, block the cranium, place the mandible and orbits, then check proportions. All exercises are self-contained and use simple arithmetic with consistent units. The printable practice sheet is planned but not yet built; the resource plan below describes what it will contain.
Practice materials: Printable downloads are not available for this lesson yet. Use the instructions and four exercises below.
Reference illustration
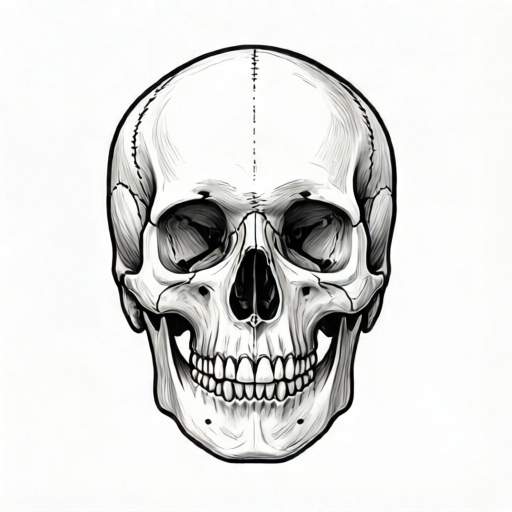
Use the stated measurements and conventions for each exercise.
Landmark Map for Quick Sketches
Before timing yourself, fix a mental map of three landmark groups. The cranium includes the top of the skull, the widest points at the sides, and the base line where the skull meets the neck. The orbits are two openings on the front of the skull; their upper edges sit roughly level with each other. The mandible is the lower jaw, hinged near the ears and ending at the chin. In a front view, the chin is the lowest point, and the cranium is the highest. In a side view, the back of the cranium extends behind the ear line, and the jaw angle sits below the ear.
Use a simple convention for all timed sketches: draw a light vertical midline for front views, and a light horizontal line through the lower edges of the orbits. These guide lines are not part of the final drawing; they are check lines. Keep units consistent: if you measure one distance in centimeters on your paper, measure all distances in centimeters. For example, if the widest cranium span is 6 cm, then the orbit width might be about 2 cm in a quick sketch. These numbers are hypothetical examples, not standards.
- Place three dots: top of cranium, widest left, widest right.
- Draw a light oval through the dots to block the cranium.
- Mark the orbit line and place two orbit ovals.
- Add the mandible from the jaw hinge to the chin.
- Check that the chin is the lowest point and the cranium the highest.
Timed Practice Routine
Use short, repeatable time blocks. A useful pattern is a 30-second block for blocking the cranium, a 30-second block for orbits and mandible, and a 60-second block for checking and refining. Total time is 2 minutes per sketch. If you have less time, use 15 seconds for blocking, 15 seconds for features, and 30 seconds for checking. The goal is not a finished artwork but a readable landmark sketch.
During each block, say the landmark name silently as you place it. This keeps attention on anatomy rather than shading. After the timer stops, compare your sketch to the landmark map. Count how many of the five check points are correctly placed: top of cranium, widest left, widest right, orbit line level, chin lowest. A score of 4 or 5 means the sketch is usable. A score of 3 or less means repeat the same view once more before moving on.
- Set a timer for 30 seconds and block only the cranium.
- Set a timer for 30 seconds and add orbits and mandible.
- Set a timer for 60 seconds and check the five points.
- Record your score out of five.
- Repeat the same view if the score is 3 or less.
Checking Proportions with Simple Arithmetic
Use one measured distance as your reference. For a front view, measure the widest cranium span on your paper. Suppose it is 8 cm. A quick sketch often places the two orbit centers about one-quarter of that span apart, so 2 cm. The chin sits below the orbit line by roughly one-third of the cranium span, so about 2.7 cm. These are hypothetical examples to make the arithmetic checkable; measure your own drawing and adjust.
For a side view, measure the horizontal back-to-front length. Suppose that length is 10 cm. The ear line sits roughly halfway along that horizontal length, at 5 cm from the back. Separately, the jaw angle sits about 1.5 cm below the ear line vertically. These are hypothetical examples. The check is consistency: if you change one distance, update the related distances so the sketch stays coherent.
- Measure the widest cranium span in centimeters.
- Divide by four to estimate orbit center spacing.
- Divide by three to estimate chin drop below the orbit line.
- Measure your sketch and compare.
- Adjust only the landmark that is off, then recheck.
Worked example
A front-view timed sketch uses a widest cranium span of 6 cm. Estimate the orbit center spacing and the chin drop below the orbit line using the one-quarter and one-third rules. Then state one check.
Worked answer
Orbit center spacing is 6 divided by 4 = 1.5 cm. Chin drop is 6 divided by 3 = 2 cm. Check: measure the actual orbit center spacing and chin drop on the sketch; both should be close to 1.5 cm and 2 cm, and the chin should be the lowest point.
Why: The rules give simple fractions of the reference span. Dividing 6 by 4 gives 1.5, and dividing 6 by 3 gives 2. The check compares the drawn distances to these estimates and confirms the chin is lowest.
Check: Measure the two orbit centers and the vertical distance from the orbit line to the chin in centimeters. Confirm the chin is lower than every other landmark.
Four practice exercises
Exercise 1
Front-view sketch: widest cranium span is 8 cm. Using the one-quarter rule, what is the estimated orbit center spacing? Using the one-third rule, what is the estimated chin drop below the orbit line?
Show answer and check
Orbit center spacing is 2 cm. Chin drop is about 2.7 cm.
Why: 8 divided by 4 equals 2. 8 divided by 3 equals 2.666..., which rounds to 2.7 for a quick sketch.
Check: Measure the orbit centers and the vertical distance from orbit line to chin on your sketch; compare to 2 cm and 2.7 cm.
Exercise 2
Side-view sketch: distance from back of cranium to front of face is 10 cm. Using the halfway rule, where is the ear line? If the jaw angle sits 1.5 cm below the ear line, what is its vertical position relative to the back-to-front length?
Show answer and check
The ear line is about 5 cm from the back along the horizontal back-to-front length. The jaw angle is about 1.5 cm below the ear line vertically. These are separate measurements: one horizontal, one vertical.
Why: Half of 10 is 5, so the ear line sits about halfway along the horizontal length. The jaw angle is then placed 1.5 cm below the ear line vertically; the horizontal and vertical measurements are not added together.
Check: Measure horizontally from the back of the cranium to the ear line and confirm it is about half the total back-to-front length. Then measure vertically from the ear line down to the jaw angle and confirm it is about 1.5 cm.
Exercise 3
A 2-minute timed sketch scores 3 out of 5 check points. According to the routine, what should you do next, and what is one likely cause if the missed points are the widest left and widest right?
Show answer and check
Repeat the same view once more before moving on. A likely cause is drawing the cranium oval before placing the widest left and right dots.
Why: The routine says a score of 3 or less means repeat the same view. Missing both widest points suggests the span was not marked first.
Check: After repeating, count the five check points again. Confirm the widest left and right dots were placed before the oval.
Exercise 4
You have 1 minute total. Propose a three-block timing plan using 15 seconds, 15 seconds, and 30 seconds, and name the landmark focus for each block.
Show answer and check
Block 1: 15 seconds for the cranium top and widest points. Block 2: 15 seconds for the orbit line and mandible hinge-to-chin. Block 3: 30 seconds for checking the five points and adjusting one landmark.
Why: The 1-minute plan mirrors the 2-minute routine but shortens each block. The first two blocks place landmarks; the last block checks.
Check: Use a timer and confirm each block stays within its limit. After 1 minute, score the five check points.
Common mistakes
- Drawing the mandible as a straight line from ear to chin. Mark the jaw angle below the ear first, then draw two segments: ear to jaw angle, jaw angle to chin.
- Placing the orbits too high or too low relative to each other. Draw a light horizontal orbit line before adding the ovals, and check that both lower edges touch it.
- Making the cranium too narrow in a quick sketch. Place the widest left and right dots before drawing the oval, and measure the span against your reference distance.
- Spending too long on shading during a timed block. Use only line and landmark dots during the timed blocks; add shading only after the timer stops.
Self-check rubric
- Five check points are placed: top of cranium, widest left, widest right, level orbit line, lowest chin.
- Cranium is blocked before orbits and mandible.
- Orbits are level with each other within the sketch's own guide line.
- Mandible includes a jaw angle below the ear line and a chin at the lowest point.
- Timed blocks are respected: blocking, features, and checking are separate.
- Arithmetic check uses one reference distance and consistent units.
- Valid style variations are accepted if the five check points and arithmetic consistency hold.
Questions and answers
How long should each timed sketch take?
A practical starting block is 2 minutes total: 30 seconds for the cranium, 30 seconds for orbits and mandible, and 60 seconds for checking. Shorter 1-minute blocks also work if you reduce detail.
Do I need to draw every bone line?
No. For timed landmark practice, draw only the outer contour and the three landmark groups: cranium, orbits, and mandible. Internal bone lines can be added later if time allows.
What if my sketch looks different from a reference?
Valid sketches vary in style. Use the five check points and the arithmetic consistency check rather than matching a single ideal image. If the landmarks are placed consistently, the sketch is acceptable.
Can I use a ruler during timed practice?
Use a ruler only during the checking block, not during the blocking block. This keeps the timed practice focused on estimation, while the check block builds measurement accuracy.