Free original lessons
Draw an Antique Balance Scale with Labeled Parts
Learn to sketch a beam-and-pan balance scale, label beam, pan, pointer, and base, and check proportions with a simple convention.
Free lesson
Four exercises
Worked answers
Object Drawing Lessons
This lesson teaches a repeatable way to draw an antique balance scale and label its main parts. You will set a drawing convention, build the scale from simple shapes, and use a short checklist to judge whether your sketch is clear and correctly labeled. The focus is the beam-and-pan balance only; digital scales and mass-comparison exercises are out of scope. All measurements below are hypothetical examples unless you measure your own paper and tools.
Practice materials: Printable downloads are not available for this lesson yet. Use the instructions and four exercises below.
Reference illustration
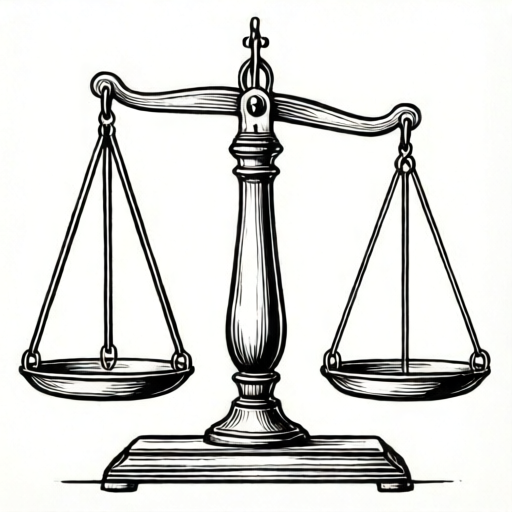
Use the stated measurements and conventions for each exercise.
Set a drawing convention before you start
Choose a paper size and mark a light frame. For this lesson, a hypothetical example is a 15 cm by 20 cm drawing area on ordinary paper. Measure your actual paper and write the real dimensions at the top of your sheet so your checks use consistent units.
Define a scale convention: one hand-drawn unit equals one centimetre on your paper. Use a pencil for construction lines and a darker pencil or pen for final lines. Keep labels horizontal and place them outside the drawing so they do not cover the parts.
Decide how you will show letter height. In this lesson, x-height means the distance from the baseline to the midline of lowercase letters. Letter styles vary, so accept any clear handwriting that stays within the label box you draw.
- Measure your paper and write the real width and height in centimetres.
- Draw a light rectangular frame for the drawing area.
- Write the scale convention at the top: one unit equals one centimetre.
- Draw small label boxes beside the frame for beam, pan, pointer, and base.
Build the scale from simple shapes
Start with the base. Draw a wide, low trapezoid for the foot and a short vertical column above it. The column should be centred on the base. For a hypothetical example, make the base 8 cm wide and the column 6 cm tall.
Add the beam as a horizontal line across the top of the column. Make the beam slightly longer than the base is wide, for example 10 cm. Mark the centre point where the beam meets the column. Draw a small triangle or pointer hanging below the centre point.
Hang two pans from the ends of the beam. Use short chains or cords drawn as two or three straight lines. Draw each pan as a shallow curve with a flat rim. Keep both pans the same size and at the same height unless you deliberately show the scale tipped.
- Draw the base trapezoid and the vertical column.
- Draw the horizontal beam and mark its centre.
- Add the pointer below the centre of the beam.
- Draw cords from each beam end and add two matching pans.
- Darken the final lines and erase construction marks.
Label the parts and check the drawing
Use four labels: beam, pan, pointer, and base. Draw a straight leader line from each label box to the part. Keep leader lines from crossing each other. Write labels in clear handwriting; x-height is baseline to midline, and any consistent letter style is acceptable.
Check symmetry by measuring from the centre of the beam to each pan. The two distances should match within your chosen tolerance. For a hypothetical example, allow a difference of 0.5 cm. Record the actual measurements on your sheet.
Check that every label points to the correct part and that no label covers the drawing. A clear, correctly labeled sketch is the goal, not a perfect replica.
- Write the four labels in their boxes.
- Draw one leader line from each label to its part.
- Measure beam-centre to left pan and beam-centre to right pan.
- Record both measurements and compare them.
- Confirm labels are readable and do not overlap the drawing.
Worked example
A student draws a scale on a 15 cm by 20 cm area. The base is 8 cm wide, the column is 6 cm tall, and the beam is 10 cm long. The left pan is 4.8 cm from the beam centre and the right pan is 5.2 cm from the centre. The pointer is drawn above the beam. List the corrections needed and the final check measurements.
Worked answer
Move the pointer below the beam centre. The pan distances differ by 0.4 cm, which is within a hypothetical 0.5 cm tolerance, so symmetry is acceptable. Record left 4.8 cm and right 5.2 cm. Confirm the beam is longer than the base and that all four labels point to the correct parts.
Four practice exercises
Exercise 1
On a 12 cm by 18 cm drawing area, draw a scale with a 7 cm base, a 5 cm column, and a 9 cm beam. Place the pointer below the beam centre. Measure from the beam centre to each pan and record both distances. Label beam, pan, pointer, and base.
Show answer and check
A complete sketch with a 7 cm base, 5 cm column, 9 cm beam, pointer below centre, two matched pans, four correct labels, and two recorded pan distances.
Why: The beam is longer than the base, the pointer is below the centre, and the labels match the parts. Recording both distances makes symmetry checkable.
Check: Measure the base, column, and beam with a ruler. Confirm the pointer is below the beam centre. Compare the two pan distances and note the difference in centimetres.
Exercise 2
A sketch has a 10 cm beam, an 8 cm base, and pans at 4.0 cm and 5.5 cm from the beam centre. The pointer is below the beam. State whether the symmetry passes a hypothetical 0.5 cm tolerance and explain what to adjust.
Show answer and check
The difference is 1.5 cm, so it does not pass the 0.5 cm tolerance. Move the pans so the two distances are closer, for example 4.5 cm and 5.0 cm, and re-measure.
Why: Subtract the smaller distance from the larger: 5.5 minus 4.0 equals 1.5 cm. Since 1.5 is greater than 0.5, the sketch is outside the chosen tolerance.
Check: Re-measure both pan distances after adjustment and subtract again. Confirm the new difference is 0.5 cm or less.
Exercise 3
Draw a scale with a tipped beam: the left pan is lower than the right pan. Keep the base, column, and pointer. Label all four parts and write one short note explaining that the tip is intentional.
Show answer and check
A sketch with a slanted beam, one pan lower than the other, a pointer below the beam centre, four correct labels, and a note such as 'tipped scale shown intentionally'.
Why: A tipped beam is acceptable when it is deliberate and noted. The pointer still hangs below the centre, and the labels remain clear.
Check: Confirm the note is present, the pointer is below the beam centre, and each label points to the correct part. Check that the lower pan is clearly lower than the other.
Exercise 4
Using a hypothetical 0.5 cm tolerance, check a drawing where the left pan is 3.7 cm and the right pan is 4.1 cm from the beam centre. State the difference, whether it passes, and one label check you would perform.
Show answer and check
The difference is 0.4 cm, so it passes the 0.5 cm tolerance. A label check is to trace each leader line from its label box to the named part and confirm no line crosses another.
Why: Subtract 3.7 from 4.1 to get 0.4 cm. Since 0.4 is less than 0.5, the symmetry passes. Label checks confirm the drawing is correctly annotated.
Check: Re-subtract the two recorded distances and confirm the result is 0.5 cm or less. Then inspect each leader line for correct endpoint and no crossing.
Common mistakes
- Making the beam shorter than the base, so the pans crowd the column. Draw the beam longer than the base width and recheck the pan spacing.
- Placing the pointer above the beam instead of below the centre. Move the pointer so it hangs below the beam centre and points downward.
- Using leader lines that cross or point to the wrong part. Redraw each leader line separately and trace it from label to part before finalizing.
- Writing labels so small that the x-height is unclear. Increase letter size until the baseline-to-midline distance is easy to see, keeping one consistent style.
Self-check rubric
- Base, column, beam, pointer, and two pans are all present and recognizable.
- Beam is longer than the base width and centred on the column.
- Pointer hangs below the beam centre and points downward.
- Two pans are matched in size and height, or a tipped scale is clearly noted.
- Four labels are readable, correctly placed, and connected by leader lines that do not cross.
- Measurements from beam centre to each pan are recorded in centimetres and compared.
- Handwriting uses a consistent style with visible x-height from baseline to midline.
Questions and answers
Do the two pans have to be exactly the same size?
For a balanced antique scale, yes: draw both pans the same size and at the same height. If you show a tipped scale, state that choice in a short note.
What if my handwriting style is different from the example?
Any clear, consistent style is acceptable. The rubric checks that labels are readable and that x-height, baseline to midline, is visible, not that letters match one model.
Can I use a ruler for every line?
Yes. A ruler helps with the beam, column, and base. Freehand curves are fine for the pans if they are clear and matched.
How do I know my drawing is symmetrical enough?
Measure from the beam centre to each pan and compare. Use a tolerance you choose and record it, such as a hypothetical 0.5 cm difference.