Free original lessons
Draw an Antique Balance Scale with Beam Symmetry and Pan Suspension
Learn to construct an antique beam-and-pan balance scale using symmetry lines, suspension points, and proportional base geometry. Includes practice tasks and a rubric.
Free lesson
Four exercises
Worked answers
Object Drawing Lessons
This lesson teaches a construction-line approach to drawing an antique balance scale with a central beam and two suspended pans. The focus is on beam symmetry, clear pan suspension, and a stable base. You will use a simple convention: x-height is measured from baseline to midline, and letter styles may vary. All numerical values are hypothetical examples for practice; measure your own paper and tools. The method is checkable with arithmetic and consistent units, and it allows valid alternative proportions as long as symmetry and suspension logic hold.
Practice materials: Printable downloads are not available for this lesson yet. Use the instructions and four exercises below.
Reference illustration
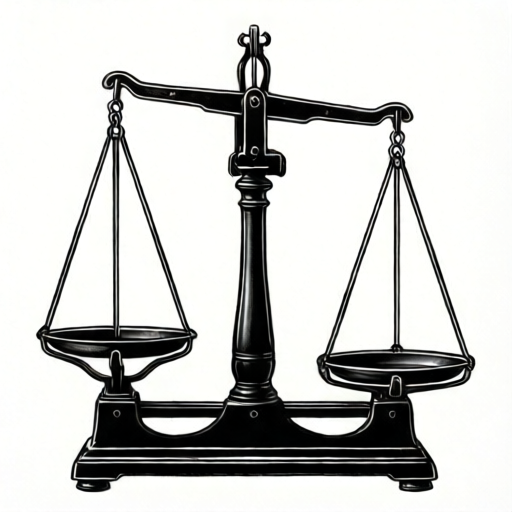
Use the stated measurements and conventions for each exercise.
Set the frame and central axis
Begin with a light rectangular frame on your paper. Mark a vertical central axis from top to bottom. This axis is the mirror line for the beam and the base. Choose a total drawing height in centimetres, for example 18 cm, and mark the top and bottom margins. The central axis must be perpendicular to the bottom edge; check with a corner square or by measuring equal distances from the axis to the left and right frame edges.
Decide the beam height as a fraction of the frame. A hypothetical example is one-third of the drawing height from the top. Mark this as the beam axis line, a horizontal line crossing the central axis. Keep all construction lines light so they can be erased or left as guides.
- Draw a rectangular frame and mark the vertical central axis.
- Measure equal left and right margins from the axis; adjust until they match within 1 mm.
- Mark a horizontal beam axis at a chosen height, for example one-third down from the top.
- Label the intersection of the central axis and beam axis as the beam centre point.
Construct the beam and suspension points
The beam is a horizontal bar centred on the beam centre point. Choose a beam length, for example 12 cm, and mark half-lengths of 6 cm to the left and right along the beam axis. These are the suspension points. Check symmetry by measuring from the centre point to each suspension point; the two distances must be equal. If they differ, move the shorter side outward or the longer side inward until they match.
At each suspension point, draw a short vertical drop line downward. These lines show where the pan chains or cords attach. The drop lines should be equal in length, for example 4 cm, so the pans hang at the same level. Mark the lower end of each drop line as the pan attachment point. A small hook or ring can be drawn at each attachment point using a circle of about 0.5 cm diameter.
- Mark equal half-lengths from the beam centre to the left and right suspension points.
- Verify the two half-lengths are equal within 1 mm.
- Draw equal vertical drop lines from each suspension point.
- Mark pan attachment points at the lower ends and add small hooks or rings.
Draw the pans and base with proportional checks
Each pan is a shallow bowl or dish suspended below its attachment point. Draw the pan as a symmetric shape about its own vertical centre line. A simple convention is a shallow arc for the pan rim and a curved lower edge. The pan width can be a chosen fraction of the beam half-length, for example two-thirds. Measure the pan width from its centre line to each side and keep the two halves equal.
The base supports the central column. Draw a vertical column from the beam centre point downward to the base. The column should be centred on the central axis. The base can be a trapezoid or a stepped shape, symmetric about the axis. Choose a base width, for example 8 cm, and mark equal half-widths of 4 cm from the axis. Check that the left and right base half-widths match. The column height and base height are chosen proportions; record your chosen values and use them consistently.
- Draw each pan symmetrically about its own vertical centre line.
- Measure pan half-widths and adjust until equal.
- Draw the central column from the beam centre to the base, centred on the axis.
- Draw a symmetric base and verify equal half-widths from the central axis.
Refine construction lines and symmetry check
With the main construction lines in place, darken the final outlines: beam, drop lines, hooks, pans, column, and base. Keep the central axis and beam axis as light guide lines. Add a symmetry check line: a horizontal line through the beam centre point that extends across the frame. Measure from this line to the left and right suspension points; the vertical distances should be zero because the suspension points lie on the beam axis. Then measure from the central axis to the left and right pan centres; these horizontal distances should be equal.
Use a simple arithmetic check: record beam half-length L, drop length D, pan half-width P, and base half-width B in centimetres. Confirm L_left equals L_right, D_left equals D_right, P_left equals P_right, and B_left equals B_right. Any difference greater than 1 mm should be corrected. The drawing is complete when the beam is symmetric, the pans hang at equal levels, and the base is centred.
- Darken final outlines and keep guide lines light.
- Measure left and right beam half-lengths and compare.
- Measure left and right drop lengths and pan half-widths and compare.
- Measure left and right base half-widths and compare; correct differences over 1 mm.
Worked example
Construct a balance scale with a beam half-length of 5 cm, drop lines of 3 cm, pan half-width of 3 cm, and base half-width of 4 cm. Describe the construction and the symmetry checks.
Worked answer
Draw a frame and a vertical central axis. Mark a beam axis at a chosen height. From the beam centre point, mark 5 cm left and 5 cm right along the beam axis for suspension points. Draw 3 cm vertical drop lines from each suspension point. At each lower end, draw a hook and a pan symmetric about its own centre line with half-width 3 cm. Draw a central column from the beam centre to the base, centred on the axis. Draw a base with half-width 4 cm on each side of the axis. Check: left and right beam half-lengths are both 5 cm; drop lengths are both 3 cm; pan half-widths are both 3 cm; base half-widths are both 4 cm. All differences are 0 cm, so the construction is symmetric.
Four practice exercises
Exercise 1
A student draws a beam with a left half-length of 6 cm and a right half-length of 5.5 cm. The drop lines are both 4 cm. Identify the symmetry error and state the corrected right half-length.
Show answer and check
The beam is asymmetric because the right half-length is 0.5 cm shorter than the left. The corrected right half-length is 6 cm.
Why: Beam symmetry requires equal half-lengths from the beam centre point. Since the left is 6 cm, the right must also be 6 cm. The drop lines are already equal, so only the beam needs correction.
Check: Measure from the beam centre to each suspension point; both should read 6 cm within 1 mm.
Exercise 2
A drawing has pan half-widths of 2.5 cm on the left and 2.5 cm on the right, but the left pan centre is 1 cm farther from the central axis than the right pan centre. Describe how to check and correct the pan placement.
Show answer and check
Measure the horizontal distance from the central axis to each pan centre. The left distance is 1 cm too large. Move the left pan centre 1 cm toward the axis so both distances match, then redraw the pan symmetrically about its new centre line.
Why: Pan symmetry includes both pan shape and pan placement relative to the central axis. Equal half-widths alone do not guarantee equal placement. The correction restores equal horizontal distances.
Check: Measure from the central axis to each pan centre; the two distances should be equal within 1 mm.
Exercise 3
A base is drawn with a left half-width of 4 cm and a right half-width of 4.5 cm. The central column is on the axis. State the base symmetry error and give a corrected right half-width.
Show answer and check
The base is asymmetric because the right half-width is 0.5 cm larger than the left. A corrected right half-width is 4 cm.
Why: Base symmetry requires equal half-widths from the central axis. Since the left is 4 cm, the right should also be 4 cm. The column placement is already correct.
Check: Measure from the central axis to each base edge; both should read 4 cm within 1 mm.
Exercise 4
A student uses a beam half-length of 7 cm, drop lines of 5 cm, pan half-width of 4 cm, and base half-width of 5 cm. All left and right measurements match. Describe the construction steps and the final symmetry check.
Show answer and check
Draw the frame and central axis. Mark the beam axis and beam centre. Mark 7 cm left and right for suspension points. Draw 5 cm drop lines and hooks. Draw pans with 4 cm half-widths, symmetric about their own centre lines. Draw the central column on the axis and a base with 5 cm half-widths. Check that all left and right measurements are equal: beam 7 cm, drop 5 cm, pan 4 cm, base 5 cm. Differences are 0 cm, so the drawing is symmetric.
Why: The construction follows the same order: axis, beam, suspension, drop lines, pans, column, base. The check compares each paired measurement. Equal values confirm symmetry.
Check: Record each left and right measurement in centimetres and subtract; each difference should be 0 cm or within 1 mm.
Common mistakes
- Making the beam half-lengths unequal. Measure from the beam centre point to each suspension point and adjust until the two distances match within 1 mm.
- Drawing drop lines of different lengths so pans hang at different levels. Use equal drop lengths from the beam axis to each pan attachment point; check with a ruler.
- Placing the central column off the central axis. Re-mark the column centre on the vertical axis and redraw the column symmetrically about it.
- Making the base asymmetric. Measure equal half-widths from the central axis to the left and right base edges and correct the shorter side.
Self-check rubric
- Beam is centred on the vertical axis and left and right half-lengths are equal within 1 mm.
- Suspension points are marked at equal distances from the beam centre.
- Drop lines are equal in length and pans hang at the same level.
- Each pan is symmetric about its own vertical centre line.
- Central column is centred on the vertical axis.
- Base is symmetric with equal left and right half-widths within 1 mm.
- Construction lines are light and final outlines are clear.
- Chosen numerical values are recorded and used consistently in centimetres.
Questions and answers
Do the pans have to be identical in shape?
For a balance scale, the pans should be symmetric about their own centre lines and hang at equal levels. Identical pan shapes are a valid choice, but slight stylistic differences are acceptable if the suspension points and levels remain symmetric.
What does x-height mean in this drawing?
X-height is the distance from the baseline to the midline of a letter or symbol. In this lesson, use it only if you add small labels; the drawing itself relies on construction lines and measured proportions.
Can I use different numerical proportions?
Yes. The numbers given are hypothetical examples. Choose your own beam length, drop length, pan width, and base width, record them, and keep the left and right measurements equal.
How do I check symmetry without a ruler?
Fold the paper along the central axis if the paper is thin, or use a straight edge to compare distances. A ruler is more reliable; measure from the axis to matching points on both sides.