Free original lessons
Poinsettia Contour Drawing in Black and White
Learn to draw a poinsettia using clean contour lines only. Practice bract and leaf edges, blind contour, and continuous-line redraws in monochrome.
Free lesson
Four exercises
Worked answers
Object Drawing Lessons
Contour drawing captures the outline and internal edges of a subject without shading or color. For a poinsettia, the key is distinguishing the star-shaped bracts from the narrower leaves and showing how both attach to the stem. This lesson uses a simple convention: every visible edge is drawn as a single black line on white paper, with no filled areas. You will compare your line placement against a labeled reference and refine accuracy through blind-contour and continuous-line exercises. All measurements are hypothetical examples; measure your own paper and tools before drawing.
Practice materials: Printable downloads are not available for this lesson yet. Use the instructions and four exercises below.
Reference illustration
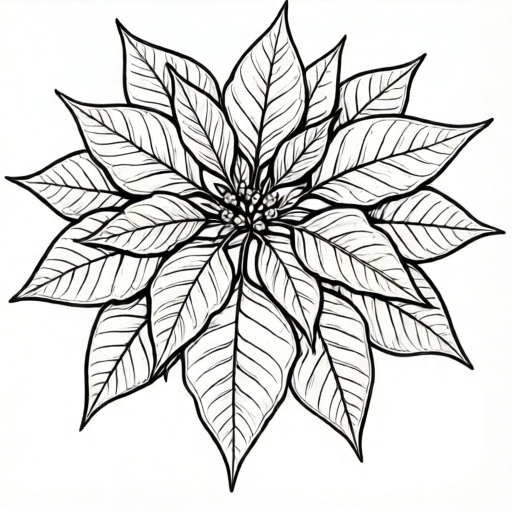
Use the stated measurements and conventions for each exercise.
Reading the Poinsettia's Edges
A poinsettia has a central cluster of small true flowers surrounded by colored bracts, which are modified leaves. Below the bracts, ordinary green leaves grow on the stem. In contour drawing, you do not need to show color differences; instead, you show shape differences. Bracts are typically broad and pointed with smooth or slightly wavy edges, while leaves are narrower and may have lobed or serrated margins. Draw each edge as one continuous line where possible, and let lines meet at natural junctions such as the stem attachment.
Work from a labeled reference plate that names the bract tip, bract base, leaf margin, and stem node. Before drawing, trace the reference with your finger to feel the direction changes. Then place your paper so the longest bract points toward your dominant hand for smoother lines. Keep your pencil or pen vertical and move your whole arm for long edges rather than only your wrist.
- Place the reference plate beside your paper and label the bract tip, bract base, leaf margin, and stem node on your own sheet.
- Lightly mark the stem center and the attachment point of the lowest leaf.
- Draw the outer edge of one large bract from tip to base in a single slow line.
- Add the opposite edge of the same bract, meeting the first line at the tip and base.
- Repeat for two more bracts, then add two leaves below the bracts.
- Check that every line connects to a stem or another edge without unexplained gaps.
Blind Contour and Continuous-Line Practice
Blind contour means you look only at the reference while your pencil moves on the paper. This trains your hand to follow the edge you see rather than a remembered symbol. Use a scrap sheet and draw one bract and one leaf without looking down. The result will look distorted; that is expected. The goal is to notice where your hand slowed or sped up. After one blind contour, draw the same shapes again while looking at your paper, and compare the two versions for edge accuracy.
Continuous-line redraw means you draw the entire poinsettia without lifting your pen. You may retrace lines to move between parts, but you do not jump. This forces you to plan a path through the bracts, leaves, and stem. A useful path is: start at the top bract tip, trace its left edge to the base, continue down the stem, add one leaf edge, return along the stem, and add the next bract. Keep the line black and even; do not fill areas.
- Draw one blind contour of a single bract on scrap paper without looking down.
- Draw the same bract again while looking at your paper and note two differences.
- On a fresh sheet, draw the full poinsettia in one continuous line without lifting your pen.
- Retrace the stem line to reach each new bract or leaf, keeping the pen on the paper.
- Compare the continuous-line drawing to the reference and circle the three largest edge errors.
Checking Edge Accuracy
Edge accuracy means your drawn line stays close to the reference edge in direction and position. A simple check is to place your drawing beside the reference at the same scale and compare the angle of each bract tip and the width of each leaf base. You can also measure with a ruler: for example, if your reference bract is 6 cm from tip to base, your drawn bract should be close to 6 cm. These numbers are hypothetical; measure your own reference.
Use a consistent convention for line quality: one black line, no shading, no filled areas, and no color. Small gaps at stem junctions are acceptable if they show attachment clearly. Wavy edges are valid for bracts; do not force every edge to be perfectly smooth. The rubric below allows alternative line styles as long as the contour remains readable and the bract-leaf distinction is clear.
- Measure three bract lengths and two leaf widths on your reference with a ruler.
- Measure the same features on your drawing and record the differences.
- Check that each bract tip points outward from the center and each leaf attaches to the stem.
- Confirm that no area is shaded or filled and that all lines are black on white.
Worked example
Draw a single poinsettia bract in contour line using the convention: one black line on white paper, no shading. The reference bract is 6 cm from tip to base and 4 cm wide at its widest point. Describe the line path and how you would check it.
Worked answer
Start at the tip and draw the left edge in one slow line down to the base, allowing a slight wave. From the base, draw the right edge back up to the tip, meeting the first line. Add a short internal line where the bract meets the stem. Check with a ruler: the drawn length should be close to 6 cm and the widest width close to 4 cm. Confirm no area is filled and the line is black on white.
Four practice exercises
Exercise 1
Draw one bract and one leaf side by side in contour line. The reference bract is 5 cm long and 3 cm wide; the leaf is 7 cm long and 2 cm wide. Use one black line per edge and no shading. Describe your line path and check both shapes with a ruler.
Show answer and check
A valid drawing shows a broader bract (about 5 cm by 3 cm) and a narrower leaf (about 7 cm by 2 cm), each outlined with single black lines. The bract tip points outward; the leaf attaches to a short stem segment. No areas are filled.
Why: The task tests shape distinction and measurement. Bracts are broader; leaves are narrower and longer in this example. Using one line per edge keeps the drawing in contour convention.
Check: Measure the drawn bract and leaf with a ruler and compare to 5 cm by 3 cm and 7 cm by 2 cm. Confirm every edge is a single black line and no shading is present.
Exercise 2
Make a blind contour of a single poinsettia leaf without looking at your paper. The reference leaf has a serrated margin and is 8 cm long. After finishing, look at your drawing and write one sentence about where your hand slowed down. Then draw the same leaf again while looking.
Show answer and check
The blind contour will likely be distorted; that is acceptable. The written sentence should identify a specific place, such as the serrated margin or the leaf tip. The second drawing should show a clearer leaf shape with a serrated edge and a length close to 8 cm.
Why: Blind contour trains hand-eye coordination. The comparison between blind and looking versions reveals where the hand relied on memory rather than observation.
Check: Confirm the blind contour was made without looking down, the sentence names a specific edge, and the second drawing has a measurable length near 8 cm with visible serrations.
Exercise 3
Draw a complete poinsettia in one continuous line without lifting your pen. Use three bracts and two leaves. The stem is 10 cm long. Start at the top bract tip and retrace the stem to reach each new part. Check that the pen never leaves the paper and that the stem length is close to 10 cm.
Show answer and check
A valid continuous-line drawing shows three bracts around a center, two leaves below, and a stem of about 10 cm. The line retraces the stem to travel between parts. No shading or filled areas appear.
Why: Continuous-line drawing forces planning and keeps edges connected. Retracing the stem is a valid way to move between parts without lifting the pen.
Check: Verify the pen stayed on the paper for the whole drawing, count three bracts and two leaves, and measure the stem against 10 cm. Confirm the line is black and no areas are filled.
Exercise 4
Compare two contour drawings of the same poinsettia: one with smooth bract edges and one with slightly wavy bract edges. Both use one black line per edge and no shading. The reference bract is 6 cm long. Decide which drawing better matches the reference and explain why, using at least one measurement.
Show answer and check
Either style can be valid if the reference shows slight waves. The better match is the one whose bract length is closer to 6 cm and whose edge character matches the reference. The explanation should cite a measured length and a specific edge feature.
Why: The rubric allows alternative line styles. The decision depends on observed edge character and measured accuracy, not on a single universal smoothness standard.
Check: Measure both drawn bracts against 6 cm, compare edge character to the reference, and confirm both drawings follow the one-line, no-shading convention.
Common mistakes
- Drawing bracts and leaves with the same shape. Compare the reference: bracts are broader and often pointed, while leaves are narrower with lobed or serrated margins. Draw one bract and one leaf side by side before starting the full drawing.
- Lifting the pen repeatedly and leaving disconnected edges. Use the continuous-line method: retrace the stem to travel between parts instead of jumping. If a gap appears, connect it with a short line along the stem.
- Adding shading or filled areas to suggest depth. Keep the drawing pure contour: use only single black lines. Show depth by overlapping edges and by drawing internal lines where one bract crosses another.
- Making every edge perfectly smooth. Allow slight waves on bract edges and small serrations on leaf margins. Check the reference for natural irregularities and reproduce them as simple line changes.
Self-check rubric
- Contour convention: all edges are single black lines on white paper; no shading, filling, or color.
- Bract-leaf distinction: bracts are broader and surround the center; leaves are narrower and attach lower on the stem.
- Edge accuracy: drawn bract lengths and leaf widths are within a reasonable margin of the measured reference; tips point outward.
- Line continuity: edges connect at tips, bases, and stem nodes without unexplained gaps; continuous-line version does not lift the pen.
- Alternative styles allowed: slight waves, small serrations, and minor gaps at stem junctions are acceptable if the contour remains readable.
Questions and answers
Do I need color to show which parts are bracts?
No. Use shape and position: bracts surround the center and are usually broader, while leaves sit lower on the stem and are narrower. Label your reference once, then rely on contour differences.
How long should each contour line be?
Draw each edge in one slow line where possible. If the edge is very long, you may pause at a natural junction such as a stem node, but avoid many short choppy strokes.
What if my blind contour looks nothing like a poinsettia?
That is normal. Blind contour is a practice for hand-eye coordination, not a final drawing. Compare it to your looking version and note where your hand drifted.
Can I use a pen instead of a pencil?
Yes. A black pen makes continuous-line practice clearer because you cannot erase. Use the same convention: one black line on white paper, no shading.