Free original lessons
Contour Line Drawing of a Bonsai Tree: A Focused Outline Study
Learn to draw a bonsai tree using continuous contour lines. This lesson isolates trunk taper, branch edges, and foliage outline without shading or leaf detail.
Free lesson
Four exercises
Worked answers
Object Drawing Lessons
Contour line drawing asks you to trace the visible edge of a form with a single, unbroken line. For a bonsai tree, that means following the trunk's taper, the branching structure, and the outer silhouette of the foliage mass. This study deliberately excludes leaf rendering, pot shading, and proportion construction so you can concentrate on edge quality and line continuity. You will use two classic exercises: blind contour, where you look only at the subject, and slow contour, where you move your pencil at the same pace as your eye. The convention for this lesson is simple: x-height refers to the distance from the baseline to the midline of lowercase letters in any handwritten labels; letter styles vary, so use your own natural handwriting. All measurements are hypothetical examples unless you measure your own equipment.
Practice materials: Printable downloads are not available for this lesson yet. Use the instructions and four exercises below.
Reference illustration
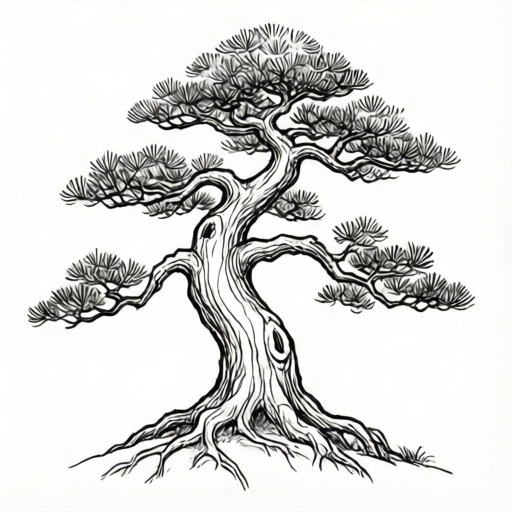
Use the stated measurements and conventions for each exercise.
What Contour Line Means for a Bonsai
A contour line is not an outline of the whole object at once. It is a record of one edge at a time, drawn as if your pencil were touching the surface. For a bonsai, the trunk edge changes direction slowly, then sharply at a branch junction. The foliage outline is a series of bumps and recesses, not a smooth cloud. Your goal is to keep the line continuous and to let it describe the form's changes in direction.
Work on a single sheet with a light pencil. Do not erase during the contour pass. If the line drifts, keep going; the drift is information about where your eye and hand disagreed. The finished drawing may look uneven, but it should show the trunk's taper and the branch edges as connected, readable lines.
- Place your paper so you can see the bonsai reference without turning your head far.
- Choose one starting point on the trunk edge, near the base.
- Begin the line and do not lift the pencil until you reach a natural stopping point, such as the end of a branch.
- Move your eye slowly along the edge and let your pencil follow at the same speed.
Blind Contour: Looking Only at the Tree
Blind contour means you do not look at your paper while drawing. This forces your hand to follow your eye rather than your memory of what a tree should look like. Start at the trunk base and trace upward along one side, then follow the first major branch to its tip. You may draw the foliage outline as a separate continuous line if you need a pause.
Expect the drawing to be distorted. That is normal. The purpose is to train attention, not to produce a polished image. After one blind pass, set the drawing aside and do a second pass while looking at your paper occasionally.
- Cover your paper with a blank sheet or look away from it entirely.
- Fix your eye on the trunk base and begin the line.
- Follow the trunk edge upward, then the branch edge outward.
- Do not lift the pencil until you reach the branch tip or a natural end.
- After finishing, compare the line to the reference and note where your eye jumped ahead.
Slow Contour: Matching Pencil Speed to Eye Speed
Slow contour is the opposite of blind contour in one way: you may glance at your paper, but you must move the pencil no faster than your eye moves along the edge. If your eye takes two seconds to travel one centimeter of trunk edge, your pencil takes two seconds to travel the same distance. This pace reveals small changes in direction that a quick sketch misses.
Use a sharp pencil and a light touch. For the foliage outline, treat each bump as a separate slow segment but keep the line continuous. If the outline doubles back, let the line double back. The result should read as a single edge that wraps around the foliage mass.
- Select a short section of trunk edge, about three centimeters long.
- Move your eye along that section at a steady, slow pace.
- Move the pencil at the same pace, glancing at the paper only to confirm position.
- At the end of the section, pause without lifting the pencil, then continue to the next section.
- Repeat for one branch and the outer foliage outline.
Checking Line Continuity and Edge Quality
A useful check is to trace your drawn line with a finger. Does it follow the trunk taper without sudden jumps? Does it connect to the branch edge at the junction? Does the foliage outline show at least three distinct bumps or recesses? These are simple, checkable criteria. You are not judging beauty; you are judging whether the line records the edge.
Another check is to compare the number of direction changes in your drawing to the reference. Count each place where the line turns noticeably. If your drawing has far fewer turns, you likely smoothed over the form. If it has far more, you may have added imaginary detail. Adjust the next pass accordingly.
- Trace the drawn line with your finger from start to end.
- Mark any place where the line lifts or jumps.
- Count direction changes on the trunk and compare to the reference.
- Check that the foliage outline has at least three bumps or recesses.
- Write one sentence about what your line recorded well.
Worked example
A bonsai reference shows a trunk that tapers from a base width of about four centimeters to a branch junction width of about two centimeters over a vertical distance of ten centimeters. Draw a slow contour line along the left trunk edge from base to junction, then continue along the lower edge of the first branch for five centimeters. Describe the line you would draw and how you would check it.
Worked answer
Start at the base on the left edge. Move your eye upward at a steady pace, letting the pencil follow. The line should curve slightly inward as the trunk narrows from four to two centimeters over ten centimeters. At the junction, do not lift the pencil; turn the line to follow the lower edge of the branch for five centimeters. The line should show a gentle taper and one clear direction change at the junction. To check, trace the line with your finger: it should be continuous from base to branch tip, with no jumps. Count direction changes: at least one at the taper and one at the junction. If the line is smooth with no taper, slow down and repeat.
Four practice exercises
Exercise 1
Draw a blind contour of a bonsai trunk from base to the first branch junction. Do not look at your paper. The reference shows a trunk that leans slightly to the right and narrows from about five centimeters at the base to about three centimeters at the junction over a vertical distance of eight centimeters. After drawing, describe where your line drifted.
Show answer and check
The line should start at the base, move upward with a slight rightward lean, and narrow gradually. Because you did not look at the paper, the line may drift left or right. A valid answer describes at least one drift, such as the line moving too far right near the junction, and notes that the taper was recorded as a gradual inward turn.
Why: Blind contour forces the hand to follow the eye. The drift shows where attention jumped ahead of the pencil. The taper is a slow change in direction, not a sudden step.
Check: Trace the line with a finger. Confirm it is continuous and that it shows at least one direction change consistent with the taper. Compare the described drift to the drawn line.
Exercise 2
Using slow contour, draw the outer foliage outline of a bonsai that has three visible bumps on the left side and two recesses on the right side. Keep the line continuous. The foliage mass is about twelve centimeters wide and eight centimeters tall. After drawing, count the direction changes in your line and compare to the reference description.
Show answer and check
The line should be continuous and show at least five direction changes: three bumps on the left and two recesses on the right. A valid answer counts five or more changes and notes that the line wraps around the foliage mass without lifting. The exact shape may vary, but the count should match the described features.
Why: Slow contour records each bump and recess as a direction change. Counting changes is a simple check that the line followed the edge rather than smoothing it.
Check: Count each noticeable turn in the drawn line. Confirm the count is at least five. Trace the line to confirm continuity.
Exercise 3
Draw a slow contour line along the upper edge of a branch that rises at a shallow angle for six centimeters, then turns downward for four centimeters. The branch thickness is about one centimeter. Do not draw the lower edge. After drawing, check whether the line shows the turn and whether the pencil lifted at the turn.
Show answer and check
The line should rise gently for six centimeters, then turn downward for four centimeters without lifting. A valid answer notes one clear direction change at the turn and confirms the line is continuous. The branch thickness is not drawn because only the upper edge is requested.
Why: The exercise isolates one edge and one direction change. The check is whether the turn is recorded and whether the line stayed continuous.
Check: Trace the line and locate the turn. Confirm the line does not lift at the turn. Measure the two segments with a ruler if needed; they should be about six and four centimeters.
Exercise 4
Combine a trunk edge and a foliage outline in one continuous slow contour line. Start at the trunk base, follow the left trunk edge upward for ten centimeters, then continue into the outer foliage outline with at least two bumps. Do not lift the pencil. After drawing, write one sentence about where the line was hardest to keep continuous.
Show answer and check
The line should start at the base, move upward along the trunk edge, and transition into the foliage outline without lifting. A valid answer identifies a difficult transition, such as the junction between trunk and foliage, and confirms at least two bumps in the foliage section. The sentence should be specific to the drawn line.
Why: Combining two edges tests whether the line can move from a slow taper to a bumpy outline while staying continuous. The written sentence encourages reflection on attention.
Check: Trace the entire line from base to foliage end. Confirm no lifts. Count at least two bumps in the foliage section. Read the sentence and check it refers to a specific point in the drawing.
Common mistakes
- Lifting the pencil at every small change in direction. Keep the line continuous through small turns. Pause without lifting, then continue.
- Drawing the foliage as a smooth cloud instead of following bumps and recesses. Slow down at the foliage outline and record each visible bump as a separate direction change.
- Looking at the paper too often during blind contour. Cover the paper or turn your head away. The distortion is part of the exercise.
- Erasing during the contour pass. Do not erase. Keep the line and note the drift; use a second pass to correct attention.
Self-check rubric
- Line is continuous from start to end with no unintended lifts.
- Trunk edge shows a visible taper from base to branch junction.
- Branch edge connects to the trunk line at the junction without a gap.
- Foliage outline includes at least three distinct bumps or recesses.
- Blind contour pass was completed without looking at the paper.
- Slow contour pass shows pencil speed matched to eye speed, with small direction changes recorded.
- Labels, if any, use the defined x-height convention: baseline to midline of lowercase letters; letter style may vary.
Questions and answers
Do I need to draw the pot?
No. This lesson excludes pot shading and proportion construction. Focus on trunk, branch, and foliage outline only.
How long should each contour pass take?
There is no fixed time. A slow contour pass on one branch may take two to three minutes. Use a pace that lets your pencil match your eye.
Can I use a pen instead of a pencil?
Yes. A pen makes lifting the line visible, which can help you notice breaks. Use whatever tool you have.
What if my blind contour looks nothing like a tree?
That is expected. Blind contour trains attention, not accuracy. Compare where your eye jumped ahead and try again.