Free original lessons
Contour Drawing of a Chess King: Outline Study
Learn to draw a chess king in pure contour line. Focus on crown, collar, and base edges with blind and slow contour exercises.
Free lesson
Four exercises
Worked answers
Object Drawing Lessons
Contour drawing captures an object's outline and key edges without shading or three-dimensional modeling. This lesson uses a chess king piece to train careful observation of its crown, collar, and base. You will work from a described reference, practice blind contour, then slow contour, and finish with four self-contained exercises. All measurements are hypothetical examples; measure your own equipment if you print or draw at a specific size. The goal is a clean, continuous outline that records the piece's silhouette and internal boundary lines where form changes sharply.
Practice materials: Printable downloads are not available for this lesson yet. Use the instructions and four exercises below.
Reference illustration
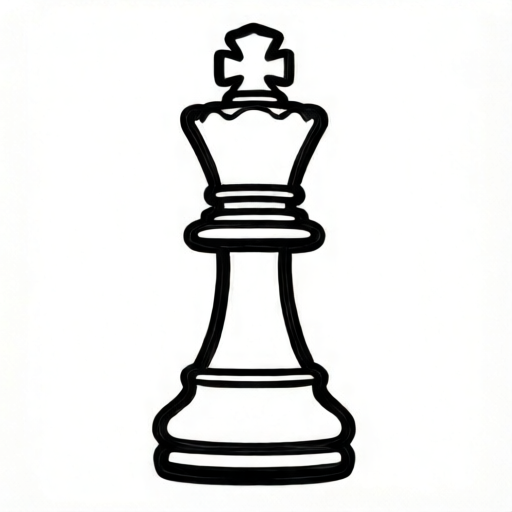
Use the stated measurements and conventions for each exercise.
Understanding Contour and the King's Edges
A contour line marks a boundary where one surface meets another or where the object ends. For a chess king, the outer silhouette includes the crown top, the flared crown sides, the narrow neck, the collar ridge, the tapered body, and the base. Internal contour lines appear where the crown meets the collar, where the collar meets the body, and where the body meets the base. These lines are not shading; they are edges you can trace with a single unbroken stroke.
Work on plain paper with a pencil or fine pen. Keep the line quality consistent: slow, deliberate, and connected. Avoid sketching multiple search lines. If you lift the tool, restart at the same point. The convention for this lesson is that a valid contour includes the outer silhouette plus zero to three internal edge lines (crown-collar, collar-body, base-body); each exercise specifies which internal edges to include. Letter styles and handwriting vary, so your line may be smoother or more angular than another student's; the rubric rewards accurate edge placement and continuity, not a single universal shape.
- Place the king reference at eye level and identify the crown top, crown sides, neck, collar, body, and base.
- Trace the outer silhouette mentally from crown top down one side to the base, then up the other side.
- Identify the three possible internal edge lines where crown meets collar, collar meets body, and body meets base; include only those specified by the exercise.
- Draw the silhouette first with one continuous line, then add internal edges without shading.
Blind Contour: Training the Eye
Blind contour means you look only at the object, not at your paper, while drawing. This exercise builds hand-eye coordination and forces you to notice every change in direction. Before starting, draw a guide rectangle about 10 cm by 15 cm (hypothetical example; adjust to your paper) centered on your page. Then, for the blind contour itself, look only at the object and not at the paper. The rectangle is a rough placement guide, not a strict boundary; because you are not looking at the paper, the line may leave the rectangle, and that is acceptable. Your line may look distorted; that is expected and acceptable. The purpose is observation, not polished output.
Choose a starting point on the crown top. Move your eye slowly along the edge and let your hand follow at the same pace. When the edge turns sharply at the crown flare, your hand should turn. Do not correct the drawing afterward. Keep the line continuous. A valid blind contour records the correct sequence of edges even if proportions drift. The convention allows any line style as long as the crown, collar, and base are represented in order.
- Before starting, draw a guide rectangle about 10 cm by 15 cm (hypothetical example; adjust to your paper) centered on your page.
- Then fix your eyes on the crown top and begin the blind-contour line there without looking down at the paper.
- Follow the silhouette down one side, through the neck, collar, body, and base, then up the other side.
- Add the three internal edges only if you can do so without looking at the paper.
- Stop at the starting point and only then look at the result.
Slow Contour: Refining Edge Placement
Slow contour allows you to glance at the paper while keeping the line continuous and deliberate. Draw a slow-contour rectangle about 10 cm by 15 cm (hypothetical example; adjust to your paper) centered on your page; it is a placement guide, not a strict boundary. This time, check that the crown flare is wider than the neck and that the base is the widest part. For example, if the crown width is about 4 cm and the base width is about 6 cm (hypothetical values), the base should appear wider on your page.
Keep the line unbroken. If you need to reposition, stop and restart at the same point rather than sketching. Add the internal edges as single strokes. Do not shade or add texture. The finished contour should read as a king piece from its silhouette alone. Valid alternatives include a slightly rounded crown or a more angular collar, provided the edge sequence and relative widths are preserved.
- Draw a slow-contour box (a rectangle about 10 cm by 15 cm, hypothetical example; adjust to your paper) and place the king reference beside it.
- Start at the crown top and draw the silhouette with one continuous line, glancing at the paper to check width relationships.
- Add the crown-collar edge, the collar-body edge, and the base-body edge as separate single strokes.
- Compare crown, neck, collar, body, and base widths using simple relative checks (wider, narrower, equal).
- Label nothing on the drawing; keep it pure contour.
Checking Your Contour Without Shading
A contour study is successful when the outline alone communicates the object. Check continuity: can you trace the silhouette from crown top back to crown top without lifting your pencil? Check edge sequence: crown, neck, collar, body, base. Check internal edges: are there no more than three, and do they sit at the correct transitions? Check line quality: are the strokes deliberate rather than scratchy? These checks are simple and do not require shading or 3D form.
Use a ruler only to compare relative widths, not to force exact dimensions. If your crown is 4 cm wide and your base is 6 cm wide, the base should be visibly wider. In the described reference, if your neck is 2 cm wide, it should be narrower than the crown, collar, and body above the base. These are hypothetical examples; measure your own reference if you use one. The rubric below lists what to look for and allows valid stylistic variation.
- Trace the silhouette with your finger to test continuity.
- List the edge sequence aloud: crown top, crown side, neck, collar, body, base, and back up.
- Count internal edges; keep to three or fewer.
- Compare relative widths with a ruler or by eye and note any reversal.
- Confirm no shading, hatching, or 3D modeling is present.
Worked example
Describe how to draw a slow contour of a king with crown width 4 cm, neck width 2 cm, collar width 3 cm, body width 3.5 cm, and base width 6 cm (hypothetical values). Start at the crown top and include three internal edges.
Worked answer
Begin at the crown top center. Draw the crown top as a short curved or angular line about 4 cm wide (shape may vary stylistically). From the left crown edge, draw down and inward to the neck at about 2 cm wide. Continue down to the collar, which is about 3 cm wide. Draw the collar edge as an internal line where it meets the body. Continue the silhouette down the body at about 3.5 cm wide, then flare to the base at about 6 cm wide. Draw the base bottom and up the right side, reversing the sequence. Add the crown-collar internal edge and the base-body internal edge. Keep every line continuous and add no shading.
Four practice exercises
Exercise 1
Draw a blind contour of a king in a blind-contour box about 10 cm by 15 cm (hypothetical example; adjust to your paper). Start at the crown top, follow the silhouette down the left side through neck, collar, body, and base, then up the right side. Do not look at the paper. Include the crown-collar internal edge only if you can do so without looking.
Show answer and check
A continuous line that records the edge sequence crown top, left crown side, neck, collar, body, base, right side, and back to crown top. Distortion and leaving the box are acceptable; the line must be unbroken and unshaded.
Why: Blind contour trains observation by removing visual feedback. The check is sequence and continuity, not proportion.
Check: Trace the line with your finger: does it return to the start without lifting? Does it pass through the named regions in order (crown top, crown side, neck, collar, body, base, and back up the other side)? Is the line unshaded and continuous? Leaving the box is not counted as an error.
Exercise 2
Draw a slow contour of a king with crown width 4 cm, neck width 2 cm, collar width 3 cm, body width 3.5 cm, and base width 6 cm (hypothetical values). Add exactly three internal edges: crown-collar, collar-body, base-body. Keep the silhouette continuous.
Show answer and check
A continuous silhouette with the stated relative widths and three internal edges at the correct transitions. The base is visibly widest, the neck narrowest above the base, and no shading is present.
Why: Slow contour allows checking relative widths while maintaining a single line. The three internal edges mark sharp form changes.
Check: Use a ruler to compare widths: base 6 cm > crown 4 cm > body 3.5 cm > collar 3 cm > neck 2 cm. Count internal edges (three). Confirm no shading.
Exercise 3
A student draws a king contour where the neck is 5 cm wide, the crown is 4 cm wide, and the base is 6 cm wide (hypothetical values). The silhouette is continuous and there are two internal edges. Identify the main error and describe the fix without redrawing the whole piece.
Show answer and check
The neck is wider than the crown, which reverses the expected relationship. Fix by narrowing the neck to less than 4 cm, for example 2 cm, and adjusting the adjacent collar and body lines to meet the new neck width. Keep the silhouette continuous and retain the two internal edges.
Why: Relative width checks catch proportion reversals. The neck should be narrower than the crown in the described reference.
Check: Compare neck and crown widths with a ruler. After the fix, neck should be less than crown, and the line should remain continuous.
Exercise 4
Draw a contour of a king that includes the outer silhouette and exactly two internal edges: crown-collar and base-body. Omit the collar-body edge. Use a continuous line and no shading. State one valid alternative style that would still meet the rubric.
Show answer and check
A continuous silhouette with two internal edges at crown-collar and base-body. A valid alternative is a more angular crown flare or a rounded collar, provided the edge sequence and relative widths are preserved and no shading is added.
Why: The rubric allows stylistic variation in line quality and shape smoothness while requiring correct edge placement and sequence.
Check: Count internal edges (two). Confirm the silhouette is continuous and unshaded. Check that crown, neck, collar, body, and base appear in order and that the base is widest.
Common mistakes
- Sketching many search lines instead of one continuous contour. Restart at the same point and draw slowly; erase or ignore extra lines only after the exercise.
- Adding shading or hatching to suggest form. Remove shading and rely on the silhouette and up to three internal edges.
- Making the neck wider than the crown or base. Check relative widths: neck should be narrower than crown and base in the described reference.
- Omitting the collar edge so the crown merges into the body. Add one internal line where the collar meets the body (the collar-body edge); the crown-collar edge is separate and may already be present.
Self-check rubric
- Silhouette is continuous from crown top back to crown top without lifting the tool.
- Edge sequence includes crown, neck, collar, body, and base in order.
- Zero to three internal edges are present; any present edges sit at crown-collar, collar-body, and/or base-body transitions.
- Relative widths are preserved: neck narrower than crown and base; base widest.
- No shading, hatching, or 3D modeling is used.
- Valid stylistic variation in line smoothness or angularity is accepted if edge placement and sequence are correct.
Questions and answers
Do I need a real chess king to do this lesson?
No. The lesson describes the edges and relative widths so you can draw from the text. If you have a king piece, use it as a reference and measure its actual widths.
Can I use a pen instead of a pencil?
Yes. A pen encourages continuous lines because you cannot erase. Either tool is acceptable under the convention.
How many internal edges should I include?
Up to three: crown-collar, collar-body, and base-body. More than three moves away from a contour study.
Is a distorted blind contour still correct?
Yes, if it records the correct edge sequence and is continuous and unshaded. Leaving the box is acceptable; blind contour prioritizes observation over proportion.