Free original lessons
Zebra Contour Line Drawing: Edge Study Without Stripes
Learn to draw a zebra outline using continuous contour lines. Focus on mane, muzzle, and leg edges while excluding stripe patterns and shading.
Free lesson
Four exercises
Worked answers
Object Drawing Lessons
Contour line drawing isolates the outer and inner edges of a subject without shading or pattern. For a zebra, this means tracing the silhouette and key edge transitions along the mane, muzzle, and legs while deliberately ignoring the stripe pattern. This study builds observational accuracy and line control. You will use a simple convention: a contour line is any line that describes a visible edge or a change in surface direction. Because letter styles and hand pressure vary, no single line weight is universal; instead, you will check continuity and closure at named edge zones. All measurements below are hypothetical examples unless you measure your own paper and pencil. The planned printable is not yet built; this text is self-contained.
Practice materials: Printable downloads are not available for this lesson yet. Use the instructions and four exercises below.
Reference illustration
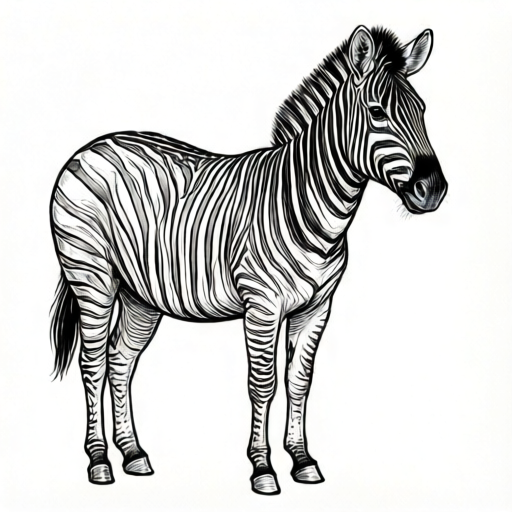
Use the stated measurements and conventions for each exercise.
Defining the contour convention
A contour line follows an edge where the zebra's body meets background or where one body part overlaps another. Do not draw stripes. Do not shade. Treat the mane as a series of overlapping edge curves, the muzzle as a rounded wedge, and each leg as a tapering column with joint transitions.
Use one pencil weight for the main silhouette and a slightly lighter weight for inner edges such as the jawline or shoulder crease. If your pencil cannot vary weight, keep one weight and rely on continuity checks instead. Label any numerical value you choose as a hypothetical example: for instance, a 0.5 mm pencil tip and 120 gsm paper are example choices, not standards.
- Place the reference zebra image or your own observed zebra sketch beside the drawing paper.
- Mark four anchor points: top of mane, tip of muzzle, front hoof edge, and rear hoof edge.
- Draw the back line from mane top to rump in one slow pass, lifting only at the rump.
- Draw the belly line from front leg to rear leg, leaving a gap where the far leg overlaps.
- Add the muzzle edge as a closed curve, then the jawline as an inner contour.
- Draw each leg as two outer edges meeting at the hoof, then add one joint crease per leg.
Edge continuity along mane, muzzle, and legs
Continuity means the line does not jump sideways or stop without a reason. A stop is valid at an overlap, such as where the mane covers the neck edge. A jump is invalid if it breaks the silhouette without an overlap explanation.
Check the mane by tracing from the forehead to the withers: every tuft edge should connect to the next tuft or to the neck line. Check the muzzle by confirming the upper lip curve meets the lower lip curve at the nose tip. Check each leg by confirming the front edge and back edge meet at the hoof without crossing.
- Trace the mane edge with your finger, noting each tuft junction.
- Trace the muzzle outline and mark the nose tip as a single meeting point.
- Trace each leg from body to hoof, confirming two edges converge.
- Circle any gap that is not explained by an overlap.
- Redraw only the circled gap with a single continuous stroke.
Separating contour from stripe pattern
Stripes are surface pattern, not contour. A stripe line that runs across the body without changing the silhouette is excluded from this study. However, a stripe that coincides with a body edge, such as the edge of the mane or the crease at the shoulder, may be used as a contour cue.
To avoid accidental stripe rendering, keep your pencil moving along the outer boundary and named inner edges only. If you find yourself drawing parallel lines inside the body, stop and return to the silhouette.
- List the allowed edges: silhouette, mane tufts, muzzle, jaw, shoulder crease, leg joints, hooves.
- List excluded marks: parallel body stripes, shading hatch, pattern texture.
- Draw the allowed edges first, then compare against the excluded list.
- Erase any excluded mark that does not also describe an edge.
Self-check and revision
A valid contour study can look different from another artist's study because line weight and tuft shape vary. Judge continuity, closure, and edge logic rather than exact resemblance. Use the rubric below to score your own drawing.
Measure your actual paper and pencil before setting any numerical target. For example, if your paper is 15 cm by 20 cm, a hypothetical mane zone of 3 cm is an example only; adjust to your reference.
- Confirm the silhouette closes at all four anchor points.
- Confirm the muzzle is a closed curve with one nose tip meeting point.
- Confirm each leg has two converging edges and one joint crease.
- Confirm no parallel body stripes were drawn.
- Revise one gap and one excluded mark, then recheck.
Worked example
A student draws a zebra silhouette but leaves a 1 cm gap at the muzzle and draws three parallel lines across the neck. Using the convention above, identify the errors and state the fix.
Worked answer
The muzzle gap is an invalid break because no overlap explains it; redraw the upper and lower lip curves to meet at one nose tip point. The three parallel neck lines are stripe pattern, not contour; erase them unless one coincides with the neck edge or shoulder crease. After revision, trace the muzzle with your finger to confirm closure and list the remaining allowed edges.
Four practice exercises
Exercise 1
Draw a zebra contour from memory using only the silhouette and mane tufts. Do not draw stripes. After drawing, mark any gap longer than 5 mm (hypothetical example) and redraw it.
Show answer and check
A valid drawing shows a closed silhouette, continuous mane tufts, and no parallel body stripes. Gaps longer than the chosen threshold are marked and redrawn as single strokes.
Why: The task isolates silhouette and mane continuity, which are the core contour edges. The 5 mm value is a hypothetical example; measure your own paper and adjust.
Check: Trace the silhouette with your finger; confirm no unexplained gap. List all drawn lines and confirm each is an allowed edge.
Exercise 2
Copy a simple zebra side view but omit the muzzle closure. Then redraw only the muzzle so the upper and lower lip curves meet at one nose tip point. Describe how you checked closure.
Show answer and check
The first drawing has an open muzzle. The redrawn muzzle is a closed curve with one meeting point at the nose tip. Closure is checked by finger tracing and by confirming no gap remains.
Why: Muzzle closure is a named edge zone in the convention. A single meeting point prevents ambiguous open contours.
Check: Place your finger at the nose tip and trace both lip curves; they must meet without crossing or stopping short.
Exercise 3
Draw one zebra leg as two outer edges meeting at the hoof, plus one joint crease. Then draw a second leg behind it, stopping the front leg edge where the rear leg overlaps. Explain each stop.
Show answer and check
The front leg has two converging edges and one joint crease. The rear leg is drawn behind, and the front leg edge stops at the overlap. Each stop is explained by the rear leg covering the front leg edge.
Why: Overlap is the only valid reason to stop a contour line without closing a shape. This exercise practices overlap logic.
Check: Confirm each leg has two edges meeting at the hoof. Confirm every stop coincides with an overlap line.
Exercise 4
Take a contour drawing that includes three parallel body stripes. Remove the stripes and replace one with a shoulder crease if it describes an edge. State which lines remain and why.
Show answer and check
The three parallel body stripes are removed because they are pattern, not contour. If one stripe coincides with the shoulder crease, it may remain as an inner contour. The remaining lines are silhouette, mane tufts, muzzle, jaw, shoulder crease, leg joints, and hooves.
Why: The convention excludes stripe pattern but allows a stripe that describes an edge. This exercise tests the boundary between pattern and contour.
Check: List every remaining line and match it to the allowed edge list. Any line not on the list is erased.
Common mistakes
- Drawing parallel stripe lines across the body. Erase any line that does not describe an edge; keep only silhouette, mane tufts, muzzle, jaw, shoulder crease, leg joints, and hooves.
- Leaving the muzzle open at the nose tip. Redraw the upper and lower lip curves so they meet at one point; check with your finger that no gap remains.
- Making leg edges cross at the hoof. Redraw the front and back leg edges so they converge at the hoof without crossing; if they cross, shorten one edge.
- Stopping the mane line without an overlap reason. Connect each tuft edge to the next tuft or to the neck line; only stop where the mane covers the neck edge.
Self-check rubric
- Silhouette closes at all four anchor points: top of mane, muzzle tip, front hoof, rear hoof.
- Mane edge is continuous, with stops only at overlaps.
- Muzzle is a closed curve with one nose tip meeting point.
- Each leg has two converging edges and at least one joint crease.
- No parallel body stripes or shading marks are present.
- Inner contours are limited to jaw, shoulder crease, ear outline, and eye rim.
- Line weight choice is consistent or clearly varied by edge type.
- Revision shows at least one gap corrected and one excluded mark removed.
Questions and answers
Can I use a ruler to check my contour lines?
A ruler can check straight distances between anchor points, but contour lines are curved. Use finger tracing and gap checks instead.
What if my zebra looks different from the reference?
Contour studies allow variation in tuft shape and line weight. Score continuity and closure, not exact resemblance.
Should I draw the eyes and ears?
Yes, if they create an edge. Draw the ear outline and the eye rim as inner contours; do not shade the eye.
How do I know my line weight is correct?
There is no universal weight. Choose one weight for silhouette and one lighter weight for inner edges, or keep one weight and rely on continuity checks.