Free original lessons
Draw Alligator Scute Texture: Edge-to-Edge Armored Plates
Learn to draw thick, ridged alligator scutes with bevel shading and cast shadows. Practice four self-contained tasks using a clear ridge-bevel-shadow convention.
Free lesson
Four exercises
Worked answers
Object Drawing Lessons
Alligator hide reads as armor because its scutes are thick, raised, and packed edge to edge. This lesson teaches a repeatable convention: each scute has a ridge line, a beveled side, and a cast shadow where it meets the next plate. You will draw a back-and-tail hide section on a grid, then shade it so the plates look raised rather than flat. The convention is a drawing aid, not a claim about exact anatomy; valid alternatives are accepted when the ridge, bevel, and shadow logic stays consistent.
Practice materials: Printable downloads are not available for this lesson yet. Use the instructions and four exercises below.
Reference illustration
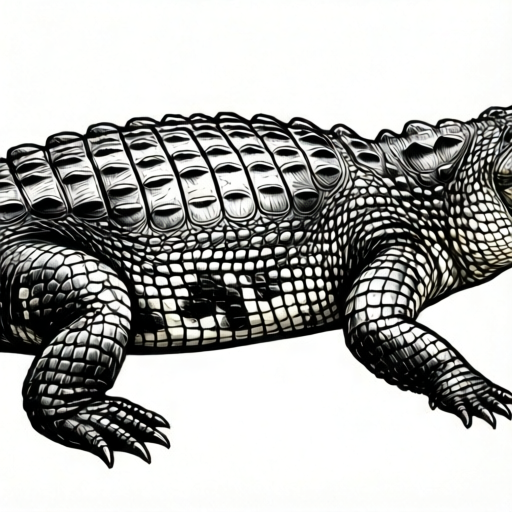
Use the stated measurements and conventions for each exercise.
Set the grid and plate footprint
Begin with a rectangular hide panel. Lightly draw a grid of squares; each square holds one scute. On the back section use wider squares, and on the tail section use narrower squares so the plates appear to shrink toward the tip. Keep the grid lines faint because they are guides, not final edges.
Inside each square, draw a rounded rectangle that nearly fills the cell, leaving a thin gap. The gap becomes the seam between plates. Do not overlap the rounded rectangles; alligator scutes sit edge to edge, so the seam is a narrow channel, not a stack of fish scales.
- Draw a faint grid with wider cells on the back and narrower cells on the tail.
- In each cell, draw a rounded rectangle leaving a thin even gap.
- Mark one long ridge line across each plate, parallel to the body axis.
Add ridge lines and bevel shading
The ridge line is the highest part of the scute. Draw it as a single line running along the plate, then add a short cross-ridge near the front edge if you want a raised bump. Keep ridge lines consistent in direction so the hide reads as one surface.
Shade the bevel on the side away from the light. If light comes from the upper left, the lower right side of each plate gets a soft band of shading. Leave the ridge area light. The bevel should be narrow and even, not a full dark fill.
- Draw one ridge line per plate, parallel to the body axis.
- Choose a light direction and shade the opposite bevel edge.
- Keep the ridge area light and the bevel band narrow.
Cast shadows between plates
Where one plate meets the next, add a thin cast shadow along the seam. The shadow falls on the lower plate, not on the raised plate. This is the key difference from overlapping scales: the shadow is a narrow line in the gap, and the plates do not cover each other.
Darken the seam shadow slightly more at the front edge of each plate and fade it toward the back. This makes the plates look thick and raised. Check that every seam has a shadow on only one side, matching your light direction.
- Draw a thin shadow line in each seam, on the lower plate.
- Fade the shadow toward the back of the plate.
- Confirm all shadows agree with the chosen light direction.
Check the texture as a whole
Step back and look for three things: ridge lines that run consistently, bevel bands on the correct side, and seam shadows that never cross onto the raised plate. If a plate looks flat, the bevel is probably missing or too wide. If the hide looks like fish scales, the plates are overlapping instead of sitting edge to edge.
Valid alternatives include a different light direction, a cross-ridge instead of a single ridge, or a slightly rounded plate shape. Any of these works if the ridge, bevel, and shadow logic stays consistent across the panel.
- Check ridge direction across the whole panel.
- Check that bevel shading matches the light direction.
- Check that seam shadows sit only in the gaps.
Worked example
A hide panel has a 3 by 2 grid of cells, each 2 cm wide and 2 cm tall. Light comes from the upper left. Describe how to place ridge lines, bevel shading, and seam shadows on the six plates.
Worked answer
Draw six rounded rectangles, one per cell, leaving a 2 mm gap. Draw one ridge line across each plate parallel to the long axis. Shade a narrow bevel band on the lower right side of each plate. Place a thin seam shadow in each gap on the lower plate, fading toward the back. Check that all six plates agree with the upper-left light.
Four practice exercises
Exercise 1
A hide panel has a 2 by 2 grid of cells, each 3 cm wide and 3 cm tall. Light comes from the upper right. Describe where the bevel shading and seam shadows go on the four plates.
Show answer and check
Bevel shading goes on the lower left side of each plate. Seam shadows go in the gaps on the lower plate, fading toward the back.
Why: Light from the upper right leaves the lower left in shade, so the bevel band sits there. The seam shadow falls on the lower plate because the raised plate blocks light from above.
Check: Confirm all four plates have bevel shading on the lower left and seam shadows only in the gaps, not on the raised plates.
Exercise 2
A tail section has a 1 by 4 grid of cells. The cell widths are 1.5 cm, 1.2 cm, 1.0 cm, and 0.8 cm from base to tip, and every cell is 1.5 cm tall. Describe how to draw the plates so they appear to shrink toward the tip while keeping the ridge lines consistent.
Show answer and check
Draw one rounded rectangle inside each cell, leaving a thin even gap, so the plates are 1.5 cm, 1.2 cm, 1.0 cm, and 0.8 cm wide from base to tip. Keep one ridge line per plate parallel to the tail axis, and keep the bevel and seam-shadow logic the same on every plate.
Why: The decreasing cell widths already make smaller plates toward the tip, which reads as shrinking. Filling each cell with a plate of matching width preserves the edge-to-edge seam, and consistent ridge direction keeps the hide reading as one surface.
Check: Measure the four plate widths and confirm they decrease from 1.5 cm to 0.8 cm toward the tip; check that every plate has one ridge line in the same direction and a thin gap on all sides.
Exercise 3
A back panel has a 3 by 1 grid of cells, each 2.5 cm wide and 2.5 cm tall. Light comes from directly above. Describe the bevel shading and seam shadows, and explain why the seam shadow is thin.
Show answer and check
Bevel shading goes on the lower side of each plate. Seam shadows sit in the gaps on the lower plate. The seam shadow is thin because the gap is narrow and the plates sit edge to edge.
Why: Light from above shades the lower bevel. The narrow gap limits how wide the cast shadow can be, so it stays a thin line.
Check: Check that bevel shading is on the lower side of all three plates and that seam shadows stay inside the narrow gaps.
Exercise 4
A hide panel has a 2 by 3 grid of cells, each 2 cm wide and 2 cm tall. A classmate drew overlapping plates like fish scales. Describe two changes to fix the drawing using the ridge-bevel-shadow convention.
Show answer and check
First, redraw each plate as a rounded rectangle inside its own cell with a thin gap, removing the overlap. Second, move the seam shadow into the gap on the lower plate and add a narrow bevel band on the side away from the light.
Why: The convention requires edge-to-edge plates with a seam, not stacked scales. Moving the shadow into the gap and adding a bevel restores the raised-plate look.
Check: Confirm no plate crosses into a neighboring cell, every gap has one seam shadow, and every plate has a bevel band on the correct side.
Common mistakes
- Drawing plates that overlap like fish scales. Keep rounded rectangles inside their grid cells with a thin gap; the seam shadow goes in the gap, not over the next plate.
- Filling the whole plate with dark shading. Leave the ridge area light and shade only a narrow bevel band on the side away from the light.
- Using the same cell size on back and tail. Use wider cells on the back and narrower cells on the tail so the plates appear to shrink.
- Putting seam shadows on both sides of a gap. Choose one light direction and place the shadow on the lower plate only.
Self-check rubric
- Plates sit edge to edge with a visible narrow seam and do not overlap.
- Each plate has a ridge line consistent in direction across the panel.
- Bevel shading appears on the side away from the chosen light direction.
- Seam shadows sit in the gaps on the lower plate only.
- Cell size changes from back to tail so plates appear to shrink.
- Valid alternatives such as a different light direction or cross-ridge are accepted if the ridge-bevel-shadow logic stays consistent.
Questions and answers
Do alligator scutes overlap?
In this drawing convention they sit edge to edge with a narrow seam. The seam shadow makes them look raised without stacking one plate over another.
How many ridge lines should each plate have?
One main ridge line is enough. A short cross-ridge is a valid alternative if it stays consistent across the panel.
Can I change the light direction?
Yes. Pick any direction, then keep every bevel and seam shadow consistent with it. The rubric checks consistency, not a single correct direction.
How do I know the texture is finished?
Every plate has a ridge, a bevel on the correct side, and a seam shadow in the gap. Step back and check that no plate looks flat or overlapping.