Free original lessons
Drawing Animals with Ellipse Scaffolds: Body and Head Construction
Learn to build animal forms from overlapping ellipses. Plan body, head, and limb ellipses, check proportions, and avoid common scaffold mistakes.
Free lesson
Four exercises
Worked answers
Object Drawing Lessons
Ellipses are a practical scaffold for animal drawing because they capture volume and proportion before detail. This lesson teaches a repeatable method: place a body ellipse, add a head ellipse, attach limb ellipses, then check alignment and overlap. You will work on a blank grid and use a simple convention for judging ellipse shape: measure each ellipse's major and minor axes (the longest and shortest spans through its center) and record both in the same unit. Treat the convention as a guide rather than a universal standard, since valid alternatives exist. All measurements are checkable with a ruler or by counting grid squares. Numerical values in examples are hypothetical and should be replaced by measurements of your actual paper and tools.
Practice materials: Printable downloads are not available for this lesson yet. Use the instructions and four exercises below.
Reference illustration
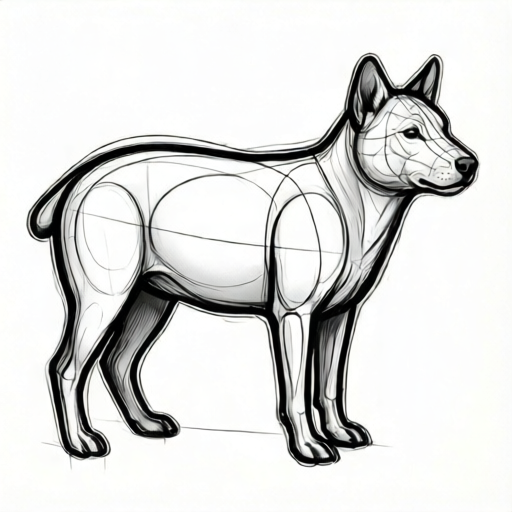
Use the stated measurements and conventions for each exercise.
Why ellipses work as an animal scaffold
An ellipse gives a compact, volumetric shape that can represent a torso, a head, or a limb segment. Overlapping ellipses let you establish relative size and position before committing to contour. The scaffold is not the finished animal; it is a proportion map. Keep the ellipses light and adjustable.
Use a consistent convention: measure each ellipse's major and minor axes (the longest and shortest spans through its center) and record both in the same unit. Two learners may draw different but valid ellipse shapes for the same animal. Judge success by proportion relationships and overlap logic, not by matching one universal outline.
- Draw a light horizontal baseline on your grid.
- Mark each planned ellipse's center and its major and minor axes.
- Sketch the body ellipse first, then the head ellipse, then limb ellipses.
- Check that overlaps read as connected volumes rather than separate shapes.
Placing body, head, and limb ellipses
Start with the largest ellipse as the body. Its long axis usually follows the animal’s forward direction. Place the head ellipse so it overlaps the body by roughly one quarter to one half of the head’s width; this creates a neck connection without a separate neck shape. Limb ellipses should attach at the body edge and point toward the ground or the direction of motion.
Keep the grid visible so you can count squares. For example, if the body ellipse spans 6 squares wide and 4 squares tall, a head ellipse spanning 3 squares wide and 2 squares tall gives a simple 2:1 width relationship. These numbers are hypothetical; measure your own grid and adjust.
- Count grid squares to set the body ellipse width and height.
- Place the head ellipse with a deliberate overlap into the body.
- Add two front and two rear limb ellipses, checking that each attaches at a plausible joint area.
- Adjust any ellipse that makes the animal look unbalanced or disconnected.
Checking proportion and overlap
A useful check is the head-to-body ratio. Measure the widest point of the head ellipse and the widest point of the body ellipse along the same axis. Record both in the same unit, such as grid squares or centimeters. A ratio near 1:2 or 1:3 often reads clearly for a generic animal, but valid alternatives exist depending on the animal type and your chosen style.
Check overlap by tracing the shared boundary. If the head ellipse barely touches the body, the neck will look pinched. If it overlaps too deeply, the head may disappear into the torso. Adjust the overlap until the connection reads as a single form.
- Measure head width and body width in the same unit.
- Write the ratio and compare it to your intended proportion.
- Trace the overlap zone and confirm it reads as a connection.
- Revise one ellipse at a time and re-measure.
From scaffold to animal form
Once the ellipses are placed, refine the outline by connecting tangent points and smoothing transitions. Do not add fur, scales, or feathers in this lesson; those are texture decisions that belong to a later stage. The goal is a clear body-head-limb structure that another person can read as an animal form.
Use the grid to keep units consistent. If you change the body ellipse, re-check the head and limb ellipses against the new measurements. A scaffold is successful when the relationships are intentional and checkable, not when it matches a single ideal drawing.
- Connect the ellipse edges with light tangent lines.
- Erase or lighten internal scaffold lines that are no longer needed.
- Re-measure the head-to-body ratio after any major change.
- Label the ellipse axes on your worksheet for later review.
Worked example
On a grid, draw a body ellipse 6 squares wide and 4 squares tall. Add a head ellipse 3 squares wide and 2 squares tall, overlapping the body by 1 square. Add four limb ellipses each 1 square wide and 2 squares tall. Measure the head-to-body width ratio and check the overlap.
Worked answer
Head width is 3 squares; body width is 6 squares; ratio is 3:6, which simplifies to 1:2. The head overlaps the body by 1 square, which is one third of the head width. The limb ellipses are each half the head width, giving a clear but not oversized limb structure. The scaffold reads as a connected animal form with a measurable proportion.
Four practice exercises
Exercise 1
Draw a body ellipse 8 squares wide and 5 squares tall. Add a head ellipse 4 squares wide and 3 squares tall with a 1-square overlap. Add two front limb ellipses each 1 square wide and 3 squares tall. Measure the head-to-body width ratio.
Show answer and check
Head width 4 squares, body width 8 squares, ratio 4:8 = 1:2. Overlap is 1 square, which is one quarter of the head width.
Why: The ratio is found by comparing widths in the same unit. The overlap is checked against the head width to confirm a deliberate connection.
Check: Count grid squares for each width, write the ratio, and confirm the overlap equals one quarter of the head width.
Exercise 2
A learner draws a body ellipse 10 cm wide and 6 cm tall, and a head ellipse 5 cm wide and 4 cm tall with no overlap. Identify the main scaffold problem and state one fix using the same units.
Show answer and check
The main problem is no overlap between head and body. Fix: move the head ellipse so it overlaps the body by about 1.25 cm, which is one quarter of the 5 cm head width.
Why: Without overlap the neck connection is missing. A quarter-head overlap creates a readable connection while keeping the head distinct.
Check: Measure the overlap in centimeters and confirm it is approximately one quarter of the measured head width.
Exercise 3
Draw a generic animal using three ellipses: one body, one head, and one rear limb. The body is 7 squares wide and 4 squares tall. The head is 3 squares wide and 2 squares tall. The rear limb is 1 square wide and 3 squares tall. Check whether the limb is too wide relative to the head.
Show answer and check
The limb width is 1 square and the head width is 3 squares, so the limb is one third of the head width. This is not too wide; it is a plausible limb proportion for this scaffold.
Why: Comparing limb width to head width gives a simple check. A limb one third of the head width is visually subordinate and does not overpower the head.
Check: Divide limb width by head width using the same unit; confirm the result is a simple fraction such as one third.
Exercise 4
On a grid, place a body ellipse 9 squares wide and 6 squares tall. Place a head ellipse 4 squares wide and 3 squares tall with a 2-square overlap. Add four limb ellipses each 1 square wide and 2 squares tall. Measure the head-to-body width ratio and the overlap as a fraction of head width.
Show answer and check
Head-to-body width ratio is 4:9. Overlap is 2 squares out of a 4-square head width, so the overlap is one half of the head width.
Why: The ratio uses the same unit for both widths. The overlap fraction is found by dividing overlap by head width.
Check: Count squares for head and body widths, write 4:9, then divide overlap 2 by head width 4 to confirm one half.
Common mistakes
- Drawing the head ellipse as a perfect circle regardless of the animal’s orientation. Use an ellipse with a clear long axis that follows the head's direction, and check the major-to-minor axis ratio.
- Leaving no overlap between head and body ellipses. Increase the overlap to roughly one quarter of the head width, then re-check that the connection reads as a neck.
- Making limb ellipses too large relative to the body. Measure limb width and body width in the same unit; reduce limb ellipses until the ratio looks intentional.
- Treating the scaffold as the final outline and adding texture too early. Keep the ellipse stage separate; refine the contour first, then add texture only after the proportion check passes.
Self-check rubric
- Body ellipse is present and clearly the largest shape.
- Head ellipse overlaps the body by a deliberate amount.
- Four limb ellipses attach at plausible joint areas.
- Head-to-body ratio is measured and recorded in consistent units.
- Overlap zone reads as a connection rather than a pinch or merge.
- Scaffold avoids finished texture and species-specific detail.
- Valid alternative ellipse shapes are accepted when proportion and overlap logic are sound.
Questions and answers
Do I need a specific animal to practice this method?
No. A generic animal form works well because the lesson focuses on body, head, and limb ellipses rather than species detail.
How do I know if my ellipse is the right shape?
Measure the ellipse's major and minor axes and compare their ratio to your intended proportion. Compare proportions and overlap logic rather than matching one universal shape.
Can I use centimeters instead of grid squares?
Yes, as long as you use the same unit for every measurement in a check. Record the unit next to each number.
What if my head-to-body ratio is different from the example?
That can be valid. The example ratio is a hypothetical guide; the important thing is that your ratio is intentional and consistent with your chosen animal form.