Free original lessons
Draw Anime Hair Strands with Head-Angle Perspective
Learn to draw anime hair strands that follow head angle, with strand direction, volume, and a printable practice plan.
Free lesson
Four exercises
Worked answers
Object Drawing Lessons
Anime hair reads as believable when strands follow the head's tilt and turn, not when they sit flat on the page. This lesson teaches a simple convention: treat the skull as a sphere, mark the hairline and crown, then draw strands that flow from crown to tips while respecting the head's angle. You will practice front, three-quarter, and tilted views, check strand direction against a guide, and use a rubric that allows valid stylistic alternatives. All measurements are hypothetical examples; measure your own paper and tools before printing or drawing.
Practice materials: Printable downloads are not available for this lesson yet. Use the instructions and four exercises below.
Reference illustration
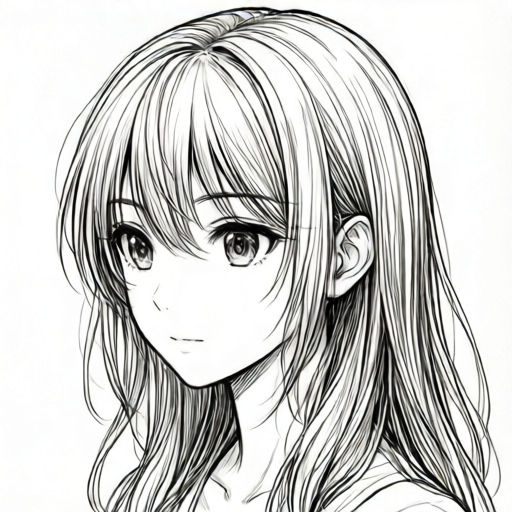
Use the stated measurements and conventions for each exercise.
Set a head-angle frame before drawing hair
Start with a light circle for the cranium and a vertical midline that curves with the head's turn. Mark the crown near the top and the hairline across the forehead. For a front view, the midline is straight and the hairline is a gentle curve. For three-quarter, shift the midline toward the visible side and compress the far side. For a tilted view, rotate the whole frame and let the hairline tilt with it.
Use a consistent unit: for example, let the cranium circle be 6 cm across on your paper. These numbers are hypothetical; measure your actual paper and adjust. Keep the crown-to-hairline distance about one-third of the circle's height. This frame is the anchor for every strand.
- Draw a light circle and mark the crown point.
- Draw the midline according to the head angle.
- Mark the hairline curve across the forehead.
- Label the visible side and far side for three-quarter views.
Direct strands from crown to tips
Every strand begins near the crown or hairline and flows outward. In a front view, strands fan symmetrically left and right, with a few crossing strands for interest. In three-quarter view, strands on the visible side sweep forward and outward, while far-side strands compress and may disappear behind the head. In a tilted view, gravity pulls tips downward, but the roots still follow the skull's curve.
Draw strand direction as a curved arrow from root to tip. Keep strand width varied: some thick clumps, some thin wisps. A useful check is to trace each strand back to the crown or hairline; if it starts nowhere, redraw it.
- Draw three to five guide arrows from crown to intended tip direction.
- Block thick clumps first, then add thin strands between them.
- Check that each strand root touches the crown or hairline.
- Adjust tips so they follow gravity and the head's tilt.
Build volume with layered clumps
Volume comes from overlapping clumps that sit slightly above the skull, not from shading alone. Draw a second layer of strands that starts higher and ends lower than the first. Leave small gaps between clumps to suggest depth. In three-quarter view, the far side should have fewer visible layers because the head blocks them.
Use a simple convention for strand thickness: keep the thickest part near the root and taper toward the tip. Strand styles vary, so treat this as a guide, not a universal rule.
- Draw a base layer of clumps close to the skull.
- Add a top layer that overlaps and extends beyond the base.
- Leave gaps between clumps for depth.
- Taper each clump from root to tip.
Check strand flow against the angle guide
After drawing, compare your strands to the head-angle frame. In front view, left and right flow should balance. In three-quarter, the visible side should have more strand detail. In tilted view, tips should hang downward even if roots curve. If a strand crosses the midline without a reason, redraw it.
Use a ruler to check that the crown-to-hairline distance stays consistent across panels. Measure your actual drawing; do not assume a standard. Label any chosen numbers as hypothetical examples.
- Trace each strand back to its root.
- Compare left and right flow in front view.
- Check visible versus far-side detail in three-quarter view.
- Confirm tips follow gravity in tilted view.
Worked example
A three-quarter head frame has the midline shifted toward the visible side. Draw five hair strands: three on the visible side sweeping forward, two on the far side compressed. Check that each strand root touches the crown or hairline.
Worked answer
Draw the cranium circle and shifted midline. Mark the crown and hairline. On the visible side, draw three curved arrows from crown to forward tips. On the far side, draw two shorter arrows that end near the head edge. Block thick clumps first, then add thin strands. Trace each strand back to its root; all five should connect to the crown or hairline. The far-side strands should be fewer and shorter, showing the head blocks them.
Four practice exercises
Exercise 1
Front view: draw a cranium circle 6 cm across (hypothetical example). Mark the crown and a hairline curve. Draw four strands: two sweeping left, two sweeping right. Check that each root touches the crown or hairline.
Show answer and check
A front-view head frame with four strands, two per side, each rooted at the crown or hairline and fanning outward symmetrically.
Why: Front view uses a straight midline and balanced left-right flow. Roots must connect to the crown or hairline to follow the head.
Check: Trace each strand back to its root. Measure the crown-to-hairline distance and confirm it is consistent. Check left and right strand counts are equal.
Exercise 2
Three-quarter view: draw a head frame with the midline shifted toward the visible side. Draw three visible-side strands sweeping forward and two far-side strands compressed near the head edge. Check that far-side detail is reduced.
Show answer and check
A three-quarter head frame with three forward-sweeping visible-side strands and two shorter far-side strands, all rooted at the crown or hairline.
Why: Three-quarter view compresses the far side. Visible-side strands should show more detail and forward flow.
Check: Count visible versus far-side strands. Trace roots. Confirm far-side strands are shorter and fewer.
Exercise 3
Tilted view: rotate the head frame 20 degrees (hypothetical example). Draw five strands whose roots follow the tilted crown and whose tips hang downward. Check that tips follow gravity.
Show answer and check
A tilted head frame with five strands rooted at the tilted crown or hairline, tips hanging downward despite the tilt.
Why: Tilt changes root direction, but gravity still pulls tips down. Strands should curve from root to downward tip.
Check: Trace each root to the tilted crown or hairline. Check that tips point downward. Measure the tilt angle on your paper.
Exercise 4
Layer check: on any head-angle frame, draw a base layer of three clumps and a top layer of two clumps that overlap and extend beyond the base. Vary clump widths and taper each from root to tip.
Show answer and check
A head-angle frame with a base layer of three clumps and a top layer of two overlapping clumps, varied in width and tapered.
Why: Volume comes from overlapping layers, not shading alone. Varied widths and tapering suggest natural strand thickness.
Check: Count layers and clumps. Check that top-layer clumps extend beyond base clumps. Confirm each clump tapers from root to tip.
Common mistakes
- Drawing strands that start in mid-air instead of at the crown or hairline. Trace each strand back; if it has no root, redraw it from the crown or hairline.
- Keeping the same strand direction in every head angle. Redraw guide arrows after setting the head-angle frame; let the midline and hairline dictate flow.
- Adding too many layers on the far side in three-quarter view. Reduce far-side detail and let the head block some strands.
- Making all clumps the same width. Vary thick clumps and thin wisps; taper each from root to tip.
Self-check rubric
- Each strand root touches the crown or hairline.
- Strand direction matches the head angle: balanced in front, visible-side detail in three-quarter, downward tips in tilted.
- Volume is shown with overlapping clumps and varied widths.
- Far-side detail is reduced in three-quarter view.
- Valid stylistic alternatives are accepted if roots, flow, and volume follow the head angle.
Questions and answers
Do I need to draw the full face first?
No. This lesson focuses on hair strands and head angle. A simple cranium circle, midline, and hairline are enough.
How do I know if my strand direction is correct?
Trace each strand back to the crown or hairline. If it starts nowhere, it is not following the head.
Can I use different strand styles?
Yes. The rubric allows valid alternatives as long as roots, flow, and volume follow the head angle.
What measurements should I use?
Measure your own paper and tools. Any numbers in this lesson are hypothetical examples, not standards.