Free original lessons
Cross-Contour Line Drawing for Portraits: Mapping Facial Surface Form
Learn to draw a portrait using cross-contour lines that wrap across cheeks, nose, and forehead to show three-dimensional facial form without shading.
Free lesson
Four exercises
Worked answers
Object Drawing Lessons
Cross-contour lines are lines that travel across a surface, changing direction to describe its curvature, like lines of latitude on a globe. In portrait drawing, they replace tonal shading as the primary means of conveying form. This lesson teaches you to place and direct cross-contour lines across the cheeks, nose, and forehead so that a viewer can read the roundness, planes, and transitions of a face. You will work from a reference portrait and from direct observation, using a simple convention: each line follows the surface as if a thin string were laid across it, bending where the surface bends and spacing according to how quickly the surface turns away. The goal is not a single correct set of lines but a set that is internally consistent and readable as form.
Practice materials: Printable downloads are not available for this lesson yet. Use the instructions and four exercises below.
Reference illustration
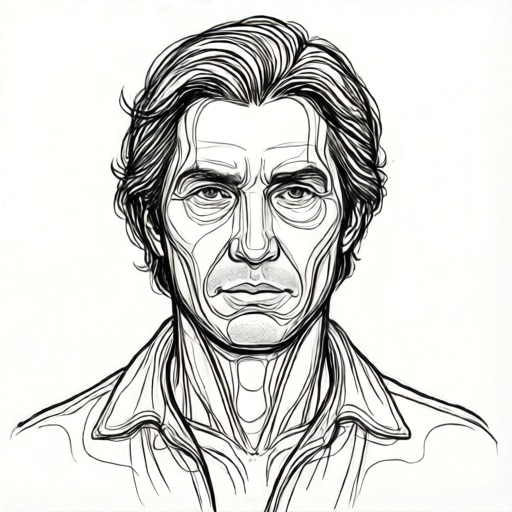
Use the stated measurements and conventions for each exercise.
Understanding cross-contour direction on facial surfaces
A cross-contour line crosses the form rather than outlining its edge. On a cheek, lines typically run roughly horizontally across the cheekbone and then curve downward as the surface turns toward the jaw. On the forehead, lines run horizontally and bow slightly forward over the brow ridge. On the nose, lines wrap around the bridge and flare outward at the nostrils. The direction of each line is determined by the surface it crosses, not by a fixed template.
Spacing carries information. Where the surface turns away quickly, lines appear closer together; where the surface is flatter or faces the viewer, lines spread apart. This is a convention you control deliberately, not a measurement of the real face. Use consistent spacing rules within a single drawing so the viewer can interpret the form.
- Identify three or four major surface zones on the reference: forehead, cheek, nose, and chin or jaw.
- For each zone, trace with your finger the direction in which the surface curves most strongly.
- Draw one test line across each zone, following that curvature, and check whether it reads as wrapping around the form.
- Adjust spacing so that lines bunch where the surface turns away and open where it faces you.
Building a consistent line convention
Choose a convention before drawing: for example, lines run left to right across the face and curve downward at the sides, with spacing decreasing toward the silhouette. State the convention in a corner note so your choices are checkable. Valid alternatives include right-to-left lines, vertical wrapping lines on the cheeks, or mixed directions by zone, provided each zone is internally consistent and the transitions between zones are explained.
Keep line weight even unless you deliberately vary it to indicate a crease or a change of plane. Avoid turning cross-contour lines into outlines: a line should cross the surface, not trace its boundary. Where two zones meet, such as the side of the nose against the cheek, let lines change direction rather than stop abruptly.
- Write your convention in one sentence at the top of the page.
- Draw a light guide line across the forehead, cheek, and nose to test direction before committing.
- Check that no line doubles as an outline of the face or feature.
- Review transitions between zones and redraw any line that stops without explaining the surface change.
Reading form from your own lines
After drawing, step back and ask whether the lines describe a rounded cheek, a projecting nose, and a receding forehead. If a zone looks flat, the lines are probably too evenly spaced or too parallel to the surface edge. If a zone looks distorted, the lines may be changing direction too sharply or crossing in ways that contradict the surface.
Use a simple check: cover the outline of the face and look only at the cross-contour lines. If the form is still readable, the lines are doing their job. This check separates cross-contour drawing from contour outline drawing, which is outside this lesson.
- Cover the face outline with a sheet of paper and assess whether the lines alone suggest form.
- Mark any zone that reads flat and adjust spacing there.
- Mark any zone that reads distorted and smooth the direction changes.
- Compare your convention note with the final drawing to confirm consistency.
Worked example
A reference portrait shows a rounded left cheek, a projecting nose, and a forehead that slopes back slightly. Using the convention that lines run left to right and curve downward at the sides, describe where you would place cross-contour lines on the left cheek and how you would space them.
Worked answer
On the left cheek, draw lines that start near the nose side, run across the cheekbone, and curve downward toward the jaw. Space them moderately apart near the center of the cheek where the surface faces the viewer, and closer together near the outer edge where the cheek turns away toward the ear. Keep the lines crossing the surface rather than outlining the cheek. At the top of the cheek, let lines bend slightly upward to meet the forehead zone, and at the bottom, let them curve toward the jaw. This spacing and direction make the cheek read as rounded without shading.
Four practice exercises
Exercise 1
A reference portrait shows a forehead that bulges forward at the center and recedes at the temples. Using horizontal lines that bow forward over the brow, describe how you would space the lines across the forehead from center to temple.
Show answer and check
Space lines wider apart at the center where the forehead faces the viewer, and closer together toward the temples where the surface turns away. Let each line bow slightly forward at the center and flatten toward the sides.
Why: Wider spacing reads as a surface facing the viewer; closer spacing reads as a surface turning away. The forward bow follows the brow ridge curvature.
Check: Cover the forehead outline and confirm the lines alone suggest a central bulge and receding sides; verify spacing is wider at center than at temples.
Exercise 2
A nose in the reference projects forward, with a rounded bridge and flaring nostrils. Using lines that wrap around the bridge from left to right, describe the direction change at the nostril and how spacing should differ between bridge and nostril.
Show answer and check
Lines wrap across the bridge in a gentle curve, then flare outward and downward at the nostril. Spacing is wider on the bridge where it faces the viewer and closer at the nostril sides where the surface turns away.
Why: The bridge is a forward-facing rounded surface, so wider spacing reads as facing the viewer. The nostril sides turn away, so closer spacing reads as curvature away from the viewer.
Check: Trace one line with a finger to confirm it wraps rather than outlines; check that nostril spacing is tighter than bridge spacing.
Exercise 3
A chin is rounded and projects forward, with a slight crease beneath the lower lip. Using vertical lines that run from the lower lip down across the chin, describe how you would handle the crease and the spacing across the chin.
Show answer and check
Let lines run downward across the chin, curving outward slightly at the sides. At the crease beneath the lower lip, change line direction briefly to follow the indentation, then resume downward. Space lines wider at the front of the chin and closer at the sides where it turns away.
Why: The crease is a change of surface direction, so lines should respond to it rather than ignore it. Wider front spacing and closer side spacing convey the rounded projecting form.
Check: Cover the chin outline and confirm the crease and roundness are readable; verify spacing is wider at front than at sides.
Exercise 4
A right cheek is flatter near the nose and rounds more toward the ear. Using lines that run roughly horizontally and curve downward at the outer edge, describe how spacing should change from nose side to ear side and state your convention in one sentence.
Show answer and check
Convention: lines run horizontally across the cheek and curve downward at the outer edge. Space lines wider near the nose side where the cheek is flatter and closer toward the ear side where it rounds away.
Why: Flatter surfaces facing the viewer get wider spacing; surfaces turning away get closer spacing. The downward curve at the outer edge follows the cheek turning toward the ear.
Check: Confirm the convention sentence matches the drawing; cover the outline and check that the cheek reads flatter near the nose and rounder toward the ear.
Common mistakes
- Drawing cross-contour lines as outlines around the eyes, nose, or lips. Redraw each line so it crosses the surface and changes direction with curvature, rather than tracing a feature boundary.
- Using evenly spaced parallel lines across the whole face. Vary spacing by zone: closer where the surface turns away, wider where it faces the viewer, and state this rule in your convention note.
- Changing line direction randomly between zones without explanation. Write a one-sentence convention and apply it consistently, or explain each zone transition in a short note.
- Treating the lines as shading and darkening them to suggest shadow. Keep line weight even and rely on direction and spacing to convey form; tonal shading is outside this task.
Self-check rubric
- Lines cross surfaces rather than outlining features or the face boundary.
- A stated convention is applied consistently across zones, or zone transitions are explained.
- Spacing varies to indicate surface turning away versus facing the viewer.
- Cheek, nose, and forehead zones are each readable as form when the outline is covered.
- Line weight is even and no tonal shading is used.
- Valid alternative conventions are accepted if internally consistent and explained.
Questions and answers
Do cross-contour lines have to be perfectly parallel?
No. They should follow the surface, so they bend and converge or spread. Consistency of direction and spacing rule matters more than parallelism.
Can I use vertical lines on the cheeks instead of horizontal ones?
Yes, if you state that convention and apply it consistently. Vertical wrapping lines can describe cheek curvature just as well, provided transitions to neighboring zones are explained.
How many lines should I draw?
Enough to make each zone readable, typically five to ten per zone. More lines do not automatically improve form; spacing and direction do.
Is shading allowed?
No. This lesson excludes tonal shading. Use line direction and spacing only.