Free original lessons
Contour Line Chrysanthemum: Petal Steps and Layering
Learn to draw a chrysanthemum in continuous contour line by planning petal layers, edge steps, and overlap order with clear checks.
Free lesson
Four exercises
Worked answers
Object Drawing Lessons
Contour line drawing records the visible edges of a subject without shading or color. A chrysanthemum is a good subject because its many petals create layered edges that step forward and back. This lesson teaches a repeatable sequence: establish the bloom center, place petal layers from back to front, and draw each petal edge as a single continuous line that steps at overlaps. You will use a simple convention for line quality and a rubric that accepts valid stylistic variation. All measurements are hypothetical examples; measure your own paper and tools before drawing.
Practice materials: Printable downloads are not available for this lesson yet. Use the instructions and four exercises below.
Reference illustration
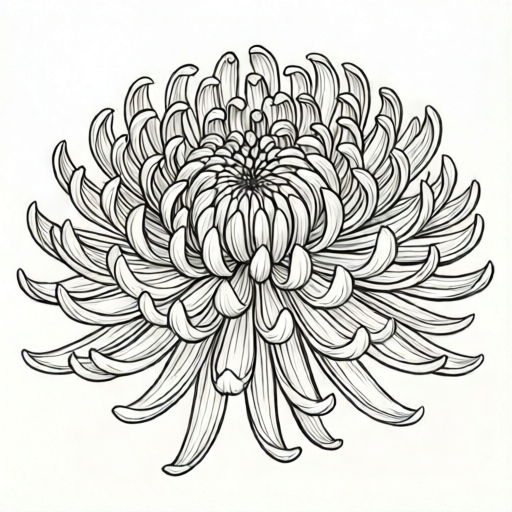
Use the stated measurements and conventions for each exercise.
Set up the page and define the contour convention
Choose a drawing surface and a line tool. Measure the actual paper width and height with a ruler and record the values in the same unit, for example millimetres. Decide a bloom diameter that fits inside the page with a margin; if you choose 120 mm on a 210 mm wide page, the side margins are 45 mm each when centered. These numbers are hypothetical examples, not standards.
Use one continuous contour line per petal edge. A petal edge is the visible boundary between a petal and the space or petal behind it. When two petals overlap, the front petal's edge steps over the back petal's edge. Draw that step as a short change of direction, not a gap. Keep line weight consistent unless you deliberately vary it; the rubric allows either choice if it is consistent.
- Measure the paper and write the width and height in one unit.
- Mark the bloom center with a light dot; check it is at least half the bloom diameter from each edge.
- Draw a faint circle for the outer petal layer boundary using the chosen diameter.
- Decide the order of petal layers from back to front and note it beside the page.
Plan petal layers from back to front
A chrysanthemum bloom can be planned as concentric layers of petals. Start with the outermost layer because its edges are usually the longest and set the bloom's silhouette. Then add inner layers that overlap the outer ones. Each layer should have a consistent petal count; for example, use 12 outer petals, 10 middle petals, and 8 inner petals as a hypothetical plan. The counts are choices, not rules.
Before drawing final lines, sketch light guide marks for each petal's tip and base. A petal tip is the outer end; a petal base is where it meets the bloom center. Check that tips of one layer do not all align on the same radius; stagger them so overlaps occur. Staggering creates the stepped edges that make the contour readable.
- Mark the outer layer petal tips around the outer circle at staggered intervals.
- Draw each outer petal as a continuous edge from base to tip and back to base.
- Mark middle layer tips between outer petal tips so middle petals overlap outer petals.
- Repeat for inner layers, always drawing the front petal edge over the back petal edge.
Draw continuous contour edges with clean steps
Begin at a petal base near the center. Draw one side of the petal to the tip, turn at the tip, and draw the other side back toward the base. When the line meets a petal behind it, step the line over that petal's edge and continue. A clean step has a short segment that crosses the back edge at a clear angle, then resumes the front petal's direction.
Keep the line continuous within each petal edge. If you must lift the tool, end at a natural junction such as a petal base. Check each petal for three features: a base, a tip, and at least one overlap step if it crosses another petal. Petals that do not overlap need no step. Avoid shading, hatching, or color; this task is contour only.
- Draw the outer layer petals first, completing each petal edge before moving to the next.
- Add middle layer petals, stepping over outer petal edges where they overlap.
- Add inner layer petals, stepping over middle and outer edges as needed.
- Check that every overlap shows a step and that no petal edge floats without a base.
Check the bloom and refine without shading
Compare the drawn bloom to your layer plan. Count petals per layer and confirm the counts match your notes. Check that the bloom center is visible and that inner petals converge toward it. Measure the drawn bloom's widest span with a ruler; if your plan was 120 mm, the span should be close to that value within your chosen tolerance, for example plus or minus 5 mm as a hypothetical example.
Refine only contour features: close unintended gaps at petal bases, straighten a step that crosses too slowly, and remove stray marks. Do not add shading to fix confusion; instead, clarify the overlap step. The rubric rewards consistent line convention and readable layering, not a single correct petal shape.
- Count petals in each layer and compare to the plan.
- Measure the bloom span and compare to the planned diameter.
- Trace each overlap to confirm a visible step.
- Erase stray marks and redraw any broken petal base as a continuous edge.
Worked example
On a 200 mm by 250 mm page, plan a chrysanthemum bloom with a 100 mm diameter centered with equal side margins. Use three petal layers with 10 outer, 8 middle, and 6 inner petals. Describe the first three outer petal edges and one overlap step.
Worked answer
Side margins are (200 - 100) / 2 = 50 mm each. Top and bottom margins are (250 - 100) / 2 = 75 mm each when centered vertically. Mark the center at 100 mm from each side and 125 mm from top and bottom. Draw a faint 100 mm diameter circle. Mark 10 outer tips at staggered intervals around the circle. Draw outer petal 1 from its base near the center to its tip and back to the base as one continuous edge. Draw outer petal 2 similarly, and where its edge crosses petal 1's edge, step over petal 1 with a short crossing segment, then continue. Draw outer petal 3, stepping over petal 2 where they overlap. Check that each drawn petal has a base, a tip, and a visible step at each overlap.
Four practice exercises
Exercise 1
A page is 180 mm wide and 240 mm tall. You center a bloom with a 90 mm diameter. Calculate the left and right margins and the top and bottom margins.
Show answer and check
Left and right margins are (180 - 90) / 2 = 45 mm each. Top and bottom margins are (240 - 90) / 2 = 75 mm each.
Why: Subtract the bloom diameter from the page dimension, then divide by two for equal margins on each side.
Check: Add the two side margins to the diameter: 45 + 90 + 45 = 180 mm. Add the two vertical margins: 75 + 90 + 75 = 240 mm.
Exercise 2
You plan 12 outer petals and 9 middle petals. Each middle petal overlaps exactly two outer petals. How many overlap steps are needed for the middle layer?
Show answer and check
9 middle petals times 2 overlaps each = 18 overlap steps.
Why: Multiply the number of middle petals by the number of outer petals each one overlaps.
Check: Divide 18 by 9 to recover 2 overlaps per middle petal, matching the plan.
Exercise 3
A drawn bloom measures 118 mm at its widest span. The planned diameter was 120 mm and the chosen tolerance is plus or minus 5 mm. Is the span within tolerance? Show the difference.
Show answer and check
Yes. The difference is 120 - 118 = 2 mm, which is less than 5 mm.
Why: Subtract the measured span from the planned diameter and compare the absolute difference to the tolerance.
Check: Add the difference to the measured span: 118 + 2 = 120 mm, confirming the planned diameter.
Exercise 4
You draw a front petal edge that crosses a back petal edge. Describe the step in words and state one check that confirms the step is clean.
Show answer and check
Draw the front petal edge until it meets the back petal edge, make a short crossing segment over the back edge at a clear angle, then resume the front petal's direction. A clean step check is that the crossing segment is visible and does not leave a gap or double back.
Why: A step records which petal is in front by crossing the back edge once and continuing the front edge.
Check: Trace the front petal edge from base to tip; confirm exactly one crossing segment at the overlap and no gap at the back edge.
Common mistakes
- Drawing all petal tips on the same circle so petals do not overlap. Stagger tips between layers and draw front petals over back petals with a clear step.
- Lifting the tool in the middle of a petal edge, leaving a gap. Draw each petal edge as one continuous line from base to tip and back, or end only at a petal base.
- Adding shading or hatching to separate petals. Use overlap steps and consistent contour lines instead; remove shading marks.
- Making the bloom too large for the page margin. Measure the paper first and choose a diameter that leaves at least half the diameter from each edge.
Self-check rubric
- Bloom center is marked and the bloom fits within the page margins.
- Petal layers are planned and drawn from back to front with recorded petal counts.
- Each petal edge is a continuous contour line with a base and tip.
- Every overlap between front and back petals shows a clear step.
- No shading, hatching, or color is used; line convention is consistent.
- Bloom span is measured and compared to the planned diameter within a stated tolerance.
Questions and answers
Does every petal need an overlap step?
No. A step is needed only where a front petal edge crosses a back petal edge. Isolated petals need a base and tip but no step.
Can I vary line weight?
Yes, if the variation is consistent and intentional. The rubric accepts either uniform or consistently varied line weight.
How many petals should the bloom have?
Choose counts per layer and record them. The example uses 12 outer, 10 middle, and 8 inner petals as a hypothetical plan; any consistent counts are valid.
What unit should I use for measurements?
Use one unit throughout, such as millimetres. Measure your actual paper and tools; numerical values in this lesson are hypothetical examples.