Free original lessons
Cartoon Drawing: Musician Practicing an Instrument
Learn to draw a cartoon figure practicing an instrument with clear pose construction and hand placement guides, plus practice exercises and a rubric.
Free lesson
Four exercises
Worked answers
Object Drawing Lessons
This lesson teaches you to draw a cartoon figure practicing an instrument, focusing on pose and hand placement. You will use simple shapes to build the body, position the arms, and place hands on the instrument in a believable but stylized way. The approach is flexible: cartoon styles vary, so you will learn a convention for hand placement and a rubric that accepts valid alternatives. No music notation or realistic anatomy is required. All resources are planned and free; they are not yet built, so use the text descriptions to guide your drawing.
Practice materials: Printable downloads are not available for this lesson yet. Use the instructions and four exercises below.
Reference illustration
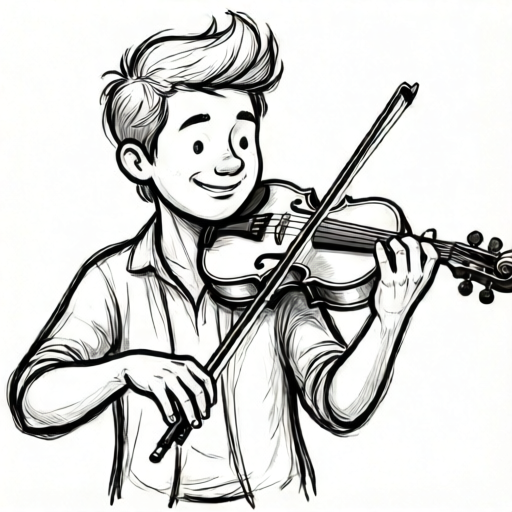
Use the stated measurements and conventions for each exercise.
Pose Construction: From Stick Figure to Cartoon Body
Start with a stick figure to capture the action. For a seated musician, draw a horizontal line for the bench, then a vertical line for the spine, a circle for the head, and lines for arms and legs. The instrument sits in front of the torso. For a standing musician, use a slight lean and bent knees. Keep proportions cartoon-like: a large head, short torso, and simple limbs.
Next, add volume with basic shapes: an oval for the torso, cylinders for arms, and rounded rectangles for legs. The key is to show the relationship between the body and the instrument. The arms should reach toward the instrument without stretching unnaturally. Use overlapping shapes to suggest depth, such as the instrument in front of the torso and the hands on top of the instrument.
- Draw a light stick figure showing the spine, head, arms, and legs in a practicing pose.
- Add an oval torso and cylindrical limbs, keeping the head large for a cartoon look.
- Sketch the instrument as a simple shape (e.g., a box for a keyboard, a circle for a drum) in front of the body.
- Adjust the arm lines so the hands can reach the instrument comfortably.
Hand Placement Convention and Guides
For this lesson, use a simple convention: draw each hand as a rounded mitten shape with a thumb line and three finger lines. The palm faces the instrument. Place the hands where a player would naturally touch: for a keyboard, hands hover above the keys with fingers curved; for a string instrument, one hand holds the neck and the other rests near the body; for a wind instrument, both hands support the instrument near the mouth. These are cartoon conventions, not realistic anatomy.
To guide placement, draw light guide lines on the instrument: a horizontal line for the keyboard, a vertical line for the neck, or a circle for the drum head. Then position the mitten hands so they overlap the guide lines slightly. This shows contact without detailed fingers. You can vary the hand style (e.g., four fingers, three fingers) as long as the placement is clear and consistent.
- Draw the instrument shape and add one or two guide lines where hands will contact.
- Sketch each hand as a mitten with a thumb and three finger lines, palm facing the instrument.
- Place the hands so they overlap the guide lines, showing contact.
- Check that the arms connect naturally to the shoulders and the hands are not floating.
Adding Expression and Details
Expression comes from the face and body language. A slight smile, focused eyes, and a tilted head suggest concentration. The shoulders can be relaxed or slightly raised. Add simple details like a music stand (a rectangle on a stick) or a stool. Keep details minimal so the pose and hands remain the focus.
Use line weight to separate the figure from the instrument. For example, draw the instrument with a slightly thicker outline. Add a shadow under the figure to ground the pose. Remember that cartoon styles vary; you can use bold outlines, simple shapes, or even a more angular style, as long as the hand placement is clear.
- Draw the face with simple eyes, a mouth, and eyebrows to show focus.
- Add a music stand or stool if it helps the scene, using basic shapes.
- Use a thicker outline for the instrument to separate it from the body.
- Add a simple shadow shape under the figure for grounding.
Worked example
Draw a cartoon figure seated at a keyboard, practicing. Use the mitten hand convention and show both hands above the keys.
Worked answer
A seated figure with a large head, oval torso, and cylindrical arms. The keyboard is a rectangle in front of the torso with a horizontal guide line. Both hands are mitten shapes with thumb and three finger lines, placed above the guide line with fingers curved downward. The face shows focus with simple eyes and a slight smile. A stool is drawn as a simple rectangle. The instrument outline is slightly thicker than the body outline.
Four practice exercises
Exercise 1
Draw a cartoon figure standing and playing a drum. The drum is a circle at waist height. Use the mitten hand convention and show both hands on the drum head.
Show answer and check
A standing figure with a large head, oval torso, and cylindrical arms. The drum is a circle in front of the waist with a horizontal guide line across the center. Both hands are mitten shapes with thumb and three finger lines, placed on the drum head overlapping the guide line. The figure has bent knees and a slight lean forward. The face shows concentration.
Why: The standing pose requires bent knees and a lean to show action. The drum circle is placed at waist height so the arms can reach comfortably. The guide line ensures the hands are on the drum head, and the mitten convention keeps the hands simple and consistent.
Check: Verify that the hands overlap the guide line on the drum, the arms connect to the shoulders without stretching, and both hands use the same mitten style.
Exercise 2
Draw a cartoon figure seated and playing a string instrument. The instrument has a rectangular body and a neck (a long rectangle) extending to the left. Show one hand on the neck and one near the body.
Show answer and check
A seated figure on a simple stool. The instrument body is a rectangle in front of the torso, with a neck rectangle extending left. The left hand is a mitten shape placed on the neck, overlapping a vertical guide line. The right hand is a mitten shape near the body of the instrument, overlapping a horizontal guide line. The figure's head is tilted slightly toward the instrument.
Why: The neck and body require different hand placements. The left hand on the neck uses a vertical guide line, while the right hand near the body uses a horizontal guide line. The tilted head suggests focus. The mitten convention is applied consistently.
Check: Check that each hand overlaps its respective guide line, the arms reach naturally, and the hand style is identical for both hands.
Exercise 3
Draw a cartoon figure seated and playing a wind instrument. The instrument is a horizontal rectangle at mouth level. Show both hands supporting the instrument near the mouth.
Show answer and check
A seated figure with a large head. The instrument is a horizontal rectangle positioned at mouth level, with two vertical guide lines where hands will go. Both hands are mitten shapes placed under the instrument, overlapping the guide lines. The figure's cheeks are slightly puffed, and the eyes are focused.
Why: The instrument at mouth level requires hands to support it from below. Vertical guide lines mark the hand positions. The puffed cheeks add expression. The mitten hands are placed consistently.
Check: Verify that the hands are under the instrument and overlap the guide lines, the instrument is at mouth level, and the hand style is consistent.
Exercise 4
Draw a cartoon figure standing and playing a keyboard on a stand. The keyboard is a rectangle at chest height. Show both hands above the keys with fingers curved.
Show answer and check
A standing figure with a slight lean forward. The keyboard is a rectangle on a stand (a simple X shape) at chest height, with a horizontal guide line. Both hands are mitten shapes with fingers curved downward, placed above the guide line. The figure's shoulders are relaxed, and the face shows a smile.
Why: The standing pose with a lean shows engagement. The keyboard at chest height allows the arms to reach comfortably. The curved fingers on the mitten hands suggest playing. The guide line ensures the hands are above the keys.
Check: Check that the hands are above the guide line with curved fingers, the arms reach the keyboard without strain, and the hand style is consistent.
Common mistakes
- Hands floating away from the instrument. Draw guide lines on the instrument and place the mitten hands so they overlap the lines.
- Arms too short or too long to reach the instrument. Adjust the arm length by redrawing the stick figure arm lines before adding volume.
- Instrument covering the entire torso, hiding the pose. Make the instrument smaller or shift it to one side so the body shape is still visible.
- Inconsistent hand style (e.g., one hand with four fingers, one with three). Choose one convention for both hands and apply it consistently.
Self-check rubric
- Pose is readable: the figure clearly sits or stands in a practicing position.
- Hands are placed on or near the instrument using the mitten convention, with clear contact shown by overlapping guide lines.
- Hand style is consistent across both hands (same number of finger lines, same shape).
- Instrument is recognizable and does not obscure the body pose.
- Cartoon style is consistent (e.g., line weight, shape language) and details support the focus on pose and hands.
Questions and answers
Do I need to know how to play the instrument?
No. This lesson focuses on cartoon pose and hand placement, not realistic playing technique. Use the convention described to show contact.
Can I use a different hand style?
Yes. The rubric accepts any consistent hand style as long as the placement on the instrument is clear.
What if my cartoon style is more angular?
That is fine. The key is to show the pose and hand placement clearly. Adjust the shapes to match your style.
How do I check my drawing?
Use the rubric: check that the pose is readable, hands are on the instrument, and the style is consistent.