Free original lessons
How to Draw Chinese Dragon Scales with Overlapping Rows
Learn a clear, repeatable method for drawing Chinese dragon scales using overlapping row construction, with practice panels and self-checks.
Free lesson
Four exercises
Worked answers
Object Drawing Lessons
Chinese dragon scales are often drawn as layered, overlapping rows that suggest depth and movement. This lesson teaches a simple row-by-row construction: establish a baseline, draw a first row of scale shapes, then add subsequent rows so each new scale overlaps the one above it. You will practice spacing, overlap direction, and consistent scale size. The method works on paper with pencil and pen, and it can be adapted to any scale panel size. No special tools are required beyond a pencil, eraser, and ruler for optional guide lines. The focus is on the construction logic, not on dragon anatomy or a complete dragon figure.
Practice materials: Printable downloads are not available for this lesson yet. Use the instructions and four exercises below.
Reference illustration
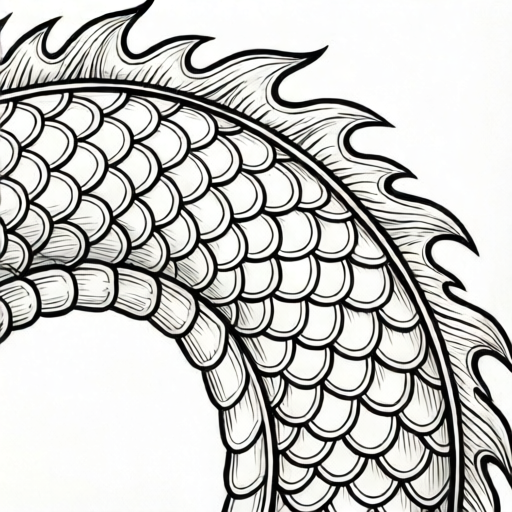
Use the stated measurements and conventions for each exercise.
Set Up a Scale Panel and Baseline
Begin with a rectangular panel. Lightly draw a horizontal baseline near the bottom of the panel; this is where the first row of scales will sit. Decide a scale width, for example 2 cm, and mark evenly spaced points along the baseline. These marks are the centers of the first row of scales. Keep the marks light so they can be erased later.
The baseline is not the bottom edge of each scale; it is a guide for consistent placement. You will draw the first row so that the scales touch the baseline and curve upward. A ruler helps with spacing, but freehand marks are acceptable if they are evenly spaced.
- Draw a light horizontal baseline across the panel.
- Mark evenly spaced points along the baseline at your chosen scale width.
- Label the leftmost point as position 1 and continue numbering to the right.
- Check that the spacing between marks is consistent within about 1 mm.
Draw the First Row of Scales
Each scale is a rounded, fan-like shape. Start at the leftmost mark and draw a curve that rises from the baseline, arcs over, and returns to the baseline at the next mark. The shape should be wider at the baseline and narrower at the top. Repeat for each mark so the first row forms a continuous band of touching scales.
Keep the height of each scale consistent. If your scale width is 2 cm, a height of about 1.5 cm is a reasonable starting proportion. These numbers are hypothetical examples; adjust them to fit your panel. The first row establishes the rhythm for all later rows.
- At mark 1, draw a curve from the baseline up and over to mark 2.
- Close the scale shape by returning to the baseline.
- Repeat for marks 2 to 3, 3 to 4, and so on.
- Check that adjacent scales touch without large gaps.
Add Overlapping Rows
The second row sits above the first. Offset the starting point by half a scale width so the new scales overlap the gaps between the first-row scales. Draw each new scale so its bottom edge crosses over the top of the scale below it. The overlap should be consistent: about one-third of the lower scale's height is a useful guide.
Continue upward with row 3, row 4, and so on, each offset by half a scale width from the row below. The overlap direction should be the same for every row, giving a shingled effect. If a scale looks too large or too small, adjust the next one to restore the rhythm rather than erasing the whole row.
- Mark the starting point for row 2 halfway between the first two marks of row 1.
- Draw row 2 scales so each one overlaps the top of two row-1 scales.
- Repeat for row 3, offsetting by half a scale width again.
- Check that every new scale overlaps the row below by a similar amount.
Refine and Self-Check
Once the rows are drawn, erase the baseline and spacing marks. Darken the final scale outlines with a pen if desired. Check that the overlap direction is consistent, that scale sizes are similar, and that rows are offset by about half a scale width. Small variations are acceptable and can add character.
A useful self-check is to trace one vertical line through the panel and count how many scales it crosses. In a well-constructed panel, the line should cross one scale per row, and the overlap points should form a regular zigzag. If the zigzag is irregular, adjust the spacing of the next row.
- Erase guide marks and baseline.
- Trace a vertical line through the panel and count scale crossings.
- Check that each row is offset by about half a scale width.
- Darken final outlines and review overlap consistency.
Worked example
A student draws a scale panel 12 cm wide. They choose a scale width of 2 cm and draw row 1 with six scales. For row 2, where should the first scale start, and how many scales can fit if the same width is used?
Worked answer
Row 2 should start 1 cm from the left edge, halfway between the first two marks of row 1. With a 2 cm scale width, five full scales fit in row 2, with a half-scale at each end if the panel is filled completely. The overlap should be about one-third of the row-1 scale height.
Four practice exercises
Exercise 1
A panel is 10 cm wide. You choose a scale width of 2.5 cm. How many full scales fit in row 1, and where does row 2 start?
Show answer and check
Four full scales fit in row 1. Row 2 starts 1.25 cm from the left edge, halfway between the first two marks.
Why: Divide panel width by scale width: 10 divided by 2.5 equals 4. Half of 2.5 is 1.25, so the offset for row 2 is 1.25 cm.
Check: Multiply the number of scales by the scale width to confirm the total width, and verify the offset is half the scale width.
Exercise 2
You draw row 1 with scales 3 cm wide and 2 cm tall. You want row 2 to overlap the row below by one-third of the lower scale height. How much vertical overlap should row 2 have?
Show answer and check
Row 2 should overlap by about 0.67 cm, which is one-third of 2 cm.
Why: One-third of 2 cm is 2 divided by 3, approximately 0.67 cm. This is the vertical distance by which row 2 covers row 1.
Check: Measure the overlap on the drawing and compare it to one-third of the row-1 scale height.
Exercise 3
A student draws row 1 with five scales across a 15 cm panel. They then draw row 2 starting at the left edge instead of offsetting it. What problem will this cause, and how can they fix it?
Show answer and check
Row 2 will sit directly above row 1 instead of overlapping the gaps, so the shingled effect is lost. Fix by shifting row 2 to start halfway between the first two marks of row 1.
Why: Overlapping rows require an offset of half a scale width so new scales cover the junctions between lower scales. Starting at the edge aligns scales vertically and removes the overlap pattern.
Check: Trace a vertical line and check that it crosses one scale per row in a zigzag pattern rather than a straight stack.
Exercise 4
You have drawn three rows. A vertical line through the panel crosses row 1 at a scale center, row 2 at a junction between two scales, and row 3 at a scale center. Is the offset consistent? Explain.
Show answer and check
Yes, the offset is consistent. Row 2 is shifted by half a scale width relative to row 1, and row 3 is shifted by half a scale width relative to row 2, returning it to the same alignment as row 1.
Why: Each row is offset by half a scale width from the row below. After two offsets, the alignment repeats every two rows, so row 3 aligns with row 1.
Check: Compare the horizontal position of scale centers in row 1 and row 3; they should match within about 1 mm.
Common mistakes
- Drawing all scales in a single row without overlap. Add a second row offset by half a scale width so each new scale overlaps the one below.
- Making scales too large so only two or three fit across the panel. Reduce scale width and height proportionally, and mark spacing before drawing.
- Changing overlap direction between rows. Choose one overlap direction and apply it to every row; check with a vertical trace line.
- Leaving large gaps between adjacent scales in the same row. Draw each scale to touch the next at the baseline, and check spacing marks before inking.
Self-check rubric
- Rows are offset by approximately half a scale width.
- Each new row overlaps the row below by a consistent amount.
- Scale sizes are similar within each row and across rows.
- Adjacent scales in the same row touch without large gaps.
- Overlap direction is consistent throughout the panel.
- Guide marks are erased and final outlines are clear.
Questions and answers
Do I need a ruler to draw Chinese dragon scales?
A ruler helps with even spacing, but freehand marks are fine if they are consistent. The key is to check spacing before drawing the final outlines.
How much should each row overlap the row below?
A consistent overlap of about one-third of the lower scale's height is a useful guide. The exact amount can vary, but it should be similar across the panel.
Can I use different scale shapes?
Yes. Rounded fan shapes are common, but slightly pointed or lobed shapes can work if the overlap logic and spacing remain consistent.
What if my panel is a different size?
Choose a scale width that fits the panel, mark evenly spaced points, and keep the height proportional. The construction method stays the same.