Free original lessons
Dragon Ball Drawing Practice: Proportion and Pose Fundamentals
Learn to draw Dragon Ball characters with structured proportion guides and pose construction. Practice head-to-body ratios, limb placement, and dynamic stances using simple checkable methods.
Free lesson
Four exercises
Worked answers
Object Drawing Lessons
Drawing Dragon Ball characters convincingly starts with proportion and pose, not fine detail. This lesson breaks down a repeatable method: establish a head unit, build a body ratio, place limbs with joint landmarks, and check your work with simple arithmetic. You will use an explicitly defined convention for head height and letter styles, and a rubric that allows valid stylistic alternatives. All practice tasks are self-contained; any needed diagram is described in text. The planned printable resources are not yet built, but the instructional content here is complete and ready to use.
Practice materials: Printable downloads are not available for this lesson yet. Use the instructions and four exercises below.
Reference illustration
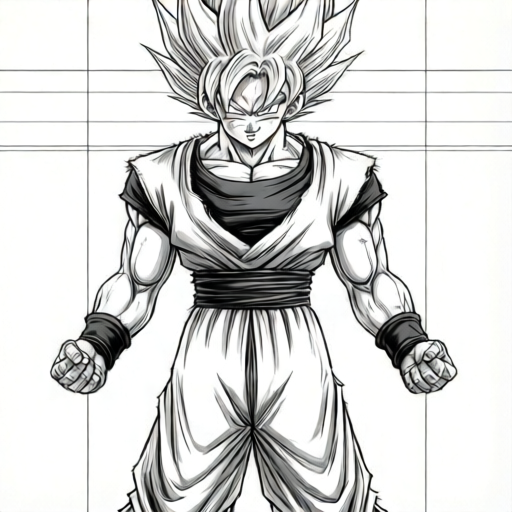
Use the stated measurements and conventions for each exercise.
Head Unit and Body Ratio
Start every Dragon Ball figure by drawing a head unit: a vertical oval from the top of the skull to the chin. Use the baseline-to-midline convention for x-height when placing facial features: the baseline is the bottom of the chin, the midline is halfway up the head oval. Eyes sit near the midline; the mouth sits about one-third up from the baseline. Letter styles vary, so treat these as guides, not rigid rules.
For a typical adult Dragon Ball fighter, use a 7-head body ratio: total height equals 7 head units. Measure your head unit in centimeters or grid squares, then multiply by 7 to set total height. For a shorter or stockier character, use 6 heads; for a taller, leaner character, use 8 heads. Label your chosen ratio and unit clearly on your paper.
- Draw one head oval and label its height as 1 unit (for example, 3 cm).
- Multiply by your chosen ratio (7 units × 3 cm = 21 cm total height).
- Draw a vertical center line for the body, marking 7 equal segments from top to bottom.
- Place the chin at the bottom of segment 1, shoulders near the bottom of segment 2, hips near the bottom of segment 4, knees near segment 6, and feet at segment 7.
Pose Construction with Joint Landmarks
Build poses from simple joint landmarks: shoulders, elbows, wrists, hips, knees, and ankles. Draw a stick figure first, then wrap simple shapes around it. For a dynamic fighting stance, offset the shoulders and hips: if the left shoulder is forward, the right hip is forward. This counter-rotation reads as movement.
Use a line of action: a single curved line from the head through the spine to the supporting foot. Keep the line of action smooth and avoid sharp bends at the waist. Check limb lengths: upper arm and forearm should be roughly equal; thigh and lower leg should be roughly equal. Measure with your head unit or a ruler to confirm.
- Draw the line of action from head to supporting foot.
- Place shoulder and hip landmarks on opposite sides of the line for a twisted stance.
- Add elbow and knee landmarks, keeping upper and lower limb segments equal.
- Wrap cylinders around the stick figure, then add hands and feet as simple blocks.
- Check that the head unit ratio still matches your chosen total height.
Checking Proportion with Simple Arithmetic
After drawing, measure key distances and compare them to your head unit. For a 7-head figure with a 3 cm head unit, total height should be 21 cm. Shoulder width for a muscular fighter is often about 2 head units (6 cm in this example). Hip width is usually about 1.5 head units (4.5 cm). These are hypothetical examples; measure your actual drawing and adjust.
Use a consistent unit throughout. If you switch from centimeters to grid squares, convert first. A simple check: divide total height by head unit height. The result should equal your chosen ratio. If it does not, adjust the legs or torso rather than redrawing the head.
- Measure total height and head unit height with the same ruler.
- Divide total height by head unit height; compare to your chosen ratio.
- Measure shoulder width and hip width; compare to 2 and 1.5 head units.
- Record any differences and adjust the next drawing accordingly.
Style Conventions and Valid Alternatives
Dragon Ball characters have varied hairstyles, clothing, and body types. Use the baseline-to-midline convention for facial feature placement, but allow valid alternatives: eyes may sit slightly above or below the midline if the character's expression requires it. Letter styles vary, so do not force a single handwriting style onto labels or notes.
The rubric rewards clear proportion checks and readable poses, not a single universal answer. A 6-head stocky figure and an 8-head lean figure can both be correct if the internal ratios are consistent and the pose reads clearly. Document your chosen ratio and unit so your work can be checked.
- Choose a ratio (6, 7, or 8 heads) and write it on your paper.
- Label the head unit height and total height in the same unit.
- Place facial features near the midline and baseline, noting any deliberate variation.
- Check that limb segments are roughly equal and the line of action is smooth.
Worked example
A student draws a Dragon Ball fighter with a 4 cm head unit and a total height of 28 cm. They claim a 7-head ratio. Check the ratio and suggest one adjustment.
Worked answer
28 cm ÷ 4 cm = 7, so the ratio is correct. If the shoulders measure 7 cm, that is 1.75 head units, slightly narrow for a muscular fighter; widening shoulders to about 8 cm (2 head units) would improve proportion. Keep the head unit and total height unchanged.
Four practice exercises
Exercise 1
Draw a 6-head Dragon Ball fighter with a 2 cm head unit. Calculate total height, then draw the figure and label shoulder width as 2 head units.
Show answer and check
Total height = 6 × 2 cm = 12 cm. Shoulder width = 2 × 2 cm = 4 cm. The drawing should show a head oval 2 cm tall, total height 12 cm, and shoulders about 4 cm wide.
Why: Multiply the ratio by the head unit to get total height. Shoulder width uses the same head unit, so 2 units × 2 cm = 4 cm.
Check: Measure the drawn head height and total height with the same ruler. Divide total by head to confirm 6. Measure shoulder width and confirm about 4 cm.
Exercise 2
A figure has a 3 cm head unit and total height of 21 cm. The drawn shoulders are 5 cm wide. Is this close to 2 head units? Show the arithmetic.
Show answer and check
2 head units = 2 × 3 cm = 6 cm. The drawn shoulders are 5 cm, which is 5 ÷ 3 ≈ 1.67 head units. This is slightly narrow; widening to about 6 cm would match 2 head units.
Why: Convert the target shoulder width to centimeters using the head unit, then compare the drawn width by dividing by the head unit.
Check: Measure head unit and shoulder width with the same ruler. Divide shoulder width by head unit and compare to 2.
Exercise 3
Describe a dynamic fighting stance in words: line of action, shoulder and hip offset, and limb placement. Then draw it using a 7-head ratio with a 2.5 cm head unit.
Show answer and check
Line of action curves from head to the supporting back foot. Left shoulder is forward, right hip is forward. Front knee is bent, back leg extended. Total height = 7 × 2.5 cm = 17.5 cm. The drawing should show these landmarks and the calculated height.
Why: The pose is built from joint landmarks and counter-rotation. The ratio sets total height by multiplication.
Check: Check that the line of action is smooth, shoulders and hips are offset, and total height measures about 17.5 cm with a 2.5 cm head unit.
Exercise 4
Draw a figure with a 4 cm head unit and total height of 24 cm. Measure your drawn shoulder width and hip width, then state whether they are close to 2 and 1.5 head units.
Show answer and check
Total height ÷ head unit = 24 ÷ 4 = 6, so the ratio is 6 heads. Target shoulder width = 2 × 4 = 8 cm; target hip width = 1.5 × 4 = 6 cm. Compare your measured widths to these targets and note any difference.
Why: The ratio is found by division. Target widths are found by multiplying the head unit by the standard multipliers.
Check: Measure head unit, total height, shoulder width, and hip width with one ruler. Confirm 24 ÷ 4 = 6, then compare widths to 8 cm and 6 cm.
Common mistakes
- Drawing the head last and forcing the body to fit it. Draw the head unit first, set the total height by multiplication, then build the body downward.
- Using different units for head height and total height. Convert all measurements to one unit before dividing or multiplying.
- Making the line of action bend sharply at the waist. Redraw the line of action as a smooth curve from head to supporting foot before adding limbs.
- Placing both shoulders and hips on the same side in a dynamic pose. Offset shoulders and hips in opposite directions to create counter-rotation.
Self-check rubric
- Head unit is clearly drawn and labeled with a unit of measurement.
- Total height equals the chosen ratio multiplied by the head unit height.
- Shoulder and hip widths are measured and compared to head units.
- Line of action is smooth from head to supporting foot.
- Shoulders and hips are offset in dynamic poses.
- Limb segments are roughly equal and measured in the same unit.
- Facial features follow the baseline-to-midline convention or a noted valid alternative.
- Work includes a written ratio and unit for checking.
Questions and answers
What head ratio should I use for a beginner Dragon Ball figure?
Start with 7 heads for a typical adult fighter. Use 6 for stockier characters and 8 for taller, leaner ones. Write your chosen ratio on the paper so you can check it later.
How do I check my proportion without a ruler?
Use a strip of paper or a grid. Mark the head unit on the strip, then see how many times it fits into the total height. The count should match your chosen ratio.
Can I vary facial feature placement?
Yes. The baseline-to-midline convention is a guide. Eyes may sit slightly above or below the midline for expression, as long as you note the variation and keep the overall head unit consistent.
What if my limb segments are not equal?
Adjust the shorter segment rather than redrawing the whole figure. Keep upper arm and forearm roughly equal, and thigh and lower leg roughly equal, measured in the same unit.