Free original lessons
Drawing Eyes on a Three-Quarter Face Grid: Offset Iris Alignment
Learn to place eyes and brows on a three-quarter face grid, align offset irises, and check placement with simple measurements and a clear convention.
Free lesson
Four exercises
Worked answers
Object Drawing Lessons
A three-quarter face turns the head so one side is foreshortened. The eyes are not mirror images: the far eye sits closer to the nose line, the near eye has more width, and the irises shift toward the turn. This lesson uses a simple grid convention: a vertical center line, a horizontal brow line, a horizontal eye line, and two vertical eye-zone guides. You will place eye shapes, set brow-to-eye spacing, and offset irises so the gaze reads consistently. All measurements are relative to the grid you draw, not to any printer or hardware standard. Use a ruler on your own paper and label any example numbers as hypothetical.
Practice materials: Printable downloads are not available for this lesson yet. Use the instructions and four exercises below.
Reference illustration
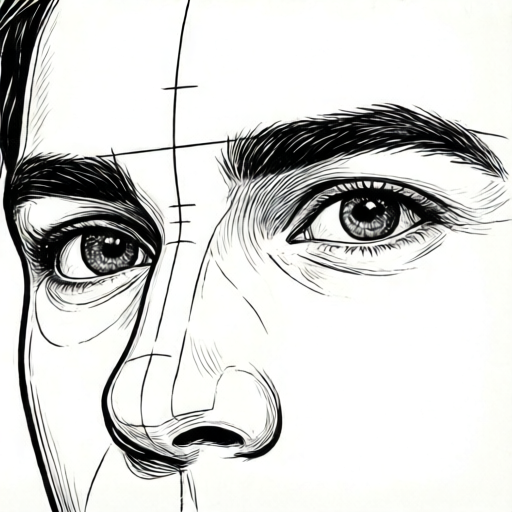
Use the stated measurements and conventions for each exercise.
Build the three-quarter grid convention
Draw a rectangle for the head. Mark a vertical center line. Because the head turns, the face features shift toward the far side; the center line represents the nose bridge, not the middle of the paper. Add a horizontal brow line and a horizontal eye line below it. The gap between brow line and eye line is the brow-to-eye spacing. Add two vertical guides: one for the near eye zone and one for the far eye zone. The far zone is narrower because of foreshortening.
Define your convention before drawing: eye line is the baseline of the eye shape; midline is the top of the iris; iris center sits halfway between baseline and midline unless you choose a different rule. Write the rule at the top of your page so every check uses the same definition. Letter styles and eye shapes vary, so the convention is about relative placement, not a single correct outline.
- Draw a rectangle and a vertical center line shifted toward the far side.
- Add a brow line and an eye line; measure and record the gap in millimeters.
- Add a narrow far eye zone and a wider near eye zone, both centered on the eye line.
- Write your iris convention: baseline, midline, and iris center rule.
Place eye shapes and brow-to-eye spacing
On the eye line, mark the near eye zone from the center line outward. The near eye is wider than the far eye. The far eye zone begins near the center line and ends before the far edge of the face. Keep both eye shapes sitting on the same eye line; the baseline is the shared reference. Brows sit above the eye line at the brow-to-eye gap you recorded. The near brow can be slightly higher or more angled, but the gap should stay within a small tolerance you choose, for example plus or minus two millimeters on your own drawing.
Check symmetry of spacing, not shape. Measure from brow line to eye line at three points: near inner corner, near outer corner, far inner corner. If the gaps differ by more than your tolerance, adjust the brow line or eye line, not the whole face.
- Mark near and far eye zones on the eye line using your recorded widths.
- Draw eye shapes with baselines on the eye line.
- Place brows at the recorded brow-to-eye gap.
- Measure three gap points and compare with your tolerance.
Offset the irises for a consistent gaze
In a three-quarter view, the irises shift toward the direction of the turn. If the face turns left, both irises move left within their eye shapes. The far iris may be partly hidden by the far eye corner, and the near iris shows more white on one side. Use the iris center rule you wrote: center the iris horizontally within each eye zone, then shift both by the same offset. A hypothetical example offset is three millimeters on a drawing where the near eye zone is twenty millimeters wide; label it as hypothetical and measure your own zones.
Check alignment by drawing a light line through both iris centers. The line should be parallel to the eye line, not tilted. If one iris sits higher, move it down to the shared midline rule. Valid alternatives include a slight tilt for a natural gaze, but the tilt must be intentional and consistent with the head turn.
- Mark iris centers using your convention.
- Shift both irises by the same offset toward the turn.
- Draw a light line through both centers and compare with the eye line.
- Adjust any iris that breaks the midline rule.
Annotate and self-check the grid
Label the center line, brow line, eye line, near zone, far zone, and iris centers. Write the measured brow-to-eye gap and the iris offset. Use a simple rubric: all features on the eye line, brows within tolerance, irises offset in the same direction, and the iris-center line parallel to the eye line. Because eye shapes and letter styles vary, accept any outline that follows the convention and passes the measurements.
Keep a separate answer sheet for practice grids. The answer sheet lists the convention, the measured values, and the check results, not a single traced outline. This lets different valid eye shapes be checked against the same placement rules.
- Label all grid lines and zones.
- Record brow-to-eye gap and iris offset.
- Run the four rubric checks.
- Note any adjustment and re-measure.
Worked example
A grid has a brow line at 40 mm from the top and an eye line at 52 mm. The near eye zone is 22 mm wide and the far eye zone is 14 mm wide. The chosen iris offset is 3 mm toward the left turn. Describe where to place the brows, eye shapes, and irises, and state one check.
Worked answer
Brow-to-eye gap is 12 mm. Place brows 12 mm above the eye line, within a chosen tolerance such as plus or minus 2 mm. Draw the near eye shape 22 mm wide with its baseline on the eye line; draw the far eye shape 14 mm wide on the same line. Mark iris centers using the midline rule, then shift both 3 mm left. Check that a line through both iris centers is parallel to the eye line and that the three brow-to-eye gap measurements are within tolerance.
Four practice exercises
Exercise 1
A grid has a brow line at 30 mm and an eye line at 44 mm. The near eye zone is 20 mm wide and the far zone is 12 mm wide. State the brow-to-eye gap and describe the eye shape placement.
Show answer and check
Gap is 14 mm. Place brows 14 mm above the eye line. Draw the near eye 20 mm wide and the far eye 12 mm wide, both with baselines on the eye line.
Why: Subtract the brow line value from the eye line value: 44 minus 30 equals 14 mm. Use the recorded zone widths and keep both baselines on the shared eye line.
Check: Re-measure the gap at the near inner corner, near outer corner, and far inner corner; each should be 14 mm within your tolerance.
Exercise 2
On a left-turning face, the near eye zone is 24 mm wide and the far zone is 16 mm wide. The iris offset is 4 mm left. Describe the iris placement and one alignment check.
Show answer and check
Place both iris centers using the midline rule, then shift both 4 mm left. Check that a line through the two centers is parallel to the eye line.
Why: Both irises must shift in the same direction by the same offset. The alignment check confirms the centers share a consistent height.
Check: Draw a light line through both iris centers and compare its distance from the eye line at each end; the distances should match within tolerance.
Exercise 3
A drawing shows the near brow 10 mm above the eye line and the far brow 16 mm above it. The chosen tolerance is plus or minus 2 mm. Is the placement acceptable, and what should change?
Show answer and check
No. The far brow is 6 mm higher than the near brow, which exceeds the 2 mm tolerance. Move the far brow down so both gaps are within 2 mm of the recorded value.
Why: Compare the two gaps: 16 minus 10 equals 6 mm, greater than the allowed 2 mm difference. Adjust the brow line rather than the eye line.
Check: Re-measure both gaps after adjustment and confirm the difference is 2 mm or less.
Exercise 4
A grid has an eye line at 50 mm from the top, a brow line at 38 mm, and a midline (top of iris) at 44 mm. The iris centers are marked at 44 mm and 47 mm from the top. Using the midline rule, which iris breaks the convention and how do you fix it?
Show answer and check
The iris at 44 mm breaks the convention. Under the midline rule the iris center is halfway between the eye line and the midline: (50 + 44) / 2 = 47 mm. Move the 44 mm iris up to 47 mm so both centers match, then re-check the iris-center line.
Why: The eye line is the baseline at 50 mm and the midline is at 44 mm, so the rule places the iris center at (50 + 44) / 2 = 47 mm. The iris marked at 47 mm already follows the rule; the one at 44 mm sits 3 mm too low and must move up to 47 mm.
Check: Measure each iris center from the eye line and confirm both are 3 mm above the eye line (50 minus 47 equals 3 mm), matching within your tolerance.
Common mistakes
- Making both eyes the same width on a three-quarter face. Narrow the far eye zone and keep the near eye wider; measure both zones on the eye line.
- Offsetting only one iris toward the turn. Shift both irises by the same offset and check the iris-center line.
- Placing brows without measuring the brow-to-eye gap. Record the gap at three points and keep each within your chosen tolerance.
- Tilting the iris-center line without intending a gaze change. Keep the line parallel to the eye line unless a deliberate tilt is part of the convention.
Self-check rubric
- Both eye baselines sit on the eye line.
- Near eye zone is wider than far eye zone, and both widths are recorded.
- Brow-to-eye gap is measured at three points and stays within the chosen tolerance.
- Both irises are offset in the same direction by the recorded amount.
- The iris-center line is parallel to the eye line unless a deliberate tilt is stated.
- Labels and convention notes are present and consistent.
Questions and answers
Do I need a printed grid?
No. Draw the rectangle, center line, brow line, eye line, and two eye zones on any paper. Measure with a ruler and record your own values.
How wide should the far eye zone be?
There is no universal ratio. Choose a width that looks foreshortened, record it, and keep the near zone wider. Label any example number as hypothetical.
Can the irises tilt?
Yes, if the tilt is intentional and consistent with the gaze. Otherwise keep the iris-center line parallel to the eye line.
What if my eye shapes differ from the example?
That is valid. The rubric checks placement and alignment, not a single outline. Keep baselines on the eye line and follow your written convention.