Free original lessons
How to Draw a Face Using a Vertical Line of Symmetry
Learn to place paired facial features evenly around a central vertical axis, with a clear convention, worked example, practice tasks, and a fair rubric.
Free lesson
Four exercises
Worked answers
Object Drawing Lessons
A vertical line of symmetry is a single straight line down the middle of a face. If you place each paired feature the same distance from that line on both sides, the face looks balanced. This guide teaches a simple, checkable convention: measure distances from the central axis, not from the outer edge of the head. Letter styles and feature shapes vary, so the goal is even placement, not one universal face. All measurements below are hypothetical examples; measure your own paper and tools.
Practice materials: Printable downloads are not available for this lesson yet. Use the instructions and four exercises below.
Reference illustration
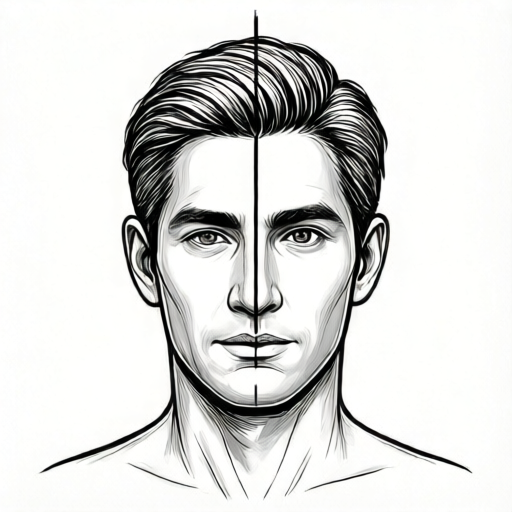
Use the stated measurements and conventions for each exercise.
Set the axis and the head outline
Draw a light vertical line down the center of your page. This is the symmetry axis. Mark a top point and a chin point on the axis, then sketch an oval head around it so the axis passes through the middle of the oval. Keep the axis visible until the end.
Check the outline by folding the paper gently along the axis or by holding a ruler on the line and comparing left and right widths at three heights: forehead, cheek, and jaw. Small differences are normal in hand drawing; aim for close, not perfect.
- Draw a vertical axis about 12 cm long on plain paper.
- Mark a top point and a chin point on the axis.
- Sketch an oval head centered on the axis.
- Compare left and right widths at forehead, cheek, and jaw.
Place paired features by equal distance from the axis
Use a ruler to measure horizontally from the axis to each feature. For the eyes, choose a distance such as 2 cm from the axis on the left, then mark 2 cm on the right at the same height. The same rule applies to ears, eyebrows, and the outer corners of the mouth.
Feature shapes may differ slightly, and that is acceptable. The convention is equal horizontal distance from the axis at matching heights. Record your chosen distances so you can repeat them.
- Choose a height for the eyes and mark it on the axis.
- Measure 2 cm left and 2 cm right from the axis at that height.
- Draw each eye centered on its mark.
- Repeat for eyebrows, ears, and mouth corners using recorded distances.
Check symmetry with simple arithmetic
For each pair, subtract the left distance from the right distance. A result of 0 means the pair is evenly placed. If the result is not 0, move the farther mark toward the axis by half the difference.
Example: left eye is 2.4 cm from the axis and right eye is 1.8 cm. The difference is 0.6 cm. Move the right mark 0.3 cm farther from the axis, or move the left mark 0.3 cm closer, then re-measure.
- Measure each feature's horizontal distance from the axis.
- Subtract the smaller distance from the larger.
- Adjust the farther mark by half the difference.
- Re-measure and record the final distances.
Finish without erasing the axis too early
Add the nose on the axis, since it is a single central feature. Add hair and other details only after paired features are placed. Keep the axis light so it can be erased or left as a construction line.
A finished drawing is acceptable when paired features are within a small tolerance you set, such as 0.2 cm, and the head outline is roughly balanced. State your tolerance before checking.
- Draw the nose centered on the axis.
- Add hair and details after paired features are set.
- Set a tolerance, for example 0.2 cm.
- Check each pair and note any that exceed the tolerance.
Worked example
A student draws an axis 12 cm long. The left eye is 2.5 cm from the axis and the right eye is 2.1 cm from the axis at the same height. The left ear is 3.0 cm from the axis and the right ear is 3.0 cm. The mouth corners are 1.5 cm left and 1.5 cm right. Which pair needs adjustment, and by how much?
Worked answer
The eyes need adjustment. The difference is 2.5 minus 2.1 equals 0.4 cm. Move the right eye 0.2 cm farther from the axis, or move the left eye 0.2 cm closer. The ears and mouth corners are already even.
Four practice exercises
Exercise 1
On a 10 cm axis, the left eyebrow is 1.8 cm from the axis and the right eyebrow is 2.2 cm at the same height. What is the difference, and what adjustment makes them even?
Show answer and check
The difference is 0.4 cm. Move the right eyebrow 0.2 cm closer to the axis, or move the left eyebrow 0.2 cm farther from the axis.
Why: Subtract the smaller distance from the larger: 2.2 minus 1.8 equals 0.4. Half of 0.4 is 0.2, so adjust one mark by 0.2 cm.
Check: Re-measure both distances after adjustment; they should differ by 0 cm or within your chosen tolerance.
Exercise 2
A face outline is drawn on a 14 cm axis. The left ear is 3.4 cm from the axis and the right ear is 3.4 cm. The left mouth corner is 1.2 cm and the right mouth corner is 1.6 cm. Which pair is even, and which needs work?
Show answer and check
The ears are even. The mouth corners need work: the difference is 0.4 cm, so move the right corner 0.2 cm closer to the axis or the left corner 0.2 cm farther out.
Why: Equal distances mean the ears are even. For the mouth, 1.6 minus 1.2 equals 0.4, and half is 0.2.
Check: Measure each pair from the axis and subtract; the ear result should be 0 and the mouth result should be 0 after adjustment.
Exercise 3
You set a tolerance of 0.2 cm. The left eye is 2.0 cm from the axis and the right eye is 2.15 cm. Is the pair within tolerance? Explain.
Show answer and check
Yes. The difference is 0.15 cm, which is less than the 0.2 cm tolerance.
Why: Subtract 2.0 from 2.15 to get 0.15. Compare 0.15 with the tolerance 0.2.
Check: Re-measure both distances and confirm the difference is 0.15 cm or less.
Exercise 4
A student measures the left eye 2.3 cm from the outer edge of the head and the right eye 2.3 cm from the outer edge. The head is wider on the left. Will the eyes be evenly placed around the axis? Explain using distances from the axis.
Show answer and check
Not necessarily. Equal distances from the outer edge do not guarantee equal distances from the axis when the head widths differ. Measure from the axis instead.
Why: The axis is the reference line. If the left side of the head is wider, a 2.3 cm edge measurement on the left may be farther from the axis than a 2.3 cm edge measurement on the right.
Check: Measure each eye from the axis, subtract the smaller distance from the larger, and compare with your tolerance.
Common mistakes
- Measuring from the outer edge of the head instead of the central axis. Place the ruler zero on the axis and measure outward to each feature.
- Placing features at different heights on each side. Mark the height on the axis first, then measure left and right at that same height.
- Erasing the axis before checking pairs. Keep the axis visible until all paired features are measured and adjusted.
- Expecting identical feature shapes on both sides. Check equal distance and matching height; allow small shape differences.
Self-check rubric
- Axis is drawn as a single vertical line through the head outline.
- Each paired feature is measured horizontally from the axis, not from the outer edge.
- Paired features are at matching heights within the stated tolerance.
- Horizontal distances for each pair differ by no more than the stated tolerance.
- The nose is centered on the axis.
- Feature shapes may vary; even placement is the main criterion.
Questions and answers
Does every face have perfect symmetry?
No. Real faces are often slightly asymmetrical. This task teaches even placement around an axis, not a claim that all faces are perfectly symmetrical.
What counts as a paired feature?
Eyes, eyebrows, ears, and the outer corners of the mouth are paired. The nose is central and sits on the axis.
How close is close enough?
Choose a tolerance before checking, such as 0.2 cm for a 12 cm axis. Record it and apply it consistently.
Can I use different eye shapes on each side?
Yes, if the horizontal distance from the axis and the height match within your tolerance.