Free original lessons
High-Angle Female Figure Drawing: Foreshortening and Head Tilt
Learn to draw a female figure from above using foreshortening and head-tilt guides. Includes a worked example, practice tasks, and a validation plan for future resources.
Free lesson
Four exercises
Worked answers
Object Drawing Lessons
Drawing a female figure from a high angle means showing the body as it recedes downward from the viewer's eye. The head appears large and tilted, the torso shortens, and the legs taper. This lesson teaches a repeatable method using simple landmarks and a defined convention for line placement. You will practice foreshortening and head tilt without relying on standard proportion drills. All measurements are hypothetical examples; always measure your own reference or model.
Practice materials: Printable downloads are not available for this lesson yet. Use the instructions and four exercises below.
Reference illustration
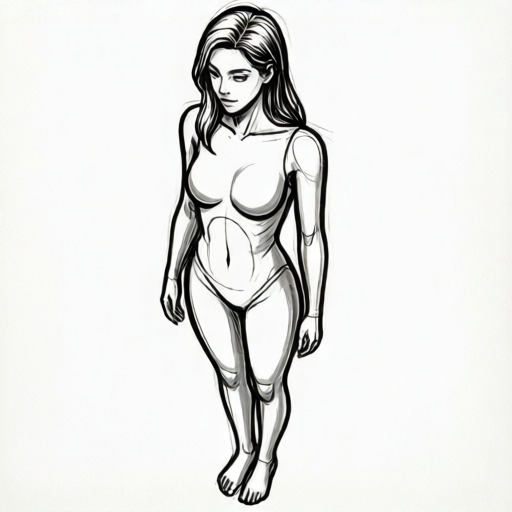
Use the stated measurements and conventions for each exercise.
Establishing the High-Angle View
Start by deciding the camera height relative to the figure. A high angle means the viewer looks down at the top of the head and shoulders. The head becomes the largest shape, and each lower body part shrinks progressively. Use a vertical axis from the top of the head to the feet, then mark where the shoulders, hips, knees, and ankles fall along that axis. Because the figure recedes, these marks will cluster closer together near the feet.
Define a simple convention for your drawing: treat the baseline as the lowest visible point of a form and the midline as the horizontal center of that form. For the head, the baseline is the chin and the midline is the line between the eyes. This convention lets you check tilt and foreshortening consistently. Letter styles vary, so do not force a single shape; instead, use the convention to compare your own lines.
- Draw a vertical axis and mark the top of the head, chin, shoulder line, hip line, knee line, and ankle line.
- Check that the gaps between marks decrease as you move down the axis; adjust until they do.
- Sketch an oval for the head with the chin at the baseline and the eye line at the midline.
- Add a shoulder curve that is wider than the hip curve, because the shoulders are closer to the viewer.
Foreshortening the Torso and Limbs
Foreshortening compresses forms that point away from the viewer. For a high angle, the torso points downward, so its vertical length shortens while its width stays relatively wide. Draw the ribcage as a short, wide oval and the pelvis as a smaller oval below it. The waist gap between them should be small. For the legs, draw the thighs as short, thick shapes and the calves as thinner, shorter shapes. The feet become tiny ovals near the bottom of the axis.
Use overlapping to show depth: the head overlaps the shoulders, the shoulders overlap the chest, and the chest overlaps the hips. Keep the overlaps consistent with the high-angle direction. If a limb points toward the viewer, it appears longer; if it points away, it appears shorter. Test your drawing by covering the lower half and asking whether the upper half still reads as looking down.
- Draw the ribcage oval with its widest part near the shoulder line.
- Place the pelvis oval so its top edge overlaps the bottom of the ribcage.
- Draw the thighs as short cones that taper toward the knees.
- Add the calves and feet as progressively smaller shapes along the axis.
- Check that every lower form is smaller than the form above it.
Head Tilt and Facial Placement
A high-angle head tilt usually shows more of the top of the head and less of the chin. Tilt the head by rotating the oval around its midline. If the head tilts to the viewer's left, the left ear moves up and the right ear moves down. Place the eyes along the midline, but shift them slightly toward the lower edge of the oval because the face is angled downward. The nose and mouth sit below the eye line and compress toward the chin.
Use the baseline-to-midline convention to check the tilt: the distance from the chin to the eye line should be shorter than the distance from the eye line to the top of the head. If your drawing shows the opposite, the head is tilting up, not down. Valid alternatives include different ear shapes and hair styles, but the tilt logic must remain consistent.
- Draw the head oval and mark the midline between the eyes.
- Rotate the oval slightly and move the ear marks to match the tilt.
- Place the eyes on the midline, then shift them toward the chin edge.
- Add the nose and mouth below the eyes, compressing the spacing toward the chin.
- Check that the chin-to-eye distance is shorter than the eye-to-top distance.
Checking and Refining the Pose
After sketching, check three things: the decreasing size of forms from head to feet, the overlap order, and the head tilt. Use a simple arithmetic check on your axis marks. For example, if the head-to-shoulder gap is 4 units and the shoulder-to-hip gap is 3 units, the hip-to-knee gap should be about 2 units and the knee-to-ankle gap about 1 unit. These numbers are hypothetical; measure your own drawing and keep units consistent.
Refine by erasing unnecessary lines and strengthening the contours that show the high angle. Add a light shadow under the chin and along the top of the shoulders to reinforce the downward view. Do not add details that contradict the foreshortening, such as long legs or a full-length torso. The final drawing should read as a female figure seen from above, with a clear head tilt and compressed lower body.
- Measure the gaps along your vertical axis and compare them to a decreasing sequence.
- Check that each lower form is smaller than the form above it.
- Confirm the head tilt by comparing chin-to-eye and eye-to-top distances.
- Erase construction lines and strengthen the high-angle contours.
Worked example
Draw a female figure from a high angle with the head tilted to the viewer's left. Use a vertical axis with these hypothetical gaps: head-to-shoulder 4 units, shoulder-to-hip 3 units, hip-to-knee 2 units, knee-to-ankle 1 unit. Describe the head tilt check.
Worked answer
Draw the vertical axis and mark the gaps in order: 4, 3, 2, 1 from top to bottom. Sketch the head oval at the top, then the shoulder curve wider than the hip curve. Place the ribcage oval below the shoulders and the pelvis oval below that, overlapping. Draw short thighs, shorter calves, and tiny feet. Tilt the head oval to the viewer's left, move the left ear up and the right ear down, and place the eyes on the midline shifted toward the chin. Check that the chin-to-eye distance is shorter than the eye-to-top distance. The decreasing gaps and overlaps confirm the high angle.
Four practice exercises
Exercise 1
A figure has axis gaps of 5 units from head to shoulder, 4 from shoulder to hip, and 3 from hip to knee. What should the knee-to-ankle gap be to continue the decreasing pattern?
Show answer and check
2 units.
Why: The gaps decrease by 1 unit each time: 5, 4, 3, so the next gap is 2. This keeps the foreshortening consistent.
Check: Subtract 1 from the previous gap and confirm the sequence is strictly decreasing.
Exercise 2
You draw a head oval with the chin at the baseline and the eye line at the midline. The chin-to-eye distance is 3 units and the eye-to-top distance is 5 units. Is the head tilting down or up?
Show answer and check
Down.
Why: For a downward tilt, the chin-to-eye distance is shorter than the eye-to-top distance. Here 3 is less than 5, so the head tilts down.
Check: Compare the two distances; if chin-to-eye is shorter, the tilt is down.
Exercise 3
A sketch shows the hips overlapping the chest and the chest overlapping the shoulders. What is wrong, and how do you fix it?
Show answer and check
The overlap order is reversed for a high angle. Fix it by drawing the head on top, then shoulders over chest, and chest over hips.
Why: In a high-angle view, closer forms overlap farther forms. The head and shoulders are closest, so they should be on top.
Check: List the overlap order from top to bottom and confirm it matches head, shoulders, chest, hips.
Exercise 4
You want to show a female figure from above with the head tilted to the viewer's right. Describe where to place the ears and eyes using the baseline-to-midline convention.
Show answer and check
Tilt the oval to the viewer's right, move the right ear up and the left ear down, and place the eyes on the midline shifted toward the chin. Check that the chin-to-eye distance is shorter than the eye-to-top distance.
Why: The tilt direction determines which ear rises. Shifting the eyes toward the chin shows the downward face angle.
Check: Confirm the ear heights match the tilt direction and the chin-to-eye distance is shorter than the eye-to-top distance.
Common mistakes
- Drawing the legs as long as in a straight-on view. Shorten the thigh and calf shapes and move the knee and ankle marks closer together along the axis.
- Making the head tilt upward by placing the eyes too high on the oval. Shift the eye line toward the chin and check that the chin-to-eye distance is shorter than the eye-to-top distance.
- Using inconsistent overlap order, such as hips over chest. Redraw the overlaps so the head is on top, then shoulders, chest, and hips in that order.
- Forgetting to shrink the feet and hands. Draw the feet as small ovals and the hands as short, compact shapes near the ends of the limbs.
Self-check rubric
- The vertical axis shows decreasing gaps from head to feet.
- Each lower form is smaller than the form above it.
- Overlap order is consistent: head over shoulders, shoulders over chest, chest over hips.
- The head tilt is clear and the chin-to-eye distance is shorter than the eye-to-top distance.
- The figure reads as female and as seen from a high angle.
- Valid alternatives in ear shape, hair, and facial features are accepted if the tilt and foreshortening logic hold.
Questions and answers
What counts as a high angle?
A high angle means the viewer looks down at the figure. The head appears largest, and lower body parts shrink progressively along a vertical axis.
How do I know if the head is tilting down?
Use the baseline-to-midline convention: the chin is the baseline and the eye line is the midline. For a downward tilt, the chin-to-eye distance is shorter than the eye-to-top distance.
Can I use different letter styles or shapes?
Yes. The convention defines where to place lines, not a single universal shape. Valid alternatives include different ear shapes, hair styles, and facial features as long as the tilt and foreshortening logic hold.
Do I need a model or reference?
A reference helps, but you can use the axis and oval method described here. Measure your own drawing and keep units consistent.