Free original lessons
Draw Overlapping Fish-Scale Rows with Shading
Learn to build fish-scale skin in overlapping rows, then shade each scale so the pattern reads clearly. Includes a worked example, four practice tasks, and a rubric.
Free lesson
Four exercises
Worked answers
Object Drawing Lessons
Fish-scale skin is a repeating pattern of rounded plates that overlap like roof tiles. The key is to draw rows that step sideways and downward, then shade each scale so the overlap is visible. This lesson teaches a simple convention: each scale is a rounded shape whose lower edge sits over the scale below. You will plan rows, draw scales in order, and shade with a consistent light direction. The goal is a clear, readable pattern, not a single correct drawing. Letter styles and scale shapes vary, so the rubric rewards consistent overlap and shading logic rather than exact copies.
Practice materials: Printable downloads are not available for this lesson yet. Use the instructions and four exercises below.
Reference illustration
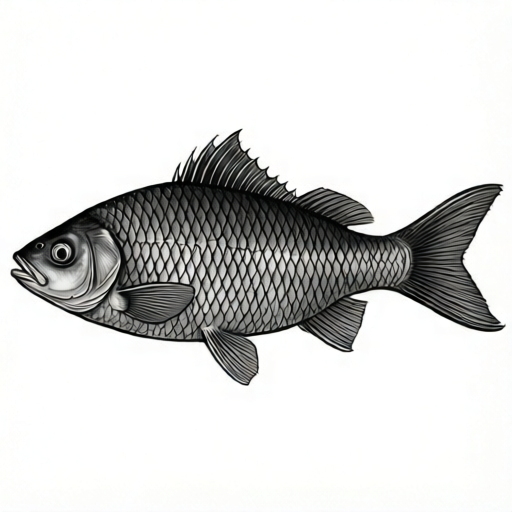
Use the stated measurements and conventions for each exercise.
Plan the row grid before drawing scales
Start by deciding the scale size and the row spacing. A useful convention is that each new row overlaps the row above by about one-third of the scale height. Mark faint guide lines for row baselines, then mark scale centers along each row. Offset each row sideways by half a scale so the pattern interlocks.
Keep the grid light. These guides are planning marks, not part of the final drawing. If you change scale size, redraw the guides rather than forcing scales into a mismatched grid.
- Draw a faint horizontal baseline for the first row.
- Mark scale centers along the baseline at equal spacing.
- Draw the next baseline below, spaced so the new row overlaps the first by about one-third of the scale height.
- Offset the new row's centers sideways by half a scale spacing.
- Repeat for as many rows as needed, keeping spacing consistent.
Draw each scale with a clear overlap edge
Draw scales from the top row downward so each new scale sits over the one below. A scale can be drawn as a rounded U or a shallow arc with two side edges. The lower edge is the visible overlap line; keep it clean and slightly darker than the side edges.
Vary scale width slightly for a natural look, but keep the overlap direction consistent. Avoid drawing complete closed ovals for every scale, because closed shapes hide the overlap and flatten the pattern.
- Draw the top row of scales as rounded shapes with open lower edges.
- For the next row, start each scale between two scales above.
- Let the new scale's upper edge tuck under the row above, and its lower edge sit over the row below.
- Keep the overlap line crisp; erase stray guide marks after the row is complete.
- Check that every scale overlaps exactly one scale in the row below and is overlapped by one in the row above.
Shade with one light direction
Choose a light direction, for example from the upper left. Shade the lower-right part of each scale, leaving the upper-left lighter. Because scales overlap, the shadow of an upper scale falls onto the scale below near the overlap line. Add a thin darker band just under each overlap edge to show that contact shadow.
Use consistent pencil pressure. A common convention is three values: light on the upper-left, mid on the body, dark under the overlap edge. Keep the darkest marks narrow so the pattern does not become muddy.
- Mark the light direction with a small arrow outside the drawing area.
- Shade the lower-right area of each scale with mid value.
- Add a narrow dark band under each overlap edge.
- Leave the upper-left of each scale light.
- Step back and check that all shadows agree with the marked light direction.
Check the pattern for readability
A readable fish-scale pattern shows clear rows, consistent overlap, and shading that follows one light direction. Check by looking at the drawing from a short distance: the rows should read as bands, not as scattered shapes. If the pattern looks flat, the overlap lines are probably too faint or the contact shadows are missing.
Valid alternatives include rounder or more pointed scales, wider or narrower rows, and different light directions, as long as the convention is stated and followed consistently.
- Confirm each row is offset by about half a scale.
- Confirm every scale overlaps the row below.
- Confirm the darkest marks sit under overlap edges.
- Confirm the light direction is consistent across the whole drawing.
- Erase remaining guide marks and recheck row spacing.
Worked example
A scale row is 6 cm wide with 4 scales of equal width. The next row overlaps by one-third of the scale height and is offset by half a scale. If the scale height is 3 cm, how far below the first baseline is the second baseline, and how wide is each scale?
Worked answer
Each scale is 6 ÷ 4 = 1.5 cm wide. The overlap is one-third of 3 cm = 1 cm, so the second baseline is 3 − 1 = 2 cm below the first. The second row is offset by half a scale = 0.75 cm.
Why: Divide row width by scale count for scale width. Multiply scale height by one-third for overlap, then subtract overlap from height for row spacing. Offset is half the scale width.
Check: Add the overlap back to the row spacing: 2 + 1 = 3 cm, matching the scale height. Multiply scale width by count: 1.5 × 4 = 6 cm, matching row width.
Four practice exercises
Exercise 1
A row is 8 cm wide with 5 equal scales. The scale height is 4 cm and the next row overlaps by one-quarter of the height. Find the scale width, the row spacing, and the sideways offset.
Show answer and check
Scale width = 8 ÷ 5 = 1.6 cm. Overlap = 4 × 1/4 = 1 cm. Row spacing = 4 − 1 = 3 cm. Offset = 1.6 ÷ 2 = 0.8 cm.
Why: Divide row width by scale count. Multiply height by the overlap fraction, subtract from height for spacing, and halve scale width for offset.
Check: Row spacing plus overlap equals scale height: 3 + 1 = 4 cm. Scale width times count equals row width: 1.6 × 5 = 8 cm.
Exercise 2
You draw three rows with 6 scales each. Each scale overlaps the row below by 1 cm, and the scale height is 3 cm. How far below the first baseline is the third baseline?
Show answer and check
Row spacing = 3 − 1 = 2 cm. Two gaps between three baselines = 2 × 2 = 4 cm below the first baseline.
Why: Find spacing per row, then multiply by the number of gaps between baselines, which is one less than the row count.
Check: Add overlaps back: 4 cm total spacing plus 2 gaps × 1 cm overlap = 6 cm, equal to 2 gaps × 3 cm scale height.
Exercise 3
A scale is 2 cm wide and 3 cm tall. The light comes from the upper right. Describe where the light area, mid area, and dark contact band go on each scale, and state one check.
Show answer and check
Light area on the upper right, mid area on the lower left body, dark narrow band under the lower overlap edge. Check: every scale's light area faces upper right and every dark band sits under the overlap edge.
Why: Shading follows the stated light direction; the contact shadow belongs where the upper scale meets the lower one.
Check: Look at three scales in different rows and confirm the light area and dark band positions match the stated direction.
Exercise 4
A practice plate has 4 rows. Row 1 has 7 scales, and each row below has one fewer scale. Scale width is 1.5 cm. What is the total number of scales, and how wide is the widest row?
Show answer and check
Scales: 7 + 6 + 5 + 4 = 22. Widest row = 7 × 1.5 = 10.5 cm.
Why: Decrease the count by one per row and sum. Multiply the largest count by scale width for the widest row.
Check: Average count is 22 ÷ 4 = 5.5, which lies between 4 and 7. Widest row check: 10.5 ÷ 7 = 1.5 cm.
Common mistakes
- Drawing scales as closed ovals with no overlap. Draw open lower edges and let each new scale sit over the row below.
- Aligning rows directly instead of offsetting them. Offset each row sideways by half a scale spacing so scales interlock.
- Shading every scale the same way regardless of light direction. Mark one light direction and shade the opposite side of every scale.
- Making contact shadows too wide and dark. Keep the dark band narrow under each overlap edge and use mid value on the scale body.
Self-check rubric
- Rows are offset by about half a scale and read as distinct bands.
- Every scale overlaps the row below with a visible lower edge.
- Shading follows one stated light direction across all scales.
- Contact shadows are narrow and sit under overlap edges.
- Guide marks are erased and spacing stays consistent.
- Valid alternatives in scale shape or light direction are accepted if applied consistently.
Questions and answers
How much should each row overlap the row above?
A practical convention is about one-third of the scale height. Any consistent value works if the overlap is visible and rows stay readable.
Do I have to draw every scale the same size?
No. Slight variation looks natural, but keep row spacing and overlap direction consistent so the pattern still reads.
Where should the darkest shading go?
Under the overlap edge where an upper scale meets the scale below, plus the side away from the light direction.
Can I use a different light direction?
Yes. State the direction and apply it consistently to every scale and contact shadow.