HomeGrandparent Portrait Drawing: Feature Placement Guide Free original lessons
Grandparent Portrait Drawing: Feature Placement Guide
Learn to place eyes, nose, mouth, and ears on a grandparent portrait using simple proportional guides, with practice exercises and a clear rubric.
Free lesson
Four exercises
Worked answers
Object Drawing Lessons
Drawing a grandparent portrait becomes manageable when you use a few proportional guides instead of guessing. This lesson teaches a repeatable method for placing facial features on a front-facing or slightly turned grandparent face. You will use a defined convention: the face is divided into horizontal bands, and feature positions are described as fractions of face height and width. Because real faces vary, the rubric rewards plausible placement and clear observation, not a single universal answer. All measurements are relative to your own drawing, so no special tools are required beyond paper and pencil.
Practice materials: Printable downloads are not available for this lesson yet. Use the instructions and four exercises below.
Reference illustration
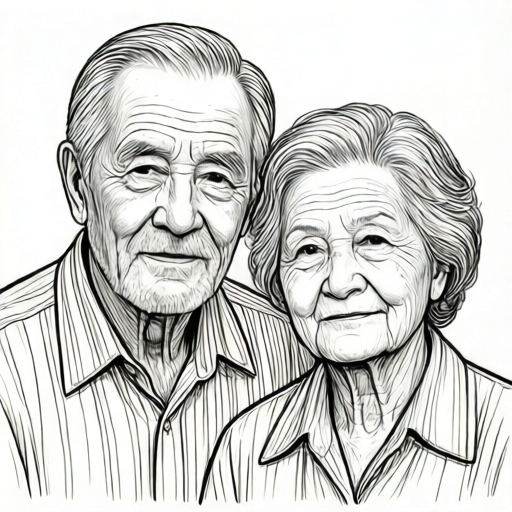
Use the stated measurements and conventions for each exercise.
Set Up the Face Outline and Proportional Bands
Begin with a light oval or egg shape for the head. Mark the top of the head and the chin. Divide the vertical distance into halves and quarters using faint lines. The midline (halfway between top and chin) is the eye line for a typical adult face. The quarter line below the top is the brow line, and the quarter line above the chin is the nose base line. These are starting guides, not rigid rules.
For a grandparent, add gentle observation notes: the eye line may sit slightly lower if the forehead appears taller, and the nose base may sit slightly lower if the face is longer. Keep your guide lines light so you can adjust them after comparing with your reference or memory.
- Draw a light oval for the head and mark top and chin points.
- Draw a faint vertical midline for symmetry.
- Mark the halfway line between top and chin as the eye line.
- Mark the quarter line below the top as the brow line.
- Mark the quarter line above the chin as the nose base line.
Place Eyes, Nose, Mouth, and Ears
Place the eyes on the eye line. A common convention is that the space between the eyes is about one eye width, and each eye is about one-fifth of the face width. These are approximate proportions; adjust after checking the overall balance. For grandparents, observe eyelid folds, under-eye shadows, and crow's feet, but keep the basic eye shape simple.
The nose base sits on the nose base line. The nose width is often about one eye width, but many noses are wider or narrower. Draw the bridge lightly from the brow line to the nose base. The mouth line sits roughly one-third of the way from the nose base to the chin. The ears run from the brow line to the nose base line in a typical front view; in a slightly turned view, the far ear may be partly hidden.
- Mark eye positions on the eye line using one eye width as a spacing guide.
- Draw simple eye shapes and add eyelid folds if observed.
- Lightly sketch the nose bridge and nose base on the nose base line.
- Place the mouth line about one-third from nose base to chin.
- Draw ears between brow line and nose base line, adjusting for head turn.
Add Age Cues and Check Proportions
Age cues should support the portrait without overwhelming it. Add soft lines around the eyes and mouth, slight sagging under the jaw, and thinning lips if observed. Keep these marks light and selective. A grandparent portrait can be warm and recognizable with only a few well-placed cues.
Check proportions by comparing distances: eye line to nose base, nose base to chin, and eye width to nose width. Use a pencil to measure relative distances on your drawing, not absolute centimeters. If the mouth sits too high, lower it slightly; if the eyes are too close, widen the gap. Make adjustments before darkening any lines.
- Add light age cues around eyes, mouth, and jaw.
- Compare eye-line-to-nose-base distance with nose-base-to-chin distance.
- Check that the space between eyes is roughly one eye width, adjusting as needed.
- Confirm ear height relative to brow and nose base lines.
- Darken final lines only after proportions look balanced.
Worked example
A student draws a front-facing grandparent face 12 cm tall from top to chin. They place the eye line at 6 cm from the top, the nose base at 9 cm from the top, and the mouth line at 10 cm from the top. The face width is 8 cm. They place the eyes with a 1.6 cm gap between them and each eye about 1.6 cm wide. Check whether these placements follow the lesson's conventions and suggest one adjustment.
Worked answer
The eye line at 6 cm is halfway from top to chin, which matches the convention. The nose base at 9 cm is three-quarters from the top, matching the quarter-line guide. The mouth line at 10 cm is 1 cm above the chin, which is one-third of the 3 cm distance from nose base to chin, so it fits the convention. The eye gap of 1.6 cm equals one eye width, and each eye is about one-fifth of the 8 cm face width, so the eye spacing is plausible. One adjustment: check the nose width; if it is much wider than one eye width, widen it slightly, but keep the nose base on the 9 cm line.
Four practice exercises
Exercise 1
A front-facing face is 10 cm tall from top to chin and 7 cm wide. The student places the eye line at 5 cm from the top, the nose base at 7.5 cm from the top, and the mouth line at 8.5 cm from the top. Are these placements consistent with the lesson's conventions? Explain.
Show answer and check
Yes. The eye line at 5 cm is halfway, the nose base at 7.5 cm is three-quarters from the top, and the mouth line at 8.5 cm is 1 cm above the chin, which is one-third of the 2.5 cm distance from nose base to chin.
Why: The conventions use halfway for eyes, three-quarters for nose base, and one-third from nose base to chin for the mouth. Each value matches those fractions.
Check: Recompute each fraction: 10 divided by 2 is 5; 10 times three-quarters is 7.5; the nose-base-to-chin distance is 2.5, and one-third of 2.5 is about 0.83, so 8.5 cm is close enough for a light guide.
Exercise 2
A student draws a face 9 cm tall from top to chin. They put the eye line at 3 cm from the top and the nose base at 6 cm from the top. What is the main placement error, and how should they fix it?
Show answer and check
The eye line is too high; it should be near 4.5 cm from the top. The nose base at 6 cm is two-thirds from the top, which is lower than the three-quarters guide, so it should move up to about 6.75 cm.
Why: Half of 9 cm is 4.5 cm for the eye line, and three-quarters of 9 cm is 6.75 cm for the nose base. The student's values are off those guides.
Check: Measure top to chin, divide by two for the eye line, and multiply by three-quarters for the nose base; compare with the drawn lines.
Exercise 3
A slightly turned grandparent face is 8 cm wide. The student places the eyes with a 2 cm gap and each eye 1.2 cm wide. Is the eye spacing plausible under the lesson's convention? Suggest a small adjustment.
Show answer and check
The gap is wider than one eye width (1.2 cm), so it is a bit wide. Reduce the gap to about 1.2 cm or widen each eye slightly, then check overall balance.
Why: The convention uses about one eye width between eyes. A 2 cm gap with 1.2 cm eyes is noticeably wider than that guide.
Check: Compare the gap to one eye width directly on the drawing; if the gap is much larger, adjust one or both values and recheck the total face width.
Exercise 4
A front-facing face is 11 cm tall from top to chin. The student places the nose base at 8 cm from the top and the mouth line at 9 cm from the top. Check the mouth placement using the one-third rule from nose base to chin.
Show answer and check
The nose base at 8 cm leaves 3 cm to the chin. One-third of 3 cm is 1 cm, so the mouth line should be about 9 cm from the top. The student's 9 cm placement is consistent.
Why: The mouth line is measured from the nose base toward the chin. With 3 cm remaining, one-third is 1 cm, giving 8 plus 1 equals 9 cm.
Check: Subtract the nose base from the chin height, divide by three, and add to the nose base; compare with the drawn mouth line.
Common mistakes
- Placing the eyes on the top quarter line instead of the halfway eye line. Re-measure from top to chin and move the eye line to the halfway point, then adjust slightly for the individual face.
- Making the nose too long so it overlaps the mouth area. Keep the nose base on the nose base line and check that the mouth line sits about one-third of the way from nose base to chin.
- Drawing ears too high, near the top of the head. Align ears between the brow line and the nose base line for a front view, adjusting for head turn.
- Adding heavy age lines that dominate the face. Use light, selective marks and keep the basic feature placement clear; age cues should support recognition, not replace proportion.
Self-check rubric
- Feature placement follows the defined proportional bands within a plausible range.
- Eyes sit on or near the eye line with spacing close to one eye width, adjusted for observation.
- Nose base sits on or near the nose base line, and mouth line sits about one-third from nose base to chin.
- Ears align between brow line and nose base line, with reasonable adjustment for head turn.
- Age cues are light and selective, supporting recognition without dominating the face.
- Valid alternatives are accepted when the drawing shows clear observation and balanced proportions.
Questions and answers
Do I need a photograph to draw a grandparent portrait?
No. You can work from memory or observation. The proportional guides help you organize what you remember or see, and you can adjust them as you go.
Are the fractions exact rules?
No. They are starting conventions. Real faces vary, so compare distances on your own drawing and adjust the guides to match the person you are drawing.
How do I handle a slightly turned head?
Keep the vertical guides but shift the midline toward the visible side. The far eye may be narrower, and the far ear may be partly hidden. Check that the nose points toward the turned side.
What if my grandparent has a beard or glasses?
Place the basic features first, then add glasses or beard shapes over them. Glasses should sit on the nose bridge and align with the eye line; a beard should follow the jaw shape without hiding the mouth line completely.