Free original lessons
Cross-Contour Face Drawing: Surface Lines That Describe Form
Learn to draw a face using cross-contour lines that wrap around facial surfaces, revealing volume without shading or edge-only outlines.
Free lesson
Four exercises
Worked answers
Object Drawing Lessons
Cross-contour drawing describes three-dimensional form with lines that travel across a surface, like elevation lines on a map. Instead of tracing the outer edge of a nose or cheek, you draw lines that follow the curvature of the face itself. This lesson teaches a repeatable method for placing cross-contour lines on a face, checking their spacing and direction, and using a simple convention to judge whether the lines communicate volume. All measurements and numerical examples are hypothetical unless you measure your own reference and paper.
Practice materials: Printable downloads are not available for this lesson yet. Use the instructions and four exercises below.
Reference illustration
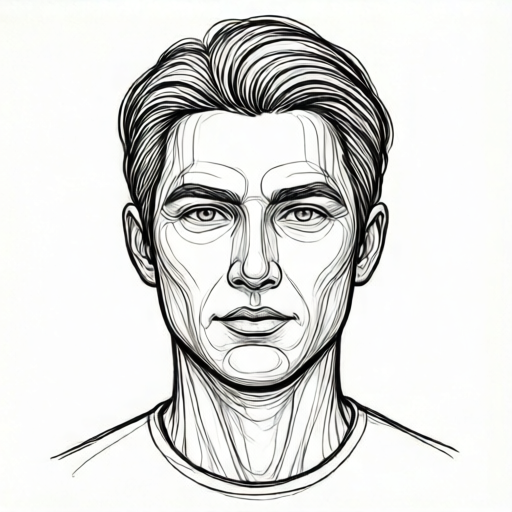
Use the stated measurements and conventions for each exercise.
What Cross-Contour Lines Do
A cross-contour line crosses the form rather than outlining it. On a face, such a line might run from the bridge of the nose across the cheek, curving as the cheek rounds toward the jaw. Where the surface turns sharply, lines bunch closer together; where the surface is broad and flat, they spread apart. This spacing is the main information carrier: tight spacing signals a steep turn, wide spacing signals a gentle slope.
Edge-only contour drawing traces the silhouette or a feature boundary. Blind contour drawing traces without looking at the paper. Cross-contour drawing is different: you look at the reference, imagine a line lying on the skin, and draw that line so its curvature and spacing describe the surface. Feature placement still matters, but the goal is volumetric description, not a flat map of where the eyes and mouth sit.
- Choose a reference face with clear lighting so surface changes are visible.
- Identify three broad zones: forehead, cheek and jaw, and nose and mouth area.
- Draw one slow line across each zone, imagining it wrapping the surface.
- Vary spacing: closer where the form turns, wider where it flattens.
A Workable Line Convention
Use a single convention so your drawing can be checked consistently. Convention: each cross-contour line is drawn as a continuous curve with no sharp corners, and adjacent lines never touch or cross. Lines may change direction gradually. This convention does not dictate one correct face; it makes the logic of surface description visible and comparable across attempts.
Letter styles and handwriting vary, and so do line styles. A valid alternative is a slightly wavy line or a line with small breaks, provided the overall curvature and spacing still describe the surface. The rubric rewards consistent spacing logic and believable curvature, not a single universal set of lines.
- Draw lightly first so you can adjust spacing without erasing heavily.
- Keep each line continuous; avoid sharp corners that suggest a crease rather than a surface.
- Check that neighboring lines do not merge; a small gap preserves readability.
- Compare tight and wide areas: the tightest spacing should sit where the form turns most.
Checking Spacing and Direction
Measure your actual paper and reference before assigning any numbers. For a hypothetical example, suppose your face outline is 12 cm tall and 8 cm wide. You might plan five cross-contour lines across the cheek zone, spaced about 1.5 cm apart at the broadest part and about 0.5 cm apart near the jaw turn. These values are examples only; measure your own materials and adjust.
Direction matters as much as spacing. Lines on the forehead typically run more horizontally, cheek lines curve downward toward the jaw, and nose lines wrap around the bridge. If a line changes direction abruptly, check whether the reference surface actually turns that sharply. A simple arithmetic check: count lines in a zone and divide the zone width by that count to estimate average spacing, then compare tight and wide regions.
- Measure the face outline on your paper and note the height and width in centimeters.
- Count the lines in one zone and compute average spacing as zone width divided by line count.
- Mark the tightest and widest gaps and confirm they match the strongest and gentlest surface turns.
- Redraw any line whose direction contradicts the visible surface change.
Building the Face Plate
A cross-contour face plate combines three resources: a reference face, a plate showing surface-line examples, and a blank face outline for independent practice. On the example plate, draw a few lines across the forehead, cheek, and nose so the spacing logic is visible. On the blank outline, place only the outline and a few landmark marks, then draw your own cross-contour lines.
Keep the plate simple. The reference face supplies the surface information; the example plate demonstrates the convention; the blank outline removes the example lines so you must generate spacing and curvature yourself. This progression moves from reading to producing cross-contour description.
- Study the reference face and note where the surface turns sharply.
- On the example plate, trace the demonstrated lines and observe their spacing.
- On the blank outline, draw your own lines zone by zone.
- Compare your blank-outline drawing to the example plate using the rubric.
Worked example
A reference face is drawn on a 12 cm by 8 cm outline. The cheek zone is 6 cm wide. You plan four cross-contour lines across the cheek. Estimate the average spacing and state where spacing should be tightest.
Worked answer
Average spacing is 6 cm divided by 4 lines, which equals 1.5 cm. Spacing should be tightest near the jaw turn where the surface curves most sharply, and wider across the broadest part of the cheek. These numerical values are hypothetical examples; measure your own outline and adjust.
Four practice exercises
Exercise 1
On a blank face outline 10 cm wide, the forehead zone is 5 cm wide. You plan five cross-contour lines across the forehead. Compute the average spacing and describe where the lines should be closest together.
Show answer and check
Average spacing is 5 cm divided by 5 lines, which equals 1 cm. Lines should be closest together where the forehead surface turns most sharply toward the sides, and wider across the flattest central area. Values are hypothetical examples.
Why: Average spacing is zone width divided by line count. Tight spacing corresponds to a steeper surface turn, so the closest lines belong at the strongest curvature.
Check: Measure the forehead zone on your own outline, count your lines, divide width by count, and confirm the tightest gap sits at the strongest visible turn.
Exercise 2
A cheek zone is 7 cm wide and you draw three lines spaced 2 cm, 2 cm, and 3 cm apart. Is the spacing consistent with a surface that turns sharply near one edge? Explain.
Show answer and check
The 3 cm gap is wider than the others, so it suggests a flatter area, not a sharp turn. If the sharp turn is near one edge, the tightest gap should be there. The spacing is only consistent if the 3 cm gap corresponds to the flattest part of the cheek. Values are hypothetical examples.
Why: Spacing communicates surface change: tight gaps mean steep turns, wide gaps mean gentle slopes. A wide gap at a sharp turn contradicts the convention.
Check: Compare each gap to the visible surface change in the reference and redraw any gap that contradicts the turn.
Exercise 3
You draw a cross-contour line across the nose bridge and it has a sharp corner halfway along. Using the convention, describe how to revise it and why.
Show answer and check
Replace the sharp corner with a gradual curve so the line reads as a continuous surface path. A sharp corner suggests a crease rather than a rounded form, which conflicts with the convention. Values are hypothetical examples.
Why: The convention requires continuous curves with no sharp corners because cross-contour lines describe smooth surface curvature.
Check: Trace the line with your eye; if direction changes abruptly, smooth the transition and confirm adjacent lines remain separate.
Exercise 4
A face outline is 12 cm tall. You plan six cross-contour lines across the jaw zone, which is 6 cm wide. Compute average spacing, then state one check you would perform before finalizing.
Show answer and check
Average spacing is 6 cm divided by 6 lines, which equals 1 cm. Before finalizing, check that the tightest spacing aligns with the strongest jaw turn and that no adjacent lines touch. Values are hypothetical examples.
Why: Average spacing follows from width divided by line count. The check confirms spacing logic and the no-touching convention.
Check: Measure the jaw zone, count lines, divide, and inspect the tightest and widest gaps against the reference surface turns.
Common mistakes
- Drawing feature outlines instead of surface lines. Trace a line that crosses the cheek or forehead rather than following the edge of an eye or lip.
- Using uniform spacing everywhere. Tighten spacing where the form turns and widen it where the surface flattens.
- Letting adjacent lines touch or cross. Keep a small gap so each line remains readable as a separate surface path.
- Making sharp corners in a line. Smooth the curve gradually; sharp corners suggest a crease, not a rounded surface.
Self-check rubric
- Lines cross the surface rather than outlining features or the silhouette.
- Spacing varies consistently: tighter where the form turns, wider where it flattens.
- Each line is continuous with gradual curvature and no sharp corners.
- Adjacent lines remain separate and do not touch or cross.
- The drawing communicates facial volume when viewed without shading.
- Valid alternative line styles are accepted if curvature and spacing logic remain clear.
Questions and answers
Is cross-contour the same as blind contour?
No. Blind contour is drawn without looking at the paper. Cross-contour focuses on lines that cross the surface to describe volume, and you may look at your paper while drawing.
Do I need shading to show form?
No. Cross-contour lines carry form information through curvature and spacing. Shading is optional and not required for this task.
How many lines should I draw?
There is no fixed number. Choose enough lines to describe each zone clearly. A hypothetical plan might use three to six lines per zone, but measure your own paper and adjust.
Can lines be wavy or broken?
Yes, as a valid alternative convention, provided the overall curvature and spacing still describe the surface and adjacent lines do not merge.