Free original lessons
Lizard Scale Patterns: Banding and Spotting Drawing Guide
Learn to draw lizard-specific scale patterns with dorsal, flank and limb zones, banding, spotting and overlapping edge shading using a clear convention and rubric.
Free lesson
Four exercises
Worked answers
Object Drawing Lessons
This guide teaches a repeatable method for drawing lizard scale patterns that read as reptile skin rather than fish, snake or dragon scales. You will define body zones, place banding and spotting deliberately, and shade overlapping scale edges so the pattern follows the animal's form. The convention is explicit: each scale is drawn as a rounded polygon whose top edge sits on the baseline and whose crown reaches the midline of its local row; scale width and height vary by zone, and valid alternatives are accepted when the pattern logic and edge shading remain consistent. All measurements below are hypothetical examples chosen for practice, not manufacturing or printer standards. Measure your own paper and tools before scaling the numbers.
Practice materials: Printable downloads are not available for this lesson yet. Use the instructions and four exercises below.
Reference illustration
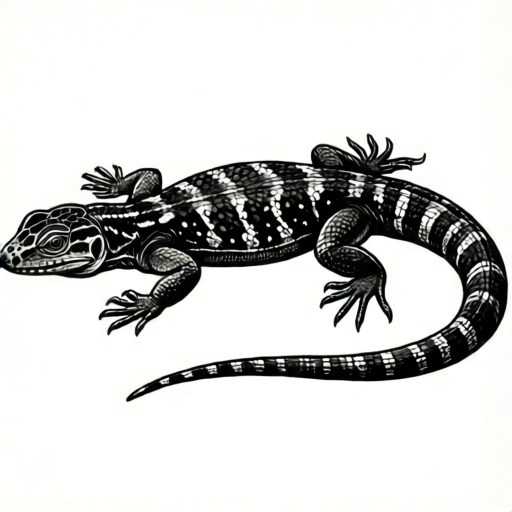
Use the stated measurements and conventions for each exercise.
Set up lizard body zones before any scales
Begin with a simple side-and-top outline of a lizard: a head, a neck, a torso, four limbs and a tail. Divide the torso into three labelled zones: dorsal (the strip along the spine), flank (the sides between dorsal and belly) and limb (each leg). Keep the tail as a fourth optional zone if your drawing includes it. The zones matter because lizard scale patterns change size and orientation across the body; dorsal scales are often smaller and tightly packed, flank scales larger and more diamond-shaped, and limb scales smaller again with clear rows.
Draw zone boundaries as light pencil lines, not hard outlines. These lines are guides for scale size and pattern placement, and they will be erased or blended later. Mark the midline of each zone: on the dorsal strip the midline runs along the spine; on each flank it runs horizontally through the widest part; on each limb it runs down the centre of the leg. The midline is the reference for the scale convention used throughout this guide.
- Draw the lizard outline lightly, including head, neck, torso, four limbs and tail.
- Mark dorsal, flank and limb zones with dashed pencil lines.
- Draw a midline through each zone and label it.
- Decide a scale size per zone using a hypothetical example: dorsal scales 4 mm wide, flank scales 7 mm wide, limb scales 3 mm wide on a 20 cm drawing.
Apply the scale convention consistently
Use one convention so the pattern is checkable. Each scale is a rounded polygon. Its lower edge rests on the baseline of its row, and its highest point reaches the midline of that row. Rows are staggered by half a scale width so scales interlock. Scale width may vary by zone, but within a zone keep width and height in a fixed ratio, for example 1.5:1 width to height as a hypothetical example. This convention allows many valid scale shapes while keeping the pattern readable and the rubric fair.
Draw scales in rows from the dorsal strip outward to the flanks, then down the limbs. On the flanks, orient the rounded polygon so its long axis follows the body contour; on limbs, orient it along the leg. Do not mix fish-like overlapping circles or dragon-like pointed plates, because the brief excludes those patterns. Lizard scales in this guide are rounded polygons with visible edges, not smooth overlapping discs.
- Draw one row of scales along the dorsal midline using the 1.5:1 width-to-height ratio.
- Add the next row offset by half a scale width, keeping the baseline-to-midline convention.
- Continue across the flank zone, increasing scale width to the chosen flank size.
- Draw limb rows last, using the smallest scale size and aligning the long axis with the leg.
Place banding and spotting with pattern logic
Banding and spotting are pattern arrangements, not random marks. Bands are transverse strips of darker or differently shaped scales that cross the dorsal and flank zones. Spots are isolated clusters of one to three scales that sit within a zone without crossing a band. A workable rule is: bands run across the body at intervals of about three to five scale rows, and spots fill the gaps between bands. Use a hypothetical example of four bands across the torso and six spot clusters per flank. Keep band width to one or two scale rows so the pattern stays legible.
Bands should follow the body contour: on the dorsal strip they run straight across the spine, and on the flank they curve slightly downward toward the belly. Spots should be placed on the flank and limb zones, not on the dorsal midline, so the spine remains readable. Vary spot size by one scale width at most. This arrangement is lizard-specific because it uses transverse banding and isolated spotting on a four-limbed body with distinct dorsal and flank zones, rather than the continuous overlapping rows typical of fish or snake patterns.
- Mark band positions every three to five scale rows across the torso.
- Shade or outline band scales using a darker tone or a distinct edge treatment.
- Place spot clusters in the gaps between bands on flank and limb zones.
- Check that no spot crosses a band and that bands follow the body contour.
Shade overlapping scale edges
Shading is what makes the pattern read as overlapping scales. For each scale, darken the lower edge where it meets the scale below, and leave the upper crown lighter. Use a consistent light direction, for example light from the upper left as a hypothetical choice. On banded areas, keep the same edge shading so the band reads as a pattern of scales rather than a flat stripe. On spotted areas, shade the spot scales slightly darker at their lower edges to separate them from surrounding scales.
Finish by erasing zone guide lines and checking the pattern against the rubric. The drawing should show dorsal, flank and limb zones with different scale sizes, staggered rows, transverse bands and isolated spots, and consistent edge shading. Valid alternatives include different scale counts, different band intervals within the stated range, and different spot cluster shapes, provided the convention and pattern logic are maintained.
- Choose a light direction and state it in a note beside the drawing.
- Darken the lower edge of every scale where it overlaps the row below.
- Keep band scales shaded with the same edge treatment as surrounding scales.
- Erase guide lines and compare the finished pattern to the rubric.
Worked example
A 20 cm lizard drawing has a dorsal zone 3 cm wide, two flank zones 5 cm wide each, and four limbs. Using hypothetical scale widths of 4 mm dorsal, 7 mm flank and 3 mm limb, describe how many scales fit across one row in each zone and state one band-and-spot arrangement that follows the pattern logic.
Worked answer
Dorsal row: 30 mm divided by 4 mm equals 7.5, so draw 7 full scales and one half-scale at the edge. Each flank row: 50 mm divided by 7 mm equals about 7.1, so draw 7 scales. Limb rows use 3 mm scales; on a 30 mm leg width that is 10 scales per row. A valid arrangement is four bands across the torso spaced every four scale rows, with six spot clusters per flank placed in the gaps between bands and none on the dorsal midline. Shade every scale's lower edge with light from the upper left.
Four practice exercises
Exercise 1
On a 16 cm lizard drawing, the dorsal zone is 24 mm wide and you choose a hypothetical dorsal scale width of 4 mm. How many full scales fit across one dorsal row, and what remains at the edge?
Show answer and check
Six full scales fit, with no remainder.
Why: 24 mm divided by 4 mm equals 6 exactly, so six full scales fill the row and no half-scale is needed at the edge.
Check: Multiply 6 by 4 mm to get 24 mm, matching the zone width.
Exercise 2
A flank zone is 42 mm wide with hypothetical 7 mm scales. You plan bands every four scale rows and want three spot clusters in the gaps. State the number of scales per flank row and whether three spot clusters can fit in two gaps between three bands.
Show answer and check
Six scales per flank row; three spot clusters cannot fit in two gaps if each gap holds at most one cluster, so use four bands to create three gaps or reduce to two clusters.
Why: 42 mm divided by 7 mm equals 6 scales per row. Three bands create two gaps, so three clusters would force one cluster to cross a band, violating the pattern logic. Four bands create three gaps and allow three clusters.
Check: Count gaps as bands minus one; confirm clusters equal gaps and no cluster crosses a band.
Exercise 3
A limb is 27 mm wide with hypothetical 3 mm scales. You draw nine scales in the first row and offset the second row by half a scale width. What offset distance do you use, and how many scales fit in the second row if the edge half-scales count as one full scale each?
Show answer and check
Offset 1.5 mm; the second row fits nine scales when the two edge half-scales are counted as one full scale.
Why: Half of 3 mm is 1.5 mm. Nine scales at 3 mm equal 27 mm, so the row is full; offsetting by 1.5 mm leaves two half-scales at the edges, which together count as one full scale, keeping the count at nine.
Check: Add the offset to the row width check: 1.5 mm plus eight full 3 mm scales plus 1.5 mm equals 27 mm.
Exercise 4
You have drawn four bands across a torso with five scale rows between each band. A spot cluster is placed on the third scale row after the second band. Does it sit in a gap, and how many full gaps exist between four bands?
Show answer and check
Yes, it sits in a gap; four bands create three full gaps.
Why: Four bands create three gaps between them. The third row after the second band is inside the gap before the third band, so the cluster does not cross a band. Gaps equal bands minus one, which is three.
Check: Count bands minus one for gaps, and confirm the cluster row number is less than the gap length of five rows.
Common mistakes
- Drawing fish-like overlapping circles or dragon-like pointed plates instead of rounded polygon lizard scales. Return to the convention: rounded polygons with a baseline-to-midline height and a fixed width-to-height ratio within each zone.
- Letting spots cross bands or placing spots on the dorsal midline. Keep spots in the gaps between bands and on flank or limb zones only, so the spine and band structure stay readable.
- Using one scale size across dorsal, flank and limb zones. Assign a different hypothetical scale width per zone, such as 4 mm dorsal, 7 mm flank and 3 mm limb on a 20 cm drawing, and keep the ratio consistent within each zone.
- Shading bands as flat stripes without edge shading. Apply the same lower-edge darkening to band scales as to surrounding scales so the band reads as overlapping scales.
Self-check rubric
- Dorsal, flank and limb zones are clearly distinguished with different scale sizes.
- Every scale follows the baseline-to-midline convention and a fixed width-to-height ratio within its zone.
- Rows are staggered by half a scale width and scales are rounded polygons, not circles or pointed plates.
- Bands are transverse, spaced within three to five scale rows, and follow the body contour.
- Spots are isolated clusters in the gaps between bands and do not cross bands or sit on the dorsal midline.
- Overlapping scale edges are shaded consistently with a stated light direction.
- Valid alternatives in scale count, band interval and spot shape are accepted when the convention and pattern logic hold.
Questions and answers
Do I need to measure my paper before drawing?
Yes. Measure your actual paper and tools first. The numerical values in this guide are hypothetical examples for practice, not printer tolerances or manufacturing standards.
Can I change the number of bands or spots?
Yes, within the stated ranges. Bands every three to five scale rows and spot clusters in the gaps are the pattern logic; exact counts are valid alternatives if the logic holds.
Why exclude fish, snake and dragon patterns?
The brief is lizard-specific. Lizard patterns here use dorsal, flank and limb zones with transverse banding and isolated spotting, which differs from continuous overlapping rows or pointed plates.
How do I know my scale convention is consistent?
Check that every scale's lower edge sits on its row baseline and its crown reaches the row midline, and that width-to-height ratio stays fixed within each zone.