Free original lessons
Drawing Noses from Front, Profile, and Three-Quarter Views
Learn to construct noses across three angles using bridge-and-tip alignment, plane shading, and a repeatable check method for proportion and placement.
Free lesson
Four exercises
Worked answers
Object Drawing Lessons
Noses change shape dramatically with viewpoint, yet the underlying structure stays consistent: a bridge that rises from the brow, a tip that projects forward, and nostril wings that wrap around the base. This lesson teaches a construction method for front, profile, and three-quarter views, then adds a shading step for nostril and plane shadows. You will use a simple alignment convention: the bridge line runs from between the brows to the tip, and the tip sits at a measurable distance from the bridge base. All measurements are checkable with a ruler or by eye against your own drawing. The goal is not a single correct nose but a structurally believable one whose parts align across angles.
Practice materials: Printable downloads are not available for this lesson yet. Use the instructions and four exercises below.
Reference illustration
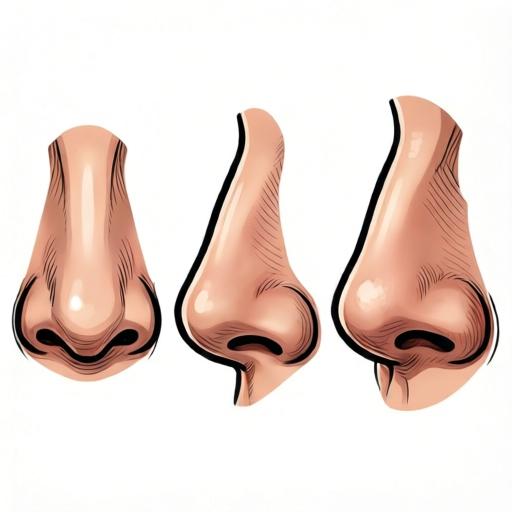
Use the stated measurements and conventions for each exercise.
Front View: Symmetry and the Bridge-Tip Axis
In front view, the nose is roughly symmetrical around a vertical axis. Begin with a light vertical line for the bridge, running from between the brows down to the tip. Mark the tip as a small horizontal dash crossing that axis. The nostril wings sit on either side of the tip, lower than the bridge base but not below the tip line by more than a small fraction of the nose length.
Use a convention for proportion: divide the nose length (brow to tip) into thirds. The upper third is the bridge, the middle third is the lower bridge, and the lower third contains the tip and wings. These are hypothetical example divisions, not universal rules; adjust to your subject after measuring.
- Draw a light vertical axis and mark brow point and tip point.
- Divide the axis into three equal parts as a starting proportion.
- Place the tip dash at the lower mark and add two wing marks at equal distances from the axis.
- Check symmetry by measuring left and right wing distances from the axis; they should match within a small tolerance you choose.
- Add a soft shadow under the tip and beside each wing to suggest the nostril plane.
Profile View: Projection and the Bridge Curve
In profile, the nose projects forward from the face. Draw a vertical reference line at the brow, then a horizontal line at the tip to measure projection. The bridge curve runs from the brow down and forward to the tip, then turns under to the base. The nostril appears as a small curved shape under the tip, and the wing sits behind the tip line.
A useful check is the tip-to-brow horizontal distance. Measure it on your drawing and compare with the nose length. If the tip projects too far, the profile looks exaggerated; if too little, the nose looks flat. Choose a ratio that matches your subject and label it as a working example.
- Draw a vertical brow line and a horizontal tip line.
- Sketch the bridge curve from brow to tip, keeping the curve smooth.
- Turn the line under the tip to form the base and add the nostril curve.
- Place the wing behind the tip line and check its height against the tip.
- Shade the underside of the tip and the nostril opening to show depth.
Three-Quarter View: Foreshortening and Wing Placement
In three-quarter view, one side of the nose is foreshortened. The bridge axis tilts slightly, and the far wing appears closer to the tip than the near wing. Begin with the tilted bridge line, then place the tip. The near wing sits farther from the axis than the far wing, and the far nostril is partially hidden.
Check foreshortening by comparing the two wing distances from the bridge axis. The near wing distance should be larger than the far wing distance. If they are equal, the view reads as front; if the far wing disappears entirely, the view reads as profile. Adjust until the ratio matches your chosen angle.
- Draw a tilted bridge axis from brow to tip.
- Mark the tip and add the near wing at a larger distance from the axis.
- Add the far wing closer to the axis and partially overlap the nostril.
- Check the wing-distance ratio and adjust to match the intended angle.
- Shade the far side of the bridge and the near nostril plane to reinforce the turn.
Shading the Nostril and Plane Shadows
Shading should describe planes, not just darken holes. The nostril opening is a small dark shape, but the shadow around it follows the curve of the wing and the underside of the tip. Use a soft shadow under the tip and a darker accent inside the nostril. On the bridge, a subtle shadow on the side away from the light helps the nose read as a raised form.
Keep shading consistent across views: the light direction should be the same in all three drawings. If the light comes from the upper left, the right side of the bridge and the underside of the tip receive shadow in every view. This consistency is a checkable feature of your set.
- Choose one light direction and state it before shading.
- Add a soft shadow under the tip in all three views.
- Darken the nostril opening and the wing shadow on the shaded side.
- Add a narrow bridge shadow on the side away from the light.
- Check that shadow placement matches the chosen light direction in each view.
Worked example
A front-view nose has a brow-to-tip length of 6 cm. Using the one-third convention, where do you place the tip and wing marks, and how do you check symmetry?
Worked answer
Divide 6 cm into three 2 cm parts. Place the tip at the 6 cm mark (lower third boundary) and the wing marks at equal distances left and right of the axis, about 1.5 cm from the axis as a hypothetical example. Check symmetry by measuring left and right wing distances; they should match within your chosen tolerance, such as 2 mm.
Four practice exercises
Exercise 1
Front view: brow-to-tip length is 9 cm. Using the one-third convention, state the tip position and a hypothetical wing distance from the axis. Describe how you would check symmetry.
Show answer and check
Tip at 9 cm from brow; wing marks about 2 cm from the axis as a hypothetical example. Check symmetry by measuring left and right wing distances and confirming they match within a chosen tolerance such as 2 mm.
Why: The one-third convention divides 9 cm into three 3 cm parts, placing the tip at the lower boundary. Wing distance is a working example, not a universal rule.
Check: Measure both wing distances with a ruler and compare; adjust until the difference is within your stated tolerance.
Exercise 2
Profile view: nose length is 7 cm and tip projection from the brow line is 3 cm as a hypothetical example. Describe the bridge curve and one check for projection.
Show answer and check
Draw a curved bridge from brow to tip, then turn under at the base. Check projection by comparing the 3 cm horizontal distance with the 7 cm nose length; adjust if the ratio does not match your subject.
Why: Profile projection is measurable as a horizontal distance from the brow line to the tip. The curve prevents a flat-looking bridge.
Check: Measure the horizontal tip distance and the nose length; confirm the ratio matches your chosen working example.
Exercise 3
Three-quarter view: near wing is 2.5 cm from the bridge axis and far wing is 1.5 cm as hypothetical examples. Explain why this reads as three-quarter and how to check foreshortening.
Show answer and check
The unequal wing distances show foreshortening: the near wing is farther from the axis and the far wing is closer, with the far nostril partially hidden. Check by confirming the near distance is larger than the far distance.
Why: Equal distances read as front view; a disappearing far wing reads as profile. The ratio between distances indicates the angle.
Check: Measure both wing distances from the axis and confirm the near distance exceeds the far distance by a clear margin.
Exercise 4
Shading: light comes from the upper left. Describe where to place the nostril accent and plane shadows in a front view, and state one consistency check across views.
Show answer and check
Place a dark accent inside the nostril and a soft shadow under the tip and on the right side of the bridge. Check consistency by confirming the same light direction produces shadow on the right side and underside in all three views.
Why: Plane shadows follow the light direction; the nostril accent is separate from the surrounding wing shadow.
Check: Compare shadow placement in each view against the stated light direction; all shaded areas should fall on the side away from the light.
Common mistakes
- Making the nose too symmetrical in three-quarter view. Offset the far wing toward the bridge axis and allow the far nostril to be partially hidden.
- Drawing the profile bridge as a straight line. Curve the bridge from brow to tip, then turn under at the base to show projection.
- Shading the nostril as a flat black hole. Use a dark accent inside the nostril and a soft shadow around the wing and under the tip.
- Ignoring the bridge-tip alignment across views. Mark brow and tip points first in every view, then build the bridge and wings around them.
Self-check rubric
- Bridge and tip align on a single axis in front and three-quarter views.
- Profile shows a curved bridge and measurable forward projection.
- Wing placement reflects foreshortening in three-quarter view.
- Nostril and plane shadows follow a stated light direction.
- Proportions are checked with simple measurements and consistent units.
- Valid alternative styles (smooth shading or cross-hatching) are accepted if plane placement is correct.
Questions and answers
Do I need to use the one-third division for every nose?
No. The one-third division is a starting proportion. Measure your subject and adjust the divisions; the check is whether your marks match your measurements.
How do I know my three-quarter view is correct?
Compare the near and far wing distances from the bridge axis. The near wing should be farther from the axis than the far wing, and the far nostril should be partially hidden.
Can I shade with cross-hatching instead of smooth shading?
Yes. The rubric checks plane placement and consistency of light direction, not the shading style. Cross-hatching is valid if the shadow shapes follow the planes.
What if my nose looks too long in profile?
Measure the tip-to-brow horizontal distance and compare it with the nose length. Reduce the projection until the ratio matches your subject.