Free original lessons
How to Draw a Starfish with Five-Fold Radial Symmetry
Learn to draw a starfish using a five-fold radial symmetry guide, arm-spacing template, and a simple symmetry-check overlay for accurate pentaradial form.
Free lesson
Four exercises
Worked answers
Object Drawing Lessons
A starfish is a natural subject for pentaradial symmetry: five arms arranged around a central point, each arm spaced equally. This lesson shows you how to build that structure with a symmetry axis guide, an arm-spacing template, and a symmetry-check overlay. You will work from a center point outward, using simple angle divisions and consistent arm lengths. The convention for this drawing is that the starfish is viewed from above, arms are drawn as tapering wedges, and the center is marked with a small circle. Letter styles and surface details vary, so the rubric accepts valid alternatives as long as the five-fold spacing and overall balance are maintained. All measurements are hypothetical examples; measure your own paper and tools before drawing.
Practice materials: Printable downloads are not available for this lesson yet. Use the instructions and four exercises below.
Reference illustration
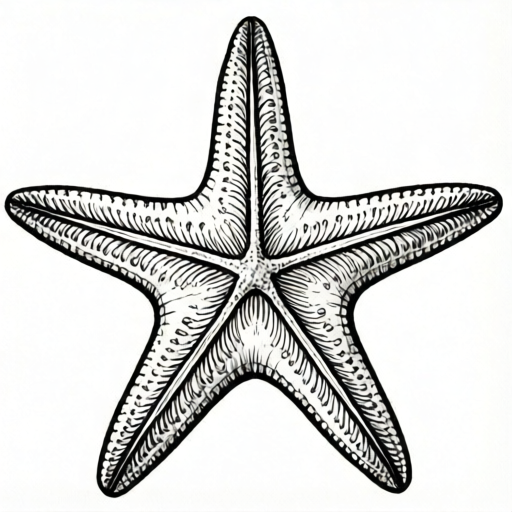
Use the stated measurements and conventions for each exercise.
Setting Up the Five-Fold Symmetry Axis Guide
Start with a square or rectangular sheet. Mark a center point roughly in the middle. Using a ruler, draw a light vertical line through the center and a light horizontal line through the center. These are your reference axes. To divide the circle into five equal sectors, you need angles of 72 degrees between arm centerlines. A simple method is to use a protractor: place its center on the center point and mark angles at 0, 72, 144, 216, and 288 degrees from the vertical axis. If you do not have a protractor, use a compass to draw a circle and step around it with a divider set to a chord length that gives five equal arcs; adjust until the last step closes neatly. Label these five radial lines lightly. They are the centerlines for the arms.
Keep all guide lines light so they can be erased later. The symmetry axis guide is the backbone of the drawing; every arm will be built around one of these five lines. Check that the angles are equal by measuring the angle between adjacent lines at the center. A small error will make the starfish look lopsided, so take time here.
- Mark the center point and draw a light vertical and horizontal axis.
- Use a protractor to mark five radial lines at 72-degree intervals, or step a divider around a circle to create five equal arcs.
- Label the five radial lines as arm centerlines.
- Check that the angle between each pair of adjacent lines is equal.
Using the Arm-Spacing Template
The arm-spacing template is a simple paper strip or card with a notch at one end and a mark at a chosen arm length. For this lesson, assume a hypothetical arm length of 8 cm from the center to the tip. Measure your own paper to choose a length that fits. Place the notch at the center point and align the strip with one radial line. Mark the tip point at the chosen length. Repeat for all five lines. These five tip points define the outer extent of the arms. Next, decide the arm width at the base. A hypothetical base width of 2 cm works for an 8 cm arm. Mark two points on either side of each radial line at the base, about 1 cm from the center along the line, and 1 cm to each side. These points help you draw tapering wedges.
The template ensures that all arms are the same length and that the spacing between arms is consistent. Because starfish arms taper, the width should decrease from base to tip. You can vary the exact taper, but keep it similar across all five arms. The template is a guide, not a rigid rule; valid alternatives include slightly wider or narrower arms as long as the five-fold symmetry is preserved.
- Set the template length to your chosen arm length and mark the five tip points along the radial lines.
- Mark base width points on each side of every radial line near the center.
- Draw a light outline connecting the base points to the tip point for each arm, creating a tapering wedge.
- Compare the five wedges for equal length and similar taper.
Drawing the Arms and Center
With the five wedges outlined, refine the arm shapes. Starfish arms are often slightly rounded at the tip and have a gentle curve along the sides. Keep the centerlines as the middle of each arm. Draw the final arm outlines with a slightly darker pencil, but keep them light enough to erase if needed. The center of the starfish is a small disk. Draw a circle of hypothetical radius 1 cm around the center point. This disk connects the bases of the arms. Ensure that the arms meet the disk smoothly and that the disk is centered on the intersection of the five radial lines.
As you draw, step back frequently to check the overall balance. The starfish should look the same if you rotate it by 72 degrees. Small differences in arm shape are acceptable, but the five-fold arrangement must be clear. Avoid making one arm noticeably longer or wider than the others.
- Refine each arm outline with gentle curves, keeping the centerline in the middle.
- Draw a small central disk around the center point.
- Connect the arm bases to the disk smoothly.
- Step back and check that the drawing looks balanced from all five directions.
Applying the Symmetry-Check Overlay
The symmetry-check overlay is a transparent sheet or tracing paper with five radial lines drawn at 72-degree intervals and a small center mark. Place it over your drawing, aligning the center mark with your starfish center and one radial line with one arm centerline. Check whether the other four arms align with the overlay lines. If an arm is off, adjust its outline. The overlay also helps you check that the arm tips are at equal distances from the center. You can mark the tip distance on the overlay and compare.
Use the overlay as a diagnostic tool, not a strict template. Because hand-drawn starfish can have natural variation, minor deviations are acceptable. The goal is to confirm that the five-fold radial symmetry is visually convincing. If the overlay shows a consistent offset, rotate the overlay to see whether the error is in the drawing or in the overlay placement.
- Place the overlay over the drawing, aligning the center and one arm.
- Check the alignment of the remaining four arms with the overlay lines.
- Adjust any arm that is noticeably off.
- Verify that all arm tips are at approximately equal distances from the center.
Worked example
Draw a starfish with five arms using a center point, five radial lines at 72-degree intervals, and an arm length of 6 cm. The central disk has a radius of 0.8 cm. Describe the steps and the check.
Worked answer
Mark the center. Draw five radial lines at 72 degrees. Mark tip points at 6 cm along each line. Mark base width points 0.8 cm from the center along each line and 0.8 cm to each side. Draw tapering wedges from base to tip. Draw a central disk of radius 0.8 cm. Check with an overlay that the five arms align and the tips are equidistant. The drawing is symmetric if rotating it by 72 degrees maps each arm onto the next.
Four practice exercises
Exercise 1
A starfish drawing has five radial lines. The angle between the first and second line is 70 degrees, between the second and third is 74 degrees, and the remaining three angles are 72 degrees each. Does this arrangement have equal five-fold spacing? Explain.
Show answer and check
No. The angles are not all equal; two angles are 70 and 74 degrees instead of 72 degrees. Equal five-fold spacing requires all five angles to be equal.
Why: Five-fold radial symmetry means the arms are spaced equally around the center. Equal spacing corresponds to equal angles of 360 divided by 5, which is 72 degrees. Any deviation means the spacing is not equal.
Check: Add the five angles: 70 + 74 + 72 + 72 + 72 = 360 degrees. Although they sum to 360, they are not equal, so the spacing is uneven.
Exercise 2
You are drawing a starfish with a hypothetical arm length of 7 cm and a central disk radius of 1 cm. You mark tip points at 7 cm from the center along each radial line. What is the distance from the center to the base of each arm if the base is at the edge of the central disk?
Show answer and check
The distance from the center to the base of each arm is 1 cm, the radius of the central disk.
Why: The central disk has radius 1 cm, so its edge is 1 cm from the center. The arms begin at the edge of the disk, so the base distance is 1 cm.
Check: Measure the central disk radius on your drawing and confirm that the arm bases start at that distance from the center.
Exercise 3
A student draws a starfish with five arms, but one arm is 9 cm long while the other four are 7 cm long. The angles between arms are all 72 degrees. Is the drawing pentaradially symmetric? Explain.
Show answer and check
No. Although the angular spacing is equal, the arm lengths are not equal, so the drawing does not have full five-fold radial symmetry.
Why: Five-fold radial symmetry requires that rotating the drawing by 72 degrees maps it onto itself. If one arm is longer, rotation will not map that arm onto the shorter arms, so symmetry is broken.
Check: Measure each arm length from the center to the tip. All five should be approximately equal for full symmetry.
Exercise 4
You have a symmetry-check overlay with five radial lines at 72-degree intervals. When you place it over your drawing, four arms align well but one arm is offset by about 5 degrees. What is a reasonable adjustment, and how would you check it?
Show answer and check
Adjust the offset arm by rotating its centerline about 5 degrees toward the nearest overlay line, then redraw the arm outline. Check by placing the overlay again and confirming that all five arms align within a small tolerance.
Why: The overlay reveals that one arm's centerline is not at the correct angle. Rotating that arm's centerline to match the overlay restores equal spacing. The check confirms alignment.
Check: After adjustment, measure the angle between the adjusted arm and its neighbors; both should be approximately 72 degrees. Use the overlay to confirm visual alignment.
Common mistakes
- Spacing the arms unevenly, so the angles between centerlines are not equal. Re-measure the angles with a protractor or use the divider method to step around a circle. Adjust the radial lines before drawing the arms.
- Making one arm longer or wider than the others. Use the arm-spacing template to mark all tip points at the same distance. Compare arm widths at the base and taper.
- Placing the center disk off the intersection of the radial lines. Mark the center point clearly and draw the disk around it. Use the symmetry-check overlay to confirm the center alignment.
- Drawing arms that do not taper, making the starfish look like a flower. Mark base width points and a single tip point per arm, then connect with gently converging lines.
Self-check rubric
- Five arm centerlines are spaced at equal angles (approximately 72 degrees).
- All five arm tips are at approximately equal distances from the center.
- The central disk is centered on the intersection of the radial lines.
- Arms taper from base to tip and have similar shapes.
- The overall drawing looks balanced when rotated by 72 degrees.
- Valid alternatives: arm length, arm width, taper style, and surface details may vary as long as five-fold symmetry is preserved.
Questions and answers
Do I need a protractor to draw a starfish with five-fold symmetry?
A protractor is helpful but not required. You can use a compass and divider to step around a circle in five equal arcs, or fold a paper circle into five equal sectors by trial. The key is equal angular spacing.
How long should the arms be?
Choose an arm length that fits your paper. For this lesson, 8 cm is a hypothetical example. Measure your paper and pick a length that leaves room for the central disk and margins.
Can I add surface details like bumps or patterns?
Yes. Surface details are optional and should not break the five-fold symmetry. If you add patterns, repeat them similarly on each arm or arrange them radially.
What if my starfish looks slightly uneven?
Hand-drawn starfish often have small variations. Use the symmetry-check overlay to identify major errors. Minor differences are acceptable as long as the five-fold arrangement is clear.