Free original lessons
Single Contour Line Figure Drawing: One Continuous Stroke
Learn to draw people with one unbroken contour line. Plan routes, cross deliberately into inner gaps, and self-check continuity with a clear rubric.
Free lesson
Four exercises
Worked answers
Object Drawing Lessons
A single contour line drawing uses one continuous stroke to describe the outer edge and key inner separations of a figure, without lifting the tool or doubling back to sketch. This lesson teaches a repeatable method for drawing people this way. You will plan a route around the body, keep the line moving, and judge continuity with a simple self-check. The convention is explicit: the contour is one unbroken stroke that may cross itself, but it must not stop and restart. Proportions and start points vary, so the rubric rewards a readable, continuous line rather than one universal shape.
Practice materials: Printable downloads are not available for this lesson yet. Use the instructions and four exercises below.
Reference illustration
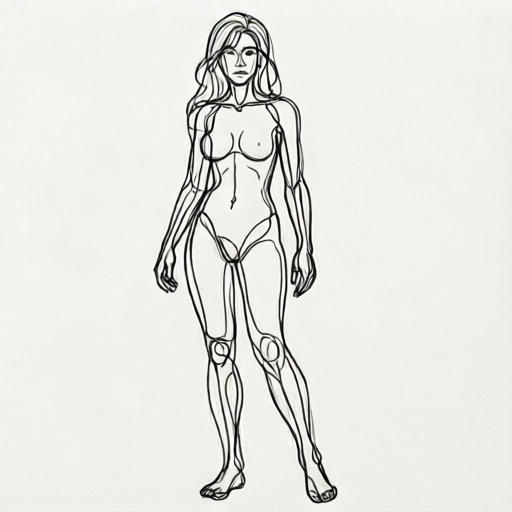
Use the stated measurements and conventions for each exercise.
Plan the route before the line starts
Choose a posed figure and identify a start point on the outer edge, such as the crown of the head or the outer shoulder. Trace the silhouette mentally: head, neck, shoulder, arm, torso, leg, and back up the other side. Decide where the line will cross over an existing segment of itself at the entrance to an inner gap, such as the wrist for the arm gap or the ankle for the space between the legs, and where it will cross back over itself to return to the outer edge. A route that enters and exits inner gaps keeps the drawing readable without lifting the tool.
Keep the tool moving at a steady pace. Slow down at tight turns such as fingers or elbows, and speed up along long edges. If the line drifts, continue; a single contour drawing accepts small deviations as part of the style. The goal is one unbroken stroke, not a perfect silhouette.
- Mark a start point on the outer edge of the posed figure.
- Trace the silhouette mentally and note where the line will cross itself.
- Begin the stroke and keep it moving without lifting the tool.
- Enter inner gaps by crossing the line, then return to the outer edge.
- Finish at the start point or at a natural end of the contour.
Keep continuity while describing the body
Continuity means the line never stops and restarts. Self-crossings are allowed and useful: to enter an inner gap, the line crosses over an existing segment of itself, continues along the inner edge, then crosses back over itself to return to the outer edge. Treat each crossing as a deliberate decision, not an error. If you need to change direction sharply, slow the tool and pivot in place rather than lifting it.
Use the body's major landmarks to guide the line: the crown of the head, the outer shoulder, the elbow, the wrist, the hip, the knee, and the ankle. At each landmark, decide whether the line continues along the outer edge or crosses inward. This keeps the figure readable while preserving one continuous stroke.
- Pause at each major landmark and choose the next segment.
- Cross the line deliberately when entering an inner gap.
- Pivot in place at sharp turns instead of lifting the tool.
- Keep the line tension even; avoid pressing harder to correct drift.
- Check that the line returns to the outer edge after each inner gap.
Self-check continuity and readability
After the drawing is complete, check continuity by tracing the line from start to finish with your eye. If you find a break, note where it occurred and redraw the whole figure in the next attempt with a clearer route at that point. Readability is separate: can a viewer identify the pose and the main body parts? A continuous line that is hard to read may need a clearer route, not a tighter grip.
Use a simple rubric: one unbroken stroke, deliberate crossings, readable pose, and even line tension. Score each item as yes, partly, or no. Valid alternatives include different start points, different crossing locations, and different proportions, as long as the line remains continuous and the figure is readable.
- Trace the line with your eye from start to finish.
- Mark any break and note its location.
- Ask whether the pose and main body parts are readable.
- Score continuity, crossings, readability, and tension.
- Redraw with one route change based on the lowest score.
Worked example
A standing figure faces the viewer with arms slightly away from the torso. Plan and describe a single continuous contour route that enters the arm gap and returns to the outer edge.
Worked answer
Start at the crown of the head. Move down the left side of the head to the neck, then out to the left shoulder. Continue down the outer left arm to the wrist, then cross over the line at the wrist to enter the gap between the arm and torso. Move up the inner arm to the armpit, cross back over the line to the torso edge, and continue down the left side of the torso to the hip. Move down the outer left leg to the ankle, cross over the line to the inner ankle, move up the inner leg to the crotch, cross back over the line, and continue down the right leg to the ankle. Move up the outer right leg to the hip, up the right side of the torso to the right armpit, cross over the line to enter the right arm gap, move down the inner arm to the wrist, cross back over the line, and continue up the outer right arm to the shoulder. Move to the right side of the neck and up to the crown, closing the line. The line crosses over itself at the wrists, armpits, and crotch, and remains one unbroken stroke.
Four practice exercises
Exercise 1
A seated figure has one arm resting on a table and the other hanging down. Describe a continuous contour route that starts at the crown of the head, enters the gap under the resting arm, and ends at the hanging wrist.
Show answer and check
Start at the crown. Move down the left side of the head to the neck, out to the left shoulder, and down the outer left arm to the resting wrist. Cross over the line under the resting arm to the table edge, move along the table edge to the torso, cross back over the line, and continue down the left side of the torso to the left hip. Move down the outer left leg to the knee, cross over the line to the inner knee, move up the inner left leg to the crotch, cross back over the line at the crotch to the inner right leg, move down the inner right leg to the right ankle, cross over the line to the outer right ankle, and move up the outer right leg to the right hip. Continue up the right side of the torso to the right shoulder, and down the hanging arm to the wrist. The line crosses over itself under the resting arm, at the knee, at the crotch, and at the right ankle, and remains one unbroken stroke.
Why: The route enters the required gap under the resting arm and returns to the outer edge, then uses the knee and hip crossings to describe inner separations while keeping one stroke.
Check: Trace the line with your eye from crown to hanging wrist. Confirm no stops and restarts, and confirm the line enters and exits the gap under the resting arm.
Exercise 2
A figure walks with one leg forward and one leg back. Describe a continuous contour route that starts at the forward ankle, enters the gap between the legs, and ends at the back shoulder.
Show answer and check
Start at the forward ankle. Move up the outer forward leg to the hip, up the side of the torso to the shoulder, and out to the forward arm. Move down the outer forward arm to the wrist, cross over the line to the inner wrist, move up the inner arm to the armpit, cross back over the line, and continue down the torso to the hip. Move down the outer back leg to the back ankle, cross over the line to the inner back ankle, move up the inner back leg to the crotch, cross back over the line at the crotch to the outer back hip, and continue up the back side of the torso to the back shoulder. The line crosses over itself at the forward wrist, armpit, back ankle, and crotch, and remains one unbroken stroke.
Why: The route starts at the required ankle, enters the gap between the legs at the crotch crossing, and ends at the back shoulder while remaining one stroke.
Check: Trace from the forward ankle to the back shoulder. Confirm the line enters and exits the gap between the legs and has no breaks.
Exercise 3
A figure reaches upward with both arms. Describe a continuous contour route that starts at the left wrist, enters the gap between the left arm and the head, and ends at the right wrist.
Show answer and check
Start at the left wrist. Move up the outer left arm to the left shoulder. Cross over the line at the shoulder into the gap between the left arm and the head, move up along the side of the head to the crown, then cross back over the line at the crown to the outer edge. Continue down the left side of the head to the neck, down the left side of the torso to the hip, and down the outer left leg to the ankle. Cross over the line at the ankle to the inner ankle, move up the inner leg to the crotch, cross back over the line at the crotch, and continue down the outer right leg to the right ankle. Move up the outer right leg to the hip, up the right side of the torso to the right armpit, and cross over the line at the armpit into the gap between the right arm and the head. Move up along the side of the head toward the crown, cross back over the line, follow the right outside edge of the head down to the right shoulder, then continue along the outer right arm to the right wrist, ending there. The line crosses over itself at the left shoulder, crown, left ankle, crotch, right armpit, and near the crown on the right side, and remains one unbroken stroke from the left wrist to the right wrist.
Why: The route enters the required gap between the left arm and the head, uses crossings to describe both arm gaps, and ends at the right wrist in one stroke.
Check: Trace from the left wrist to the right wrist. Confirm the line enters and exits the gap between the left arm and the head, and check for no stops and restarts.
Exercise 4
A figure bends forward to touch the ground. Describe a continuous contour route that starts at the top of the back, enters the gap between the arms and the legs, and ends at one hand.
Show answer and check
Start at the top of the back and trace the outer back to the hip, then down one outer leg to the ankle. Cross the drawn ankle segment into the inner leg, continue to the crotch, and cross back into the other leg. Follow that leg to its hip, then move up the torso to the shoulder of the first arm. Draw that arm only as far as its wrist, cross into the gap between forearm and shin, follow the shin edge to the knee, and cross back to the leg contour. Continue along the torso to the other shoulder, then draw the second arm down to its hand and stop. The first arm ends at the wrist before the gap; the second distinct arm reaches the hand after the gap.
Why: The route enters the required arm-and-leg gap at the first wrist, exits at the knee, then continues to the other shoulder and down the second arm. It distinguishes both arms and does not retrace the first outer-arm segment.
Check: Trace from the top of the back to the final hand. Confirm one continuous route, entry at the first wrist, exit at the knee, and a final descent along the other arm.
Common mistakes
- Lifting the tool to correct a drift. Continue from the drift point and treat the deviation as part of the style; redraw the whole figure next time with a slower pace at that landmark.
- Avoiding crossings and leaving inner gaps undescribed. Plan one or two deliberate crossings to enter arm gaps or the space between legs, then return to the outer edge.
- Pressing harder to fix a shaky line. Reduce pressure and slow down at tight turns; even tension matters more than a perfectly smooth edge.
- Judging the drawing against a single ideal proportion. Use the rubric: continuity, deliberate crossings, readability, and even tension. Proportions may vary.
Self-check rubric
- One unbroken stroke from start to finish; no stops and restarts.
- Crossings are deliberate and used to enter inner gaps.
- The pose and main body parts are readable.
- Line tension is even; no heavy pressing to correct drift.
- Valid alternatives in start point, crossing location, and proportion are accepted.
Questions and answers
Can the line cross itself?
Yes. Crossings are allowed and useful for entering inner gaps such as the space between an arm and the torso. The rule is one unbroken stroke, not zero crossings.
What counts as a break?
A break is any place where the tool stops and restarts. Small drifts are not breaks. Trace the line with your eye from start to finish to find true breaks.
How do I start a figure?
Pick a start point on the outer edge, such as the crown of the head or the outer shoulder. Plan the route mentally before the tool touches the page.
Is there one correct contour?
No. Start points, crossing locations, and proportions vary. The rubric rewards continuity, deliberate crossings, readability, and even tension.