Free original lessons
Draw Realistic Mermaid Tail Scales: Row Construction and Fin Transition
Build believable mermaid tail scales row by row, then taper them cleanly into fin rays using a repeatable drawing method and self-check rubric.
Free lesson
Four exercises
Worked answers
Object Drawing Lessons
This lesson focuses only on the tail: constructing overlapping scale rows that follow the tail's curve, then transitioning those scales into fin rays without a visual break. You will work from a simple tail outline, establish a row grid, draw scales in offset columns, and taper the final rows into a fin-transition zone. The method uses a defined convention for scale overlap and fin-ray spacing so that different drawing styles remain valid. All measurements are hypothetical examples; measure your own paper and tools. No downloads or files are currently available; the resource plan below describes what is planned.
Practice materials: Printable downloads are not available for this lesson yet. Use the instructions and four exercises below.
Reference illustration
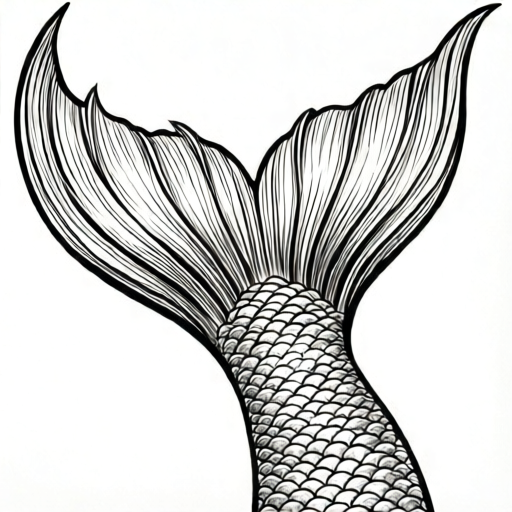
Use the stated measurements and conventions for each exercise.
Set the tail outline and row grid
Begin with a single closed tail outline: a tapered tube that narrows toward the fin base. Mark a centerline from the waist to the fin tip. Decide a scale row height as a hypothetical example, such as 1.5 cm on A4 paper, and mark evenly spaced row lines perpendicular to the centerline. Row lines curve with the tail so scales appear to wrap around the form.
Number rows from the waist downward. The fin-transition zone is the last two or three rows before the fin base. Keep row spacing consistent until that zone, where spacing may compress slightly to suggest scales flattening into rays.
- Draw the tail outline and centerline.
- Mark row lines at a chosen consistent spacing, curving them across the tail.
- Label rows 1 to N and shade the final two or three rows as the fin-transition zone.
- Check that row lines meet the outline at similar angles on both sides.
Draw offset scale columns
Within each row, draw scales as rounded shapes that overlap the row below by about one third of their height. Offset each row by half a scale width so scales interlock like roof tiles. Use a consistent convention: each scale's lower edge sits over the upper edge of the scale beneath it. Scale width can vary across the tail, but keep the offset pattern readable.
Work row by row from waist to fin. On curved sections, rotate each scale slightly so its long axis follows the tail surface. Avoid drawing all scales as identical circles; vary width and height modestly while preserving the row rhythm.
- Draw the first row of scales along row line 1, spacing them evenly.
- Offset row 2 by half a scale width and overlap the row above.
- Continue downward, rotating scales to follow the tail curve.
- Check overlap consistency and offset rhythm every three rows.
Taper scales into the fin transition
In the fin-transition zone, reduce scale height and increase scale width slightly so each scale becomes a flatter, elongated shape. Gradually align the lower edges of these scales with the direction of the fin rays. The last scale row should read as a set of flattened plates that split into rays rather than ending abruptly.
Draw fin rays starting from the fin base and extending outward. Where a ray meets the last scale row, let the ray emerge from the gap between two flattened scales. Keep ray spacing consistent with the scale width at that point so the transition looks continuous.
- Flatten scales in the transition rows by reducing height and widening the shape.
- Align flattened scale edges with the intended fin-ray direction.
- Draw fin rays beginning at the fin base and passing between flattened scales.
- Check that no ray starts in the middle of a scale and that scale edges do not cross rays awkwardly.
Refine overlap, shading, and edge control
Add a thin shadow under each scale's lower edge to reinforce overlap. Keep shadow direction consistent across the tail. Darken the fin-transition zone slightly to show compression, but preserve visible scale edges. Erase construction row lines only after the scale pattern is stable.
Use a simple convention for line weight: outline heavier than scale edges, scale edges heavier than shading lines. This keeps the row structure readable at a glance.
- Shade under each scale's lower edge in one consistent direction.
- Darken transition-zone scale edges slightly.
- Erase row grid lines that are no longer needed.
- Check line-weight hierarchy and overall row rhythm.
Worked example
A tail outline is 12 cm long with a hypothetical row height of 1.5 cm. How many full rows fit before a two-row fin-transition zone, and how should the last full row relate to the first transition row?
Worked answer
Twelve divided by 1.5 equals 8 rows total. Reserve the last two rows for the transition, leaving 6 full scale rows. The last full row should overlap the first transition row by about one third, and the first transition row should be slightly flatter and wider than the row above.
Four practice exercises
Exercise 1
A tail outline is 18 cm long. Using a hypothetical row height of 2 cm, how many full rows fit before a three-row fin-transition zone?
Show answer and check
Six full rows fit before the transition zone.
Why: Eighteen divided by 2 equals 9 total rows. Subtract 3 transition rows to get 6 full rows.
Check: Multiply 6 full rows by 2 cm to get 12 cm, add 3 transition rows at 2 cm to get 6 cm, and confirm 12 plus 6 equals 18 cm.
Exercise 2
A scale row has 8 scales across. The next row is offset by half a scale width. Describe how many scale positions the offset row should show across the same width, using the convention that edge scales may be partial.
Show answer and check
The offset row should show 8 full-scale positions plus two half-scale edge positions, or 9 visible scale shapes if partial edge scales are drawn.
Why: Half-width offset shifts every scale by half a position, creating partial scales at both edges. Counting full positions plus two halves gives 9 visible shapes.
Check: Sketch a short row of 8 equal marks, shift the next row by half a mark, and count the resulting shapes at both edges.
Exercise 3
In a fin-transition zone, a flattened scale is 2 cm wide and a fin ray is 0.5 cm wide. If rays emerge between every pair of adjacent flattened scales, how many ray gaps exist across 5 adjacent flattened scales?
Show answer and check
Four ray gaps exist across 5 adjacent flattened scales.
Why: Gaps between adjacent scales equal the number of scales minus one. Five minus one equals four.
Check: List five scales in a row and count the spaces between them: one between first and second, and so on, totaling four.
Exercise 4
A student draws 7 rows with a hypothetical row height of 1.2 cm, then adds a 2-row transition zone at the same height. What total tail length does this cover, and what check confirms the row count?
Show answer and check
The total covers 10.8 cm, using 9 rows at 1.2 cm each.
Why: Seven full rows plus two transition rows equals 9 rows. Nine multiplied by 1.2 cm equals 10.8 cm.
Check: Add 7 and 2 to confirm 9 rows, then multiply 9 by 1.2 and verify the product is 10.8 cm.
Common mistakes
- Drawing scales in aligned columns instead of offset rows. Offset each row by half a scale width so scales interlock like roof tiles.
- Ending scales abruptly at the fin base with no taper. Flatten and widen scales in the last two or three rows, then let fin rays emerge between them.
- Letting fin rays start in the middle of a scale. Start each ray at the fin base and pass it through the gap between two flattened scales.
- Using identical scale sizes everywhere, making the tail look flat. Vary scale width and height modestly while preserving row rhythm and overlap.
Self-check rubric
- Row lines curve with the tail and are evenly spaced outside the transition zone.
- Scales overlap the row below by a consistent fraction, approximately one third.
- Each row is offset by about half a scale width from the row above.
- Scale size varies modestly while row rhythm remains readable.
- The final two or three rows flatten and widen into the fin-transition zone.
- Fin rays begin at the fin base and emerge between flattened scales, not through scale centers.
- Shadow direction is consistent and supports the overlap convention.
- Line-weight hierarchy distinguishes outline, scale edges, and shading.
Questions and answers
How many scale rows should a tail have?
Choose row count from tail length and row height. With a hypothetical 1.5 cm row height on a 15 cm tail, about ten rows fit before the transition zone. Adjust to your drawing size.
Must every scale be the same shape?
No. The convention requires consistent overlap and offset, not identical shapes. Modest variation in width and height is valid and often more realistic.
Where exactly does the fin transition begin?
Begin it in the last two or three rows before the fin base, where scales flatten and widen to meet the rays.
Can I use a different overlap fraction?
Yes. One third overlap is a working example. Any consistent fraction that keeps scale edges visible is acceptable under the rubric.