HomeDraw Siren Scale Rows: A Step-by-Step Pattern Guide Free original lessons
Draw Siren Scale Rows: A Step-by-Step Pattern Guide
Learn to construct siren scale rows with a clear convention, row-by-row template, overlap shading, and self-checking exercises. No prior drawing experience needed.
Free lesson
Four exercises
Worked answers
Object Drawing Lessons
This guide teaches you to draw the scale pattern on a siren tail using a simple, repeatable convention. You will define a scale unit, build rows that overlap like roof tiles, and shade the overlap so the pattern reads clearly. The focus is the scale-row pattern itself, not the full siren figure or an underwater scene. All measurements are hypothetical examples; measure your own paper and tools. The convention is explicit so you can check your work and accept valid alternatives.
Practice materials: Printable downloads are not available for this lesson yet. Use the instructions and four exercises below.
Reference illustration
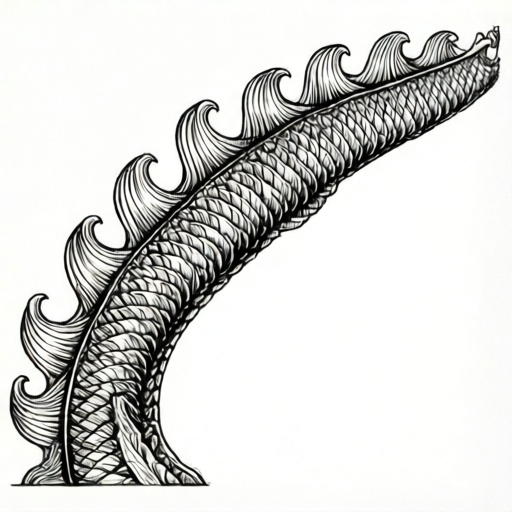
Use the stated measurements and conventions for each exercise.
Define the scale unit and row convention
A scale unit is a single rounded shape, like a soft shield or a wide U with a flat top. Decide its width and height in millimetres on your paper. For this guide, a hypothetical unit is 12 mm wide and 10 mm tall. Draw one unit lightly in pencil at the top centre of your tail area. This is your reference unit.
Rows overlap downward. Each new row sits below the previous row, and its top edge tucks under the bottom of the row above. The visible part of each scale is the lower portion. This overlap is the key to a convincing siren scale pattern. Keep the overlap consistent: a hypothetical 3 mm overlap means each row's top edge is 3 mm above the bottom edge of the row above.
- Draw a light horizontal guide line where the first row will sit.
- Draw one reference scale unit centred on the guide line.
- Mark the unit width and height in millimetres beside your reference.
- Decide the overlap amount and write it down.
- Draw a second unit beside the first, touching but not overlapping sideways.
- Check that both units match your recorded width and height.
Build rows with alternating offsets
To avoid vertical seams, offset every other row by half a unit width. If your unit is 12 mm wide, the offset is 6 mm. Row 1 starts at the centre. Row 2 starts 6 mm to the left or right, so its scales sit between the scales of Row 1. Row 3 returns to the Row 1 alignment. This alternating pattern is the row-by-row template.
Work downward row by row. After each row, step back and check the offset and overlap. If a row drifts, correct it before adding the next. The pattern should look like a brick wall or roof tiles, not a grid. Keep the tail outline light so the scale rows remain the focus.
- Draw Row 1 across the tail width using your reference unit.
- Draw Row 2 starting half a unit to the side, tucked under Row 1 by the overlap amount.
- Draw Row 3 aligned with Row 1.
- Continue alternating until you reach the tail tip.
- At the tail tip, taper the last row by reducing the number of units, not by shrinking each unit.
- Check that every row overlaps the one above by the same amount.
Shade the overlap to show scale depth
Shading is what makes the overlap readable. Choose one light source direction, for example from the top left. The lower edge of each scale casts a small shadow onto the scale below. Shade a thin band along the bottom edge of each scale, on the side away from the light. Keep the band narrow: a hypothetical 2 mm band is enough.
Do not shade the entire scale. The goal is to show that the lower scale is tucked under the upper one. Use a soft pencil and light pressure. If you use colour, choose one shade darker than the base colour for the shadow band. Valid alternatives include cross-hatching or stippling, as long as the shadow band stays on the lower edge and follows the light direction.
- Mark your light direction with a small arrow outside the tail area.
- For each scale, identify the bottom edge.
- Shade a narrow band along the bottom edge, opposite the light direction.
- Keep the band width consistent across the row.
- Check that the shadow falls on the scale below, not on the scale itself.
- Erase any guide lines that are no longer needed.
Check your pattern with simple arithmetic
You can check your row spacing with arithmetic. If your unit height is 10 mm and your overlap is 3 mm, the visible height of each row is 7 mm. After 4 rows, the total visible height is 4 times 7 mm, which is 28 mm. Measure your drawing from the top of Row 1 to the bottom of Row 4. If it is close to 28 mm, your rows are consistent.
For width, if your unit width is 12 mm and you have 5 units in a row, the row width is 60 mm. With a half-unit offset, Row 2 starts 6 mm to the side. Check that the offset is half of 12 mm, which is 6 mm. These simple checks catch drift early. Label your chosen numbers as hypothetical examples and measure your own paper to confirm.
- Record unit width, unit height, and overlap in millimetres.
- Calculate visible row height as unit height minus overlap.
- Multiply visible row height by the number of rows to get expected total height.
- Measure your drawing and compare.
- Calculate row width as unit width times number of units.
- Check that the offset equals half the unit width.
Worked example
A siren tail area is 60 mm wide at the top. Use a hypothetical scale unit 12 mm wide and 10 mm tall with a 3 mm overlap. Row 1 has 5 units. Row 2 is offset by half a unit. How wide is Row 2 if it also has 5 units, and what is the visible height after 3 rows?
Worked answer
Row 2 width is 5 times 12 mm, which is 60 mm. The offset is half of 12 mm, which is 6 mm, so Row 2 starts 6 mm to the side but still spans 60 mm if it has 5 units. Visible row height is 10 mm minus 3 mm, which is 7 mm. After 3 rows, visible height is 3 times 7 mm, which is 21 mm.
Four practice exercises
Exercise 1
A scale unit is 10 mm wide and 8 mm tall with a 2 mm overlap. Row 1 has 4 units. What is the row width and the visible height after 2 rows?
Show answer and check
Row width is 4 times 10 mm, which is 40 mm. Visible row height is 8 mm minus 2 mm, which is 6 mm. After 2 rows, visible height is 2 times 6 mm, which is 12 mm.
Why: Multiply unit width by unit count for row width. Subtract overlap from unit height for visible row height. Multiply by row count for total visible height.
Check: Measure your drawing: Row 1 should be about 40 mm wide, and two rows should be about 12 mm tall from top to bottom.
Exercise 2
A scale unit is 14 mm wide. Row 1 starts at the left edge. Row 2 is offset by half a unit. How many millimetres from the left edge does Row 2 start?
Show answer and check
Half of 14 mm is 7 mm, so Row 2 starts 7 mm from the left edge.
Why: The offset is half the unit width. Divide 14 mm by 2 to get 7 mm.
Check: Mark the left edge, measure 7 mm, and confirm Row 2's first scale begins there.
Exercise 3
You draw 5 rows with a visible row height of 9 mm. What is the total visible height? If your unit height is 12 mm, what is the overlap?
Show answer and check
Total visible height is 5 times 9 mm, which is 45 mm. The overlap is 12 mm minus 9 mm, which is 3 mm.
Why: Multiply visible row height by row count. Subtract visible row height from unit height to find overlap.
Check: Measure from the top of Row 1 to the bottom of Row 5; it should be about 45 mm. Check that each row tucks under the one above by about 3 mm.
Exercise 4
A tail tip row has room for 3 full units and a half unit. Your unit width is 12 mm. How wide is the tapered row?
Show answer and check
Three full units are 3 times 12 mm, which is 36 mm. A half unit is 6 mm. The tapered row is 36 mm plus 6 mm, which is 42 mm.
Why: Multiply full unit count by unit width, then add half the unit width for the half unit.
Check: Measure the tapered row; it should be about 42 mm wide, and the half unit should be about 6 mm wide.
Common mistakes
- Drawing scales in a straight grid with no offset between rows. Offset every other row by half a unit width so scales sit between the scales above.
- Making the overlap different on each row. Record one overlap amount and use it for every row. Check with the visible row height calculation.
- Shading the whole scale instead of the overlap band. Shade only a narrow band along the bottom edge, opposite your marked light direction.
- Shrinking individual scales at the tail tip. Keep the unit size constant and reduce the number of units in the last row.
Self-check rubric
- Scale units match the recorded width and height within 1 mm.
- Every other row is offset by half a unit width.
- Overlap is consistent across all rows.
- Shadow band sits on the lower edge of each scale and follows the marked light direction.
- Tail tip tapers by reducing unit count, not unit size.
- Arithmetic check for visible height matches the drawing within 2 mm.
Questions and answers
Do I have to use the hypothetical 12 mm by 10 mm unit?
No. Those numbers are examples. Choose any unit size that fits your paper, record it, and use it consistently. The arithmetic checks work with your own numbers.
Can I shade with cross-hatching instead of a smooth band?
Yes. Any shading method is valid if the shadow band stays on the lower edge of each scale and follows your marked light direction.
How many rows should I draw?
Draw as many rows as your tail outline allows. The pattern is the focus, so three to six rows are enough to show the repeat clearly.
What if my tail outline is curved?
Keep the scale units the same size and let the row follow the curve. The offset and overlap rules still apply. Taper only by reducing the number of units at the edges.