Free original lessons
Draw Overlapping Dragon Scale Rows: A Step-by-Step Guide
Learn to draw small dragon scales in overlapping rows with clear steps, shading tips, common fixes, and four practice tasks.
Free lesson
Four exercises
Worked answers
Object Drawing Lessons
This guide teaches a repeatable method for drawing small, overlapping dragon scale rows. You will learn how to set a baseline, place scales in staggered rows, control overlap order, and add simple edge shading. The focus is on scale-row construction only, not full dragon anatomy. All measurements are hypothetical examples; measure your own paper and tools. A consistent convention is used: x-height means the distance from baseline to midline. Work on plain paper with a pencil and eraser.
Practice materials: Printable downloads are not available for this lesson yet. Use the instructions and four exercises below.
Reference illustration
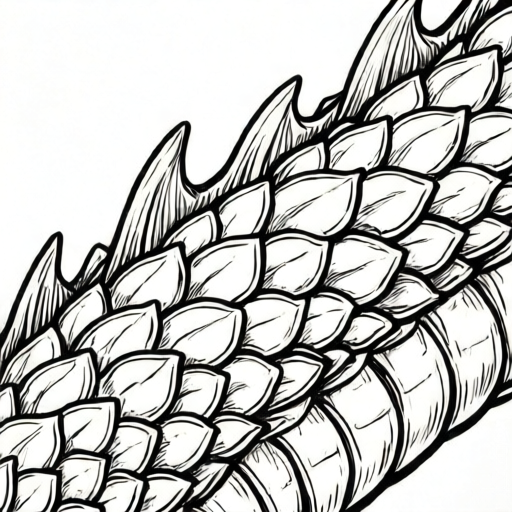
Use the stated measurements and conventions for each exercise.
Setting Up the Row Grid
Start by drawing a light horizontal baseline. Decide a scale width and height in simple units, such as 10 mm wide and 8 mm tall. These are hypothetical values; adjust to your paper. Mark the baseline and a midline at the chosen height. The x-height is baseline to midline, so each scale sits within that band.
Use a faint grid to keep rows even. Draw vertical guide marks every scale width along the baseline. For the second row, offset the marks by half a scale width. This staggering creates natural overlap and prevents scales from lining up in straight columns.
- Draw a light baseline across the page.
- Mark a midline at your chosen scale height above the baseline.
- Place tick marks every scale width along the baseline.
- Offset the next row's tick marks by half a scale width.
- Keep all guides faint so they can be erased later.
Drawing and Overlapping Scales
Draw each scale as a rounded, slightly pointed shape that sits on the baseline and reaches toward the midline. Begin with the bottom row. Draw scales left to right, leaving a small gap between neighbors. Then draw the next row above, offset by half a width. The upper scales should overlap the lower ones slightly: each upper scale's lower edge sits in front and covers the top portion of the lower scale by about one quarter of the scale height.
Overlap order matters. Always draw the upper row after the lower row so its lower edge sits in front and covers the top portion of the lower scale. Shade that lower edge of the upper scale. Keep the overlap consistent across the row. If a scale looks too round, flatten its top slightly; if too pointed, round the tip. Scale shapes may vary slightly, so accept small differences in shape as long as the row rhythm stays even.
- Draw the bottom row of scales on the baseline.
- Draw the next row above, offset by half a scale width.
- Let each upper scale overlap the lower scale by about one quarter of its height.
- Continue row by row, always drawing the upper row after the lower one.
- Erase guides only after the row structure is clear.
Edge Shading for Depth
Shade only the lower edge of each scale where it overlaps the scale below. Use a light pencil stroke and keep the shading narrow, about one fifth of the scale height. This creates a simple shadow that suggests depth without turning the drawing muddy. Leave the upper part of each scale light.
Check shading consistency by looking at the row from a short distance. Shadows should appear under the overlapping edge, not on top. If a shadow looks too dark, lift it with an eraser. If it looks uneven, redraw the edge line lightly and shade again.
- Identify the lower edge of each overlapping scale.
- Apply a narrow shadow along that edge only.
- Keep the shadow light and even across the row.
- Compare rows from a short distance for consistency.
- Erase and redraw any shadow that looks too dark or misplaced.
Worked example
Draw three overlapping scale rows using a scale width of 10 mm and height of 8 mm. Offset each row by 5 mm and shade the lower overlap edge.
Worked answer
Draw a baseline and a midline 8 mm above it. Mark ticks every 10 mm on the baseline. Draw the bottom row of scales sitting on the baseline and reaching the midline. For row two, start ticks 5 mm to the right and draw scales overlapping the bottom row by about 2 mm. Repeat for row three. Shade a narrow band along each upper scale's lower edge. Check that rows stagger and shadows sit under overlaps.
Four practice exercises
Exercise 1
Draw two rows of scales with width 12 mm and height 9 mm. Offset the second row by 6 mm. Describe where the overlap shadow goes.
Show answer and check
Two staggered rows with the second row offset by 6 mm; shadow along the lower edge of each second-row scale where it covers the first row.
Why: Offsetting by half the width staggers scales. The upper row overlaps the lower, so its lower edge casts the shadow.
Check: Measure tick spacing: 12 mm in row one, first tick at 6 mm in row two. Confirm shadow is only on lower overlap edges.
Exercise 2
A learner draws three rows but all scales line up vertically. State the fix and the new offset for a 14 mm scale width.
Show answer and check
Offset each new row by half the width, so 7 mm for a 14 mm scale.
Why: Vertical alignment happens when rows share the same tick positions. Half-width offset staggers them.
Check: Check that row two ticks start 7 mm right of row one ticks and row three starts 7 mm right of row two.
Exercise 3
Draw one row of five scales, width 8 mm, height 6 mm. Then draw a second row of four scales offset by 4 mm. Count visible overlaps.
Show answer and check
Four visible overlaps, one for each scale in the second row.
Why: Each upper scale overlaps one lower scale. With four upper scales, there are four overlap edges.
Check: Count second-row scales and confirm each has a shaded lower edge touching a first-row scale.
Exercise 4
A scale row looks muddy because shading covers the whole scale. Give a correction using a narrow edge band. Use a hypothetical scale width of 10 mm and height of 8 mm, and state a band width for that scale.
Show answer and check
Erase broad shading and shade only a narrow lower edge band, about 1.6 mm wide for a 10 mm-wide, 8 mm-tall scale (roughly one fifth of the scale height).
Why: Depth comes from the overlap shadow, not full-scale shading. A narrow band keeps the row clear.
Check: Measure the shaded band: it should be about one fifth of the scale height. For the hypothetical 8 mm height, that is about 1.6 mm; confirm the band stays narrow and sits only on the lower overlap edge.
Common mistakes
- Scales in straight vertical columns. Offset each new row by half a scale width so scales stagger.
- Upper scales drawn before lower scales, causing wrong overlap. Draw bottom rows first, then upper rows so each upper scale's lower edge sits in front of the lower scale.
- Shading the whole scale instead of the overlap edge. Shade only the narrow lower edge where one scale covers another.
- Inconsistent scale height across a row. Use the midline as a height guide and check each scale against it.
Self-check rubric
- Rows are staggered by about half a scale width.
- Upper rows overlap lower rows consistently.
- Scale height stays close to the chosen midline.
- Shading is limited to the lower overlap edge.
- Guides are faint and erased where possible.
- Valid alternatives in scale shape are accepted if row rhythm remains even.
Questions and answers
How wide should each scale be?
Choose a simple width such as 10 mm as a hypothetical example, then measure your own paper and keep the width consistent within a row.
How much should scales overlap?
A small overlap, about one quarter of the scale height, keeps rows readable. Adjust slightly if your scales are very small.
Do I need special paper?
No. Plain paper and a pencil work. Use light guides so they erase cleanly.
Can I vary scale shapes?
Yes. Slight differences in roundness or point are acceptable if the row rhythm stays even.