Free original lessons
How to Draw Snake Scales on a Curved Gourd Surface
Plan scale rows that follow a gourd's bulge, using contour guides, simple spacing arithmetic, and a clear convention for checking alignment.
Free lesson
Four exercises
Worked answers
Object Drawing Lessons
Drawing snake scales on a gourd is a contour problem before it is a texture problem. A gourd bulges, narrows, and often leans, so rows that look even on flat paper can bunch or fan out on the surface. This guide defines a simple scale convention, shows how to place contour guide lines that follow the bulge, and gives arithmetic checks so you can keep row spacing consistent. The convention is deliberately flexible: scale shape and exact row count may vary, but the relationship between rows and the gourd's contour must stay readable. All measurements below are hypothetical examples; measure your own gourd and adjust the numbers.
Practice materials: Printable downloads are not available for this lesson yet. Use the instructions and four exercises below.
Reference illustration
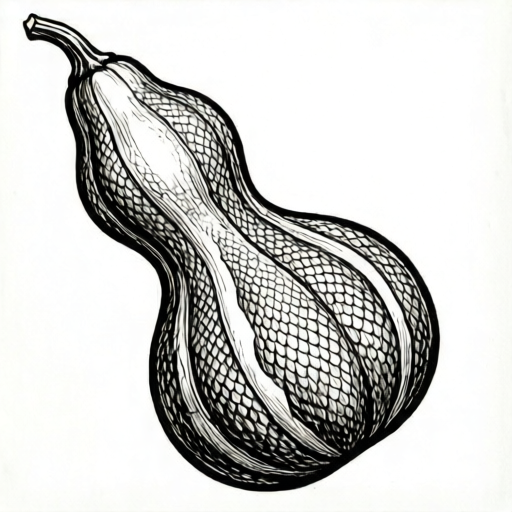
Use the stated measurements and conventions for each exercise.
Define a scale convention before drawing
A convention is a stated rule you can check. For this task, use overlapping teardrop scales arranged in staggered rows. Each scale points toward the gourd's neck, and each row overlaps the row below by about one-third of a scale height. Staggering means a scale in one row sits between two scales in the row below, which prevents vertical seams.
Write your convention at the top of the worksheet: scale height, scale width, overlap fraction, and row direction. For example, a hypothetical scale might be 12 mm tall and 9 mm wide with one-third overlap. These numbers are examples only; choose values that suit your gourd and mark them as your working convention.
- Measure the gourd's height and its widest circumference with a flexible tape.
- Choose a hypothetical scale height, such as 12 mm, and record it as your convention.
- Decide the overlap fraction, such as one-third, and write it beside the scale height.
- Mark the direction scales point, usually toward the neck.
Place contour guide lines that follow the bulge
Contour guide lines are faint lines that run around the gourd at intervals. They are not scale rows yet; they are reference rings that let you see where the surface widens or narrows. On a bulging gourd, the distance between rings measured along the surface stays constant, but the ring's circumference changes. That change is what makes scale rows fan or compress.
Draw three to five guide rings: one near the neck, one at the widest bulge, one near the base, and optional rings between them. Space them by your chosen scale height multiplied by the number of rows you want between guides. If your scale height is 12 mm and you want four rows between guides, space the guides about 48 mm apart along the surface.
- Mark the neck, widest point, and base with light pencil ticks.
- Measure along the surface between ticks and divide by your planned row spacing.
- Draw faint rings at those intervals, keeping each ring perpendicular to the gourd's local curve.
- Label each ring with its row number so you can track stagger.
Build staggered rows and check spacing arithmetic
Start at the widest ring and work outward in both directions. Place scales along the ring, then place the next row so each scale sits between two scales of the previous row. Because the gourd narrows toward the neck and base, the number of scales per row will decrease. That is correct: the row count changes, but the scale size and overlap stay constant.
Use simple arithmetic to check. If a ring's circumference is 300 mm and your scale width plus gap is 10 mm, you can fit about 30 scales on that ring. On a narrower ring of 240 mm, you can fit about 24 scales. The difference of six scales is spread across the row, so the stagger remains even. Record these counts on the worksheet before drawing final scales.
- Measure each guide ring's circumference with a flexible tape.
- Divide each circumference by your scale width plus gap to estimate scales per row.
- Round to a whole number and note the count beside the ring.
- Draw scales on alternating offsets so no two rows line up vertically.
- Check that overlap stays about one-third of scale height on the bulge and near the ends.
Adapt the pattern where the gourd leans or narrows sharply
A leaning gourd has a contour that shifts sideways. Keep guide rings perpendicular to the local surface, not to the table. Where the gourd narrows sharply, reduce the number of scales per row rather than shrinking scales. If a row would otherwise crowd, omit one scale at the narrow side and keep the stagger consistent.
At the neck, scales may become too small to draw clearly. Stop the scale pattern at a marked boundary and leave the neck plain or use a simpler band. State this boundary in your convention so the decision is deliberate, not accidental.
- Trace the lean by marking the centerline of the gourd from neck to base.
- Adjust each guide ring so it crosses the centerline at a right angle to the local surface.
- At sharp narrowing, remove scales from the crowded side first.
- Mark a clear stop line near the neck and keep the area beyond it plain.
Worked example
A hypothetical gourd has guide rings at 300 mm, 260 mm, and 220 mm circumference. Your convention uses a 10 mm scale width plus 2 mm gap. Estimate scales per row and explain the stagger.
Worked answer
Divide each circumference by 12 mm. The 300 mm ring fits about 25 scales; the 260 mm ring fits about 21.7, rounded to 22; the 220 mm ring fits about 18.3, rounded to 18. Offset each row by half a scale width so scales sit between those below. The decreasing counts are expected because the gourd narrows; scale size stays constant.
Four practice exercises
Exercise 1
A gourd ring measures 240 mm circumference. Your convention uses an 8 mm scale width plus 2 mm gap. Estimate how many scales fit on that ring.
Show answer and check
About 24 scales.
Why: Add width and gap to get 10 mm per scale. Divide 240 by 10 to get 24.
Check: Multiply 24 by 10 mm to return to 240 mm; confirm the count is a whole number.
Exercise 2
Two guide rings measure 360 mm and 300 mm circumference. Your scale width plus gap is 12 mm. Estimate the difference in scales per row and state whether scale size should change.
Show answer and check
The wider ring fits about 30 scales; the narrower ring fits about 25 scales. The difference is 5 scales, and scale size should not change.
Why: 360 divided by 12 is 30; 300 divided by 12 is 25. The narrowing surface reduces the count, not the scale size.
Check: Multiply each count by 12 mm to recover the original circumference.
Exercise 3
A gourd leans so that one guide ring is tilted relative to the table. Describe how to redraw that ring and why.
Show answer and check
Redraw the ring so it crosses the gourd's centerline at a right angle to the local surface, even if it looks tilted compared with the table.
Why: Guide rings must follow the surface contour; using the table as a reference would make scales bunch on one side.
Check: Check that the ring's distance from the neighboring ring stays roughly constant along the surface.
Exercise 4
Your convention uses a 12 mm scale height and one-third overlap. You want four rows between guide rings. How far apart should the guide rings be along the surface?
Show answer and check
About 48 mm apart along the surface.
Why: Four rows at 12 mm each gives 48 mm. Overlap affects appearance but not the row-to-row spacing along the surface in this simple convention.
Check: Measure the surface distance between rings with a flexible tape and compare it with 48 mm; adjust if your measured value differs.
Common mistakes
- Drawing rows as straight horizontal lines across a bulging gourd. Use contour guide rings that follow the local surface, and check each ring against the gourd's curve before adding scales.
- Shrinking scales near the neck to keep the same count per row. Keep scale size constant and reduce the number of scales per row as the circumference decreases.
- Aligning scales vertically from row to row, creating seams. Offset each row by half a scale width so scales sit between the scales below.
- Guessing row spacing without measuring the surface. Measure along the surface with a flexible tape and divide by your chosen row spacing; label all numbers as hypothetical examples.
Self-check rubric
- Guide rings follow the gourd's local contour rather than a straight horizontal line.
- Scale size and overlap fraction match the stated convention across rows.
- Rows are staggered so no vertical seams appear.
- Scale count per row decreases where circumference decreases, without shrinking scales.
- A clear stop line or boundary is marked and explained.
- All numerical values are labeled as hypothetical examples or measured from the actual gourd.
Questions and answers
Do I need a specific scale shape?
No. The convention allows teardrops, rounded diamonds, or simple ovals, provided each scale points consistently and overlaps the row below by the stated fraction.
How many rows should I draw?
Choose a number that fits your measured surface and scale height. For example, a hypothetical 12 mm scale on a 180 mm surface allows about 15 rows, but your gourd and convention will differ.
What if my gourd is very uneven?
Add more guide rings where the contour changes quickly. Keep scale size constant and adjust the count per row instead of forcing even spacing.
Can I leave part of the gourd without scales?
Yes, if you mark a clear stop line and state it in your convention. A plain neck or base band is a valid design choice.