Free original lessons
How to Draw a Snake's Spiky Scales: Pointed Overlap Practice
Learn to draw pointed, spiky snake scales with clear overlap order, shape steps, and a practice panel plan. Includes exercises, rubric, and common fixes.
Free lesson
Four exercises
Worked answers
Object Drawing Lessons
This guide teaches a repeatable way to draw spiky pointed snake scales, focusing on shape and overlap rather than body anatomy. You will define a simple scale convention, practice pointed shapes, and learn how to layer them so each spike reads clearly. All measurements are hypothetical examples; measure your own paper and tools. The planned printable is described but not yet built.
Practice materials: Printable downloads are not available for this lesson yet. Use the instructions and four exercises below.
Reference illustration
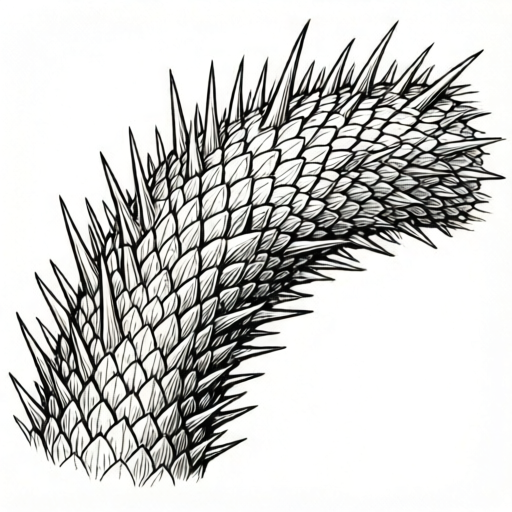
Use the stated measurements and conventions for each exercise.
Define a Spiky Scale Convention
A spiky scale is a pointed shape with a wide base and a narrow tip. For practice, use a simple convention: each scale is a triangle-like form with slightly curved sides and a sharp tip. The base sits on an imaginary row line, and the tip points away from the body direction you choose. This convention is not the only valid style; rounded sides or asymmetric tips can also read as spiky if the point is clear.
Set a working size. For example, draw scales about 12 mm wide at the base and 18 mm long from base to tip on standard paper. These numbers are hypothetical; adjust to your paper and comfort. Keep units consistent: use millimeters for all measurements in one practice session.
Decide a pointing direction. For a snake moving left to right, scales often point backward, but you may choose forward or upward for stylized work. Mark a small arrow on your practice sheet to keep direction consistent.
- Draw a light horizontal row line as a guide.
- Mark base points every 12 mm along the line (hypothetical spacing).
- From each base point, draw two slightly curved sides meeting at a tip 18 mm away.
- Check that every tip is sharp and every base is wide enough to overlap the next row.
Overlap Order and Layering
Overlap makes spiky scales read as a surface. Draw the row closest to the viewer last so its points sit on top. A simple order is bottom row first, then middle, then top, if the body curves upward. For a flat practice panel, draw row 1, then row 2 offset by half a scale width, then row 3 offset again.
Offset each new row by half the base width. If bases are 12 mm apart, start the next row 6 mm to the side. This creates a staggered pattern that avoids aligned gaps. Keep tips pointing the same direction unless you intentionally vary style.
When overlapping, let each new scale cover about one-third of the scale behind it. This is a hypothetical proportion; adjust until the points remain visible. Erase guide lines lightly after the final row.
- Draw row 1 with bases on the guide line.
- Draw row 2 starting half a base width to the side and slightly above row 1.
- Draw row 3 the same way, covering about one-third of row 2.
- Check that every tip is visible and no base line cuts through a point.
Practice Panel and Self-Check
The planned printable will include a blank practice panel with three row lines and a small direction arrow. Since it is not yet built, you can recreate it on plain paper: draw three parallel lines 20 mm apart (hypothetical) and mark a pointing arrow. Use the panel to draw three rows of spiky scales.
Self-check with simple arithmetic. Count scales per row: if the panel is 120 mm wide and bases are 12 mm apart, row 1 has about 10 scales. Row 2 offset by 6 mm may have 9 or 10 depending on edges. Record counts and compare rows for consistency.
Use a rubric to judge clarity, overlap, and consistency. Valid alternatives include sharper or softer points, as long as the spiky character is clear and overlaps are intentional.
- Create three guide lines and a direction arrow.
- Draw row 1 and count scales.
- Draw row 2 offset by half a base width and count scales.
- Draw row 3 and check that each tip remains visible.
Worked example
On a 120 mm wide practice panel with bases 12 mm apart, draw three staggered rows of spiky scales pointing right. Row 1 starts at the left edge. Row 2 is offset by 6 mm. Row 3 is offset by another 6 mm. Estimate scales per row and state one overlap check.
Worked answer
Row 1: about 10 scales (120 divided by 12). Row 2: offset 6 mm, so about 9 or 10 scales depending on edge treatment. Row 3: same offset pattern, about 9 or 10 scales. Overlap check: each new row should cover about one-third of the row behind, and every tip should remain visible. Record actual counts and compare for consistency.
Four practice exercises
Exercise 1
Draw one row of five spiky scales on a 60 mm guide line with bases 12 mm apart. Point all tips upward. State the base width and length you used.
Show answer and check
A row of five pointed scales with bases about 12 mm apart and tips about 18 mm from the base line, all pointing upward. Exact shape may vary.
Why: Five bases at 12 mm spacing fit a 60 mm line. Pointing upward follows the stated convention. Length is a hypothetical example.
Check: Count five scales, measure base spacing near 12 mm, and confirm every tip is sharper than its base.
Exercise 2
Draw two staggered rows of spiky scales pointing right. Row 1 has bases 10 mm apart on a 50 mm line. Row 2 is offset by 5 mm. Estimate scales per row and check overlap.
Show answer and check
Row 1: about 5 scales. Row 2: about 4 or 5 scales depending on edges. Each row 2 scale should cover about one-third of a row 1 scale, with tips visible.
Why: 50 divided by 10 gives 5 bases. Offset by half the base width staggers the rows. Overlap proportion is a hypothetical guide.
Check: Count scales in each row, confirm offset near 5 mm, and verify no row 2 scale hides a full row 1 tip.
Exercise 3
Create a three-row practice panel 90 mm wide with bases 15 mm apart. Row 1 starts at the left edge; rows 2 and 3 are each offset by 7.5 mm. Estimate scales per row and list one mistake to avoid.
Show answer and check
Row 1: about 6 scales. Rows 2 and 3: about 5 or 6 scales depending on edges. Avoid aligning rows directly, which creates vertical gaps.
Why: 90 divided by 15 gives 6 bases. Half-width offset is 7.5 mm. Edge treatment changes counts by one.
Check: Measure row width and base spacing, count scales, and check that rows are staggered rather than aligned.
Exercise 4
Draw a small panel with three rows of spiky scales pointing left. Use bases 8 mm apart on a 40 mm line and offset each row by 4 mm. State how you would check that tips remain visible.
Show answer and check
Row 1: about 5 scales. Rows 2 and 3: about 4 or 5 scales. Check visibility by confirming that each new scale covers only part of the scale behind and that every tip can be seen.
Why: 40 divided by 8 gives 5 bases. Offset by half the base width staggers rows. Visibility check follows the overlap rule.
Check: Count scales, measure offset near 4 mm, and trace each tip to confirm it is not fully covered.
Common mistakes
- Drawing scales with rounded tips that do not read as spiky. Sharpen the final third of each scale and check that the tip is narrower than the base.
- Aligning rows directly so gaps form vertical lines. Offset each new row by half the base width to stagger the pattern.
- Letting a new row cover all of the previous tips. Cover only about one-third of the scale behind and keep tips visible.
- Using inconsistent scale sizes across rows. Measure base width and length for each row and keep within a small range, such as 10 to 14 mm base width (hypothetical).
Self-check rubric
- Spiky character: tips are clearly pointed and narrower than bases.
- Overlap order: rows are staggered and each new row covers a consistent portion.
- Visibility: every tip remains visible after layering.
- Consistency: scale sizes and pointing direction follow the chosen convention.
- Valid alternatives: softer or sharper points are acceptable if the spiky character and overlap are intentional.
Questions and answers
Do all spiky scales need to point the same way?
No. A consistent direction helps readability, but stylized work may vary direction. Choose one convention per drawing and state it.
How much should each row overlap?
A practical starting point is one-third of the scale behind. Adjust until tips remain clear and the surface looks layered.
Can I use different scale sizes?
Yes, if intentional. Keep sizes within a checkable range and record your chosen values as hypothetical examples.
What if my points look too soft?
Narrow the tip and reduce the curve near the end. Check that the tip is visibly sharper than the base corners.