Free original lessons
Draw a Scaled Ball: Wrapping Overlapping Rows Around a Sphere
Learn to draw a ball covered in overlapping scale rows by mapping curved rows, controlling overlap, and shading to show spherical form.
Free lesson
Four exercises
Worked answers
Object Drawing Lessons
This lesson teaches a reliable method for drawing a ball covered in overlapping scale rows. The goal is not a single correct pattern but a believable spherical form: rows that wrap around curvature, scales that overlap in a consistent direction, and shading that reinforces volume. You will use a simple convention: each scale is a rounded wedge whose top edge sits near the row above and whose tip points toward the bottom of the ball. Scale size and row spacing may vary, but overlap direction and curvature must stay consistent. All measurements below are hypothetical examples; measure your own paper and tools before relying on any number.
Practice materials: Printable downloads are not available for this lesson yet. Use the instructions and four exercises below.
Reference illustration
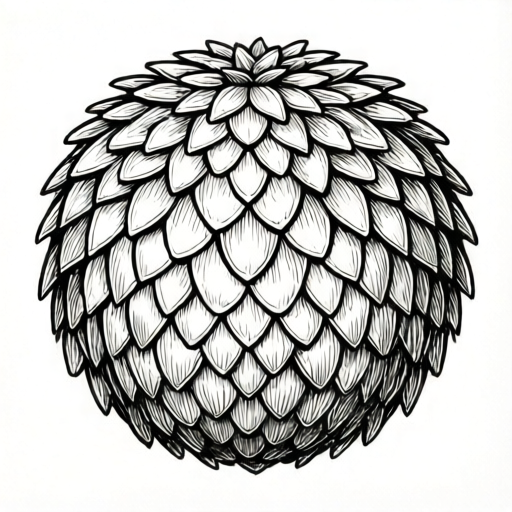
Use the stated measurements and conventions for each exercise.
Mapping rows around a sphere
Begin with a circle and a light vertical axis. Mark the equator and two or three latitude lines that curve with the sphere. These guide rows; they are not the scales themselves. Rows near the equator appear wider and more evenly spaced, while rows near the top and bottom compress because the surface turns away from the viewer.
Draw row guides as gentle arcs that bow in the same direction as the sphere's curvature. On a ball seen straight on, horizontal rows bow slightly downward at the sides; vertical rows bow outward. Keep the spacing between guides wider at the center and narrower toward the edges to suggest foreshortening.
- Draw a circle and a faint vertical axis.
- Add three curved latitude guides: one near the top, one at the equator, one near the bottom.
- Check that each guide bows consistently with the sphere's curvature.
- Adjust spacing so center rows are wider than edge rows.
Placing overlapping scales
Work one row at a time, starting at the equator and moving outward. Each scale is a rounded wedge: a broad top edge, two curved sides, and a tip. Place the top edge just below the row guide above, and let the tip cross into the row below. Overlap should be consistent: every scale overlaps the one beneath it, like roof tiles.
Scale width can vary slightly, but avoid sudden jumps. On the sides of the ball, scales become narrower and more tilted because the surface curves away. Do not draw scales as flat identical tiles; let their shapes compress and rotate with the sphere.
- Start at the equator and draw one scale centered on the vertical axis.
- Add neighboring scales outward, keeping tips pointing down and overlap consistent.
- Move to the next row above or below, offsetting scales by about half a width.
- Compress and tilt scales near the left and right edges.
- Leave the top and bottom rows slightly smaller and closer together.
Shading for spherical volume
Choose a light direction, for example from the upper left. Shade the lower right of the ball more deeply, and keep the upper left lighter. Each scale can receive a subtle shadow under its top edge where the scale above overlaps it. This shadow is narrow and follows the curve of the overlap.
Do not shade every scale identically. Scales facing the light stay lighter; scales turning away darken gradually. A soft core shadow near the lower right and a faint reflected light near the bottom edge help the ball read as round. Keep highlights on the upper left and avoid pure white unless your paper allows it.
- Mark a light direction with a small arrow outside the ball.
- Shade the lower right hemisphere gradually darker.
- Add a thin shadow under each overlapping top edge.
- Soften the transition between light and dark across several scales.
- Add a faint reflected light near the bottom edge and a small highlight upper left.
Checking curvature and overlap
Step back and check whether rows wrap rather than sit flat. A common sign of failure is rows that stay parallel to the page instead of bowing with the sphere. Another is overlap that reverses direction in different areas. Use a simple check: trace one row with your finger; it should curve smoothly and every scale in it should overlap the row below in the same direction.
If a row looks flat, redraw its guide with more bow near the edges. If overlap reverses, pick one direction and correct the offending scales. Keep your lines light until the pattern reads correctly.
- Trace each row and confirm smooth curvature.
- Check overlap direction across the whole ball.
- Compare scale size at center versus edges.
- Confirm shading matches the chosen light direction.
Worked example
A circle of radius 4 cm is drawn. Row guides are placed at the top, equator, and bottom. The equator row has scales about 1 cm wide; edge rows are about 0.6 cm wide. Describe how to place the first three scales of the equator row and one scale in the row above, including overlap and shading direction with light from upper left.
Worked answer
Draw the first scale centered on the vertical axis with its top edge just below the equator guide and its tip pointing down. Place the second scale to the right, overlapping the first slightly, and the third to the left, also overlapping. Offset the row above by about half a scale width so its scales sit between the equator scales. Shade under each top edge and darken the lower right of the ball gradually.
Four practice exercises
Exercise 1
A circle has a vertical axis and one equator guide. The first scale is centered on the axis with its tip down. Describe where to place the next scale to the right so overlap is consistent.
Show answer and check
Place it to the right with its top edge just below the equator guide, overlapping the first scale's right side slightly, tip pointing down.
Why: Consistent overlap means each new scale covers part of the previous one in the same direction. Keeping the top edge below the guide maintains row alignment.
Check: Trace the row: both scales should share the same downward tip direction and the right scale should overlap the left.
Exercise 2
A ball is drawn with light from the upper left. A student shades the upper left scales dark and the lower right scales light. What is wrong and how should it be fixed?
Show answer and check
The shading is reversed. Darken the lower right gradually and keep the upper left lighter, with thin shadows under overlapping edges.
Why: Light from upper left means surfaces facing upper left are lit; surfaces turning away darken. Reversing this flattens the sphere.
Check: Compare shading to the light arrow: the side nearest the arrow should be lighter overall.
Exercise 3
On a circle of radius 5 cm, a student draws five straight horizontal rows of identical scales. Name two problems and one correction for each.
Show answer and check
Problem one: rows are straight, not curved. Correction: redraw guides as arcs bowing with the sphere. Problem two: scales are identical everywhere. Correction: narrow and tilt scales near edges and compress rows near top and bottom.
Why: A sphere's surface curves, so rows must bow and scales must foreshorten near edges. Identical flat rows read as a flat pattern.
Check: Trace a row: it should curve smoothly. Compare center and edge scale widths: edges should be narrower.
Exercise 4
A student draws overlapping scales but the overlap direction reverses on the left side. Describe a check and a fix using row-by-row inspection.
Show answer and check
Check each row from left to right, noting tip direction and which scale covers which. On the left side, redraw scales so their tips point down and each covers the scale beneath in the same direction as the rest of the ball.
Why: Overlap direction is a global convention; reversing it locally breaks the roof-tile effect and confuses curvature.
Check: Mark one arrow per row showing overlap direction; all arrows should match.
Common mistakes
- Drawing rows as straight horizontal lines across the circle. Redraw row guides as arcs that bow with the sphere; compress spacing near top and bottom.
- Making every scale identical in size and orientation. Narrow and tilt scales near the edges; vary width slightly while keeping overlap consistent.
- Reversing overlap direction in different areas. Choose one overlap direction and correct scales that break it; check row by row.
- Shading each scale with the same dark tone. Shade gradually from light upper left to dark lower right; keep overlap shadows thin.
Self-check rubric
- Rows curve with the sphere rather than staying flat.
- Overlap direction is consistent across the ball.
- Scale size and spacing compress toward top, bottom, and side edges.
- Shading shows a clear light direction and spherical volume.
- Overlap shadows are present but not overpowering.
- Valid alternative scale shapes are accepted if curvature and overlap remain consistent.
Questions and answers
Do I need to draw every scale perfectly?
No. Consistency of curvature and overlap matters more than perfect individual shapes. Slight variation is acceptable if rows still wrap and overlap uniformly.
How many rows should the ball have?
Use as many as fit your circle clearly. A hypothetical example is five to seven visible rows on a medium circle, but adjust to your paper size and scale size.
Can I use a different scale shape?
Yes. Rounded wedges are a convention, not a rule. Diamond or leaf shapes work if they overlap consistently and follow the sphere's curvature.
Where should the light come from?
Any direction is valid if shading is consistent. Upper left is a common choice because it separates highlight and core shadow clearly.