Free original lessons
Draw a Bass Drum: Shell, Hoops, and Tension Rods
Learn to draw a bass drum using ellipse-and-cylinder construction, with hoop placement guides and tension-rod spacing practice.
Free lesson
Four exercises
Worked answers
Object Drawing Lessons
A bass drum is a large cylindrical drum with two circular heads, metal hoops around each rim, and tension rods spaced around the shell. This lesson uses a simple ellipse-and-cylinder construction so you can place the shell, hoops, and rods accurately. You will work with a defined drawing convention: the drum stands upright, viewed slightly from above and to one side, so both the front head and part of the cylindrical shell are visible. All measurements are hypothetical examples; measure your own paper and tools before drawing.
Practice materials: Printable downloads are not available for this lesson yet. Use the instructions and four exercises below.
Reference illustration
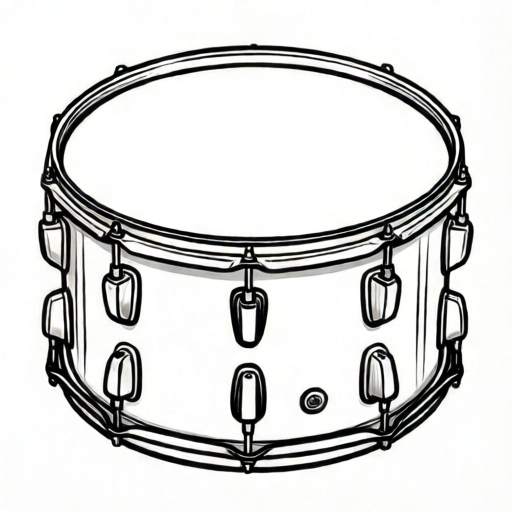
Use the stated measurements and conventions for each exercise.
Building the Cylinder and Ellipses
Start by deciding the drum's proportions. A typical bass drum is wider than it is deep, but you may choose any consistent ratio. For this lesson, use a hypothetical shell depth of 40 units and a head diameter of 60 units. Draw a vertical center line and a horizontal center line crossing at the middle of the page. The front head is an ellipse: its horizontal axis equals the head diameter (60 units), and its vertical axis is shorter because we view it at an angle. A practical convention is to make the vertical axis about two-thirds of the horizontal axis, so 40 units. Mark these four points and connect them with a smooth ellipse.
The back head is another ellipse of the same size, shifted to the right and slightly up to show depth. The shift distance equals the shell depth (40 units) along a diagonal direction. Draw light construction lines from the leftmost, rightmost, top, and bottom points of the front ellipse to the corresponding points on the back ellipse. These lines form the cylindrical shell. Only the visible portion of the back ellipse and the connecting lines should remain in the final drawing; erase the hidden parts of the back ellipse that fall behind the front head.
- Draw vertical and horizontal center lines crossing at the page center.
- Mark the front ellipse: 60 units wide, 40 units tall, centered on the crossing.
- Draw the back ellipse: same size, shifted 40 units diagonally up and right.
- Connect the four extreme points of both ellipses with straight construction lines to form the shell.
- Erase the hidden portion of the back ellipse and any construction lines inside the shell.
Placing Hoops Around Each Head
Each hoop is a ring that sits just outside the head's rim. Draw the front hoop as a slightly larger ellipse sharing the same center as the front head. For a hypothetical hoop thickness of 4 units, increase both axes by 8 units total (4 units on each side). So the front hoop ellipse is 68 units wide and 48 units tall. Draw it with a light line first, then darken the visible outer edge. The hoop should appear as a narrow band, not a solid disc; keep the inner edge visible where it meets the head.
The back hoop follows the same rule around the back ellipse. Because the back head is partly hidden, only the visible arc of the back hoop is drawn. Use the same 4-unit offset from the back ellipse. Check that the hoop bands are consistent in width all around; if one side looks thicker, adjust the ellipse axes rather than redrawing freehand. This keeps the drawing checkable and avoids a lopsided drum.
- Offset the front ellipse outward by 4 units on all sides to create the front hoop.
- Draw the front hoop as a narrow band, keeping the inner edge visible.
- Offset the visible arc of the back ellipse by the same 4 units for the back hoop.
- Compare band widths at four points (top, bottom, left, right) and adjust for consistency.
Spacing Tension Rods Evenly
Tension rods are evenly spaced around the shell, connecting the hoops. For this lesson, use a hypothetical count of 8 rods per hoop. To place them, divide the front hoop ellipse into 8 equal arcs. A simple method is to mark the top, bottom, left, and right points first, then bisect each quarter arc to get 8 points. Draw a short rod at each point, angled slightly outward from the shell surface. Rods on the front hoop appear as short lines crossing the hoop band; rods on the back hoop are mostly hidden but a few may be visible along the top edge.
Keep rod length consistent: a hypothetical 10 units. Use a small tick mark to check length before darkening. Because the drum is viewed at an angle, rods on the far side appear shorter due to foreshortening; this is acceptable and should be consistent with the ellipse perspective. Do not invent hardware standards; the count and lengths are chosen for practice only.
- Mark top, bottom, left, and right on the front hoop ellipse.
- Bisect each quarter arc to create 8 evenly spaced points.
- Draw a 10-unit rod at each point, angled outward from the shell.
- Repeat for the visible back hoop arc, using the same spacing rule.
- Check that rod lengths are consistent except where foreshortening applies.
Refining and Checking the Drawing
Darken the final lines: the front head ellipse, the front hoop band, the visible shell edges, the back hoop arc, and the tension rods. Erase construction lines and hidden edges. Add a small foot or stand only if it helps the drum sit convincingly; the brief focuses on the drum itself, so keep any support minimal. Check the drawing against the construction: the front and back ellipses should have the same axes, the hoop bands should be even, and the rods should be evenly spaced.
Use the rubric to evaluate your work. Because letter styles and handwriting vary, the rubric focuses on construction accuracy and consistency rather than a single perfect line. Valid alternatives include different rod counts (as long as spacing is even) and different viewing angles (as long as ellipses and foreshortening remain consistent). Measure your actual paper and tools before starting; the numerical values here are hypothetical examples, not manufacturing standards.
- Darken final lines and erase construction marks.
- Verify ellipse axes match between front and back heads.
- Check hoop band width at four points.
- Count rods and confirm even spacing.
- Compare rod lengths and note any foreshortening.
Worked example
Using the lesson convention, describe how to place the front hoop and four tension rods on a bass drum with a 60-unit head diameter, 40-unit shell depth, and 4-unit hoop thickness.
Worked answer
Draw the front head ellipse 60 units wide and 40 units tall. Offset it outward by 4 units to make the front hoop ellipse 68 units wide and 48 units tall, drawn as a narrow band. Mark top, bottom, left, and right on the hoop, then place four rods at those cardinal points, each 10 units long and angled outward. Check that the band width is 4 units at all four points and that rod lengths match.
Why: The hoop offset is applied equally on all sides, so the axes increase by 8 units total. Four rods at cardinal points give even spacing for this simplified example. The check method compares measured band widths and rod lengths.
Check: Measure the hoop band at top, bottom, left, and right; each should be about 4 units. Measure each rod; each should be about 10 units. Confirm the front head axes are 60 and 40 units.
Four practice exercises
Exercise 1
A bass drum has a head diameter of 50 units and a shell depth of 30 units. Using the two-thirds convention for the vertical axis, state the front ellipse dimensions and the shift for the back ellipse.
Show answer and check
Front ellipse: 50 units wide, about 33 units tall (two-thirds of 50 is 33.3, rounded to 33). Back ellipse: same size, shifted 30 units diagonally.
Why: The vertical axis is two-thirds of the horizontal axis, so 50 times 2/3 equals about 33. The back ellipse is shifted by the shell depth, 30 units.
Check: Multiply 50 by 2/3 and round to the nearest whole unit; confirm the shift equals 30 units.
Exercise 2
A front hoop is drawn with a 3-unit offset around a head ellipse that is 40 units wide and 28 units tall. What are the hoop ellipse dimensions?
Show answer and check
The hoop ellipse is 46 units wide and 34 units tall.
Why: A 3-unit offset on each side adds 6 units to each axis: 40 plus 6 equals 46, and 28 plus 6 equals 34.
Check: Add twice the offset to each axis and verify the band width is 3 units at four points.
Exercise 3
You want 6 evenly spaced tension rods on a front hoop. Describe how to find the spacing points using equal angular divisions rather than cardinal points plus bisection.
Show answer and check
Divide the full ellipse into 6 equal angular increments of 60 degrees each, starting from the top point. Mark each point where the increment lands on the ellipse, giving 6 evenly spaced points around the hoop. Place rods at these points.
Why: Cardinal points plus bisection only produces even spacing when the rod count is a multiple of 4, such as 8. For 6 rods, each point must be 1/6 of the full turn apart, so use 60-degree increments from the top.
Check: Count the 6 points and confirm that each adjacent pair is separated by the same angular increment (60 degrees) and by equal arc distance along the ellipse.
Exercise 4
A drawing shows a front hoop band that measures 4 units at the top, 4 units at the bottom, 6 units on the left, and 2 units on the right. State the likely error and a fix.
Show answer and check
The hoop ellipse is not centered on the head ellipse; the offset is uneven. Fix by re-drawing the hoop ellipse with a consistent 4-unit offset on all sides, then re-check the four measurements.
Why: Uneven band widths indicate the hoop ellipse axes were not increased equally or the centers do not match.
Check: Measure the offset at four cardinal points after redrawing; all should be about 4 units.
Common mistakes
- Drawing the front head as a perfect circle instead of an ellipse. Use the two-thirds vertical-axis convention or measure your viewing angle; mark four points and connect smoothly.
- Making the back ellipse the same size but not shifting it enough, so the shell looks flat. Shift the back ellipse by the full shell depth along a diagonal; check that connecting lines are parallel.
- Hoops drawn as solid discs rather than narrow bands. Offset the head ellipse outward by a small consistent amount and keep the inner edge visible.
- Tension rods clustered or unevenly spaced. Mark four cardinal points first, then bisect each quarter arc to get equal spacing.
- Inconsistent rod lengths without accounting for foreshortening. Use a fixed hypothetical length for near rods and shorten far rods slightly and consistently.
Self-check rubric
- Front head is an ellipse with horizontal axis longer than vertical axis.
- Back ellipse matches front ellipse in size and is shifted by the shell depth.
- Shell connecting lines are parallel and hidden edges are removed.
- Front and back hoops are narrow bands of consistent width.
- Tension rods are evenly spaced and lengths are consistent or consistently foreshortened.
- Construction lines are erased and final lines are clear.
- Valid alternatives are accepted if construction remains consistent and checkable.
Questions and answers
Do I need to use exactly 8 tension rods?
No. Eight is a hypothetical example for practice. Any even count works if spacing is consistent and the drawing remains checkable.
How do I know the ellipse is correct?
Check that the horizontal axis is longer than the vertical axis and that the curve is smooth at the four extreme points. Measure the axes with a ruler.
Can I draw the drum from a different angle?
Yes. Keep the ellipse-and-cylinder construction consistent: the back ellipse should be shifted along the depth direction, and foreshortening should apply to rods on the far side.
What if my hoop band looks uneven?
Re-measure the offset at four points. Adjust the ellipse axes rather than patching freehand; consistency is more important than a single perfect line.