Free original lessons
Beaver Body-Shape Drawing: Step-by-Step Worksheet Plan
Learn to draw a beaver by building body shapes in sequence: head, torso, tail, and limbs. Includes a worked example, practice tasks, and a planned printable worksheet.
Free lesson
Four exercises
Worked answers
Object Drawing Lessons
Drawing a beaver becomes manageable when you build it from large body shapes rather than tracing details first. This lesson sequences the beaver as a whole animal: start with the torso, add the head, attach the broad tail, then place the limbs. Each step uses simple, checkable shapes and a consistent unit so you can verify proportions as you go. The convention for line art is explicit: outlines are single continuous strokes, interior construction lines are lighter and removed at the end, and the x-height of any lettering runs from baseline to midline. Because letter styles and hand proportions vary, the rubric rewards valid alternatives rather than one universal answer. The instructional text is complete on its own; the printable worksheet is a planned free resource described in the resource plan.
Practice materials: Printable downloads are not available for this lesson yet. Use the instructions and four exercises below.
Reference illustration
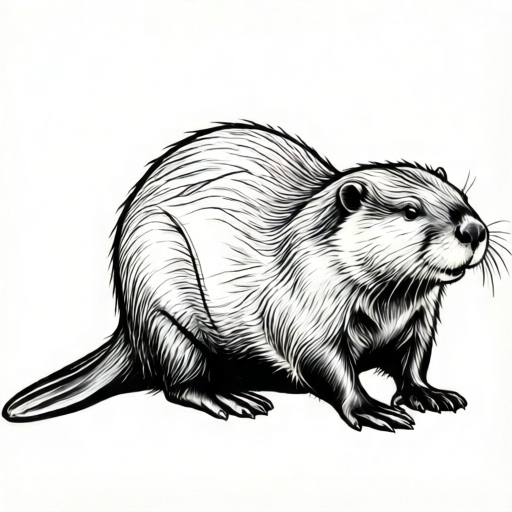
Use the stated measurements and conventions for each exercise.
Why body-shape sequencing works
A beaver is not a circle with a tail. It has a heavy torso, a rounded head, a broad flat tail, and short limbs. If you draw the tail first, you tend to shrink the torso to fit it. If you draw the head first, you tend to make the body too small. Sequencing from the largest mass to the smallest keeps proportions stable.
Use one unit for the whole drawing. Define the torso length as 3 units. Then the head is about 1.5 units long, the tail about 2 units long and 1.5 units wide, and each visible limb about 1 unit long. These are hypothetical example values, not standards; measure your own paper and adjust the unit so the drawing fits.
Construction lines are light and temporary. Final outlines are darker and continuous. At the end, erase construction lines and check that the silhouette reads as a beaver without labels.
- Mark a unit length on scrap paper and label it U.
- Draw a light torso oval 3 U long and 2 U tall.
- Add a head circle 1.5 U across at the front of the torso.
- Attach a tail shape 2 U long and 1.5 U wide behind the torso.
- Place two short limbs, each about 1 U long, under the torso.
- Darken the final outline and erase construction lines.
Head and torso construction
The torso is the anchor. Draw it as a soft oval, wider at the rear than at the shoulders. The head overlaps the front of the torso by about one third of its own width, so the neck reads as thick rather than pinched.
Place the eye at roughly the midline of the head, and the nose at the front edge. Ears are small rounded shapes set high and slightly back. Keep the muzzle short; a long muzzle makes the animal read as a different rodent.
Check the head-to-torso ratio before adding details. If the head is longer than half the torso, the beaver will look juvenile or incorrect for this construction.
- Draw the torso oval first and mark its center line.
- Overlap the head circle at the front, one third of its width onto the torso.
- Add a short muzzle and a small nose at the front edge.
- Place the eye on the head midline and add small high ears.
- Check that head length is about half the torso length.
Tail and limb placement
The tail is broad, flat, and paddle-like. Attach it at the rear of the torso, angling slightly downward. Its width should be about three quarters of the torso height (1.5 U vs 2 U), and its length about two thirds of the torso length (2 U vs 3 U). These proportions are hypothetical examples; adjust to your unit.
Limbs are short and sturdy. The front limbs sit under the chest, the hind limbs under the rear. Each visible limb is about one third of the torso length. Feet are wide and flat, not pointed.
Check balance by drawing a vertical line through the torso center. The head and tail should sit on opposite sides of that line, and the limbs should fall within the torso width.
- Attach the tail at the rear, angled slightly down.
- Draw the front limbs under the chest, about 1 U long.
- Draw the hind limbs under the rear, about 1 U long.
- Add wide flat feet at the ends of the limbs.
- Check that head and tail balance across the torso center line.
Final outline and self-check
Once the construction is balanced, darken the final outline in one continuous stroke per body part. Erase the light construction lines. Add only essential details: eye, nose, ear line, and a few fur direction marks.
Use the x-height convention for any labels: lettering runs from baseline to midline, and letter styles may vary. Do not judge handwriting style, only the defined x-height range.
Self-check by covering the labels and asking whether the silhouette reads as a beaver. Then measure the torso, head, and tail against your unit and record any differences.
- Darken final outlines continuously.
- Erase construction lines completely.
- Add eye, nose, ear line, and minimal fur marks.
- Label parts using baseline-to-midline x-height.
- Measure torso, head, and tail against U and note differences.
Worked example
Using U = 2 cm, construct a beaver with torso 3 U long, head 1.5 U across, tail 2 U long and 1.5 U wide, and limbs 1 U long. Describe the sequence and the final measurements.
Worked answer
Torso: 6 cm long and 4 cm tall. Head: 3 cm across, overlapping the torso by 1 cm. Tail: 4 cm long and 3 cm wide, attached at the rear and angled slightly down. Limbs: 2 cm each, placed under the chest and rear within the torso width. Final outline darkened, construction lines erased. Check: head is half the torso length (3 cm vs 6 cm); tail width is three quarters of the torso height (3 cm vs 4 cm), consistent with 1.5 U vs 2 U. Balance line through torso center shows head and tail on opposite sides.
Four practice exercises
Exercise 1
A student draws a torso 9 cm long, a head 3 cm across, and a tail 6 cm long. Using the lesson ratios, what should the head and tail lengths be, and how far off is the student?
Show answer and check
Head should be 4.5 cm (half of 9 cm); student is 1.5 cm short. Tail should be 6 cm (two thirds of 9 cm); student is correct.
Why: Torso is 3 U, so U = 3 cm. Head is 1.5 U = 4.5 cm. Tail is 2 U = 6 cm. Compare each to the student values.
Check: Recompute U from torso length, then multiply by the ratio for head and tail; subtract to find differences.
Exercise 2
Describe where to place the limbs relative to a torso oval 8 cm long and 6 cm tall, and give a check for balance.
Show answer and check
Place front limbs under the chest and hind limbs under the rear, both within the 8 cm torso length. Each limb is about 2.67 cm long (one third of 8 cm). Check balance with a vertical line through the torso center: limbs should fall within the torso width, and head and tail should sit on opposite sides of that line.
Why: Limbs are short and sturdy, about one third of torso length. Keeping them within the torso width prevents an unstable look. One third of 8 cm is 8 ÷ 3 ≈ 2.67 cm.
Check: Draw the center line and measure limb positions from it; confirm each limb is inside the torso width and that limb length is about one third of the 8 cm torso length (about 2.67 cm).
Exercise 3
A drawing has a head 5 cm across and a torso 8 cm long. Is the head ratio acceptable under the lesson guideline? Show the arithmetic.
Show answer and check
Guideline head is half torso length: 4 cm. The drawing is 5 cm, which is 1 cm over, or 25 percent over the guideline. Not acceptable if strict 20 percent tolerance is used.
Why: Half of 8 cm is 4 cm. Difference is 1 cm. 1 divided by 4 equals 0.25, or 25 percent.
Check: Divide the difference by the guideline value and compare to the 20 percent tolerance.
Exercise 4
You have paper 20 cm wide. Using U = 3 cm, will the beaver fit if torso is 3 U, tail is 2 U, and head overlaps by 1 U? Show the total width calculation.
Show answer and check
Torso 9 cm, tail 6 cm, head 4.5 cm with a 3 cm overlap onto the torso. Total width = 9 + 6 + (4.5 − 3) = 16.5 cm. Fits within 20 cm with 3.5 cm spare.
Why: Torso is 3 U = 9 cm, so U = 3 cm. Tail is 2 U = 6 cm. Head is 1.5 U = 4.5 cm, but 1 U (3 cm) overlaps the torso, so only 1.5 cm of head adds new width. Add torso, tail, and the non-overlapping head part, then compare to paper width.
Check: Recompute each part from U, add torso + tail + (head − overlap), and subtract the total from 20 cm to confirm a positive remainder.
Common mistakes
- Drawing the tail before the torso, which shrinks the body. Draw the torso oval first and treat the tail as an attachment sized from the torso.
- Making the head too large or the muzzle too long. Keep head length about half the torso length and the muzzle short; check the ratio before adding details.
- Placing limbs outside the torso width, making the animal look unstable. Draw a vertical center line through the torso and keep limbs within its width.
- Leaving construction lines visible in the final drawing. Use light lines for construction and erase them after darkening the final outline.
Self-check rubric
- Sequence followed: torso first, then head, tail, limbs.
- Proportions within 20 percent of the stated unit values, or documented adjustments.
- Final outline continuous and construction lines erased.
- Silhouette reads as a beaver without labels.
- Labels, if used, follow baseline-to-midline x-height; letter style not graded.
- Valid alternatives accepted when body-shape logic is sound.
Questions and answers
Do I need special paper or tools?
No. Plain paper and a pencil are enough. Use a light touch for construction lines and a darker stroke for the final outline.
What if my beaver looks different from the example?
Valid alternatives are allowed. The rubric checks sequence, proportion, and clean outlines, not an exact copy. Different ear shapes or fur marks are acceptable if the body-shape logic holds.
How do I know my proportions are correct?
Measure against your unit U. Torso 3 U, head 1.5 U, tail 2 U by 1.5 U, limbs about 1 U. These are hypothetical examples; record your own measurements and compare.
Can I label the parts?
Yes. Use the x-height convention: lettering runs from baseline to midline. Letter style may vary and is not graded.