Free original lessons
Contour Line Chameleon: Observation Drawing Guide
Learn to draw a chameleon in contour line by following edges, using a simple convention, and checking your work with clear steps and practice tasks.
Free lesson
Four exercises
Worked answers
Object Drawing Lessons
Contour line drawing records the edges you see, not shading or texture. This guide focuses on the chameleon as an observation exercise: its casque, eye turret, curled tail, and gripping feet. You will use one continuous line where possible, keep your pencil moving slowly, and compare angles and distances as you go. A defined convention makes the work checkable: treat the chameleon's body as a single closed outline, add interior contour lines only for major forms such as the eye turret and tail curl, and leave scale patterns out. Letter styles and handwriting vary, so the rubric rewards accurate edge-following and proportion, not a single perfect shape. All measurements below are hypothetical examples; measure your own paper and reference before drawing.
Practice materials: Printable downloads are not available for this lesson yet. Use the instructions and four exercises below.
Reference illustration
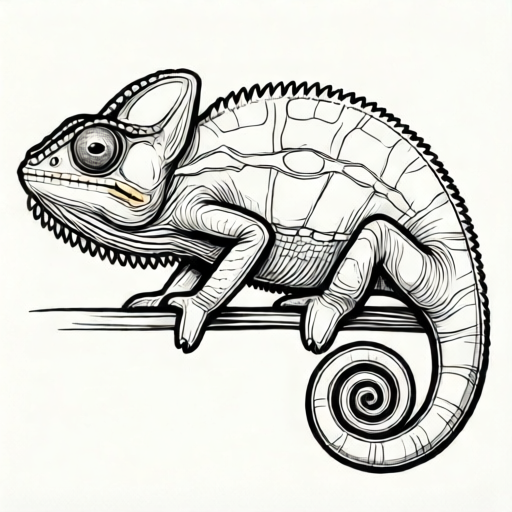
Use the stated measurements and conventions for each exercise.
Set up the contour plate and choose a viewing convention
Place a printed chameleon reference beside a blank panel of the same size. Decide a simple convention before drawing: the outer body edge is one continuous contour, the eye turret is a separate closed contour that overlaps the head, and the tail curl is drawn as a spiral contour that follows the visible outer edge. This convention keeps the drawing readable without implying scale detail.
Use a light pencil and keep the paper at a comfortable angle. Measure the reference's longest body dimension and the blank panel's matching dimension with a ruler; if they differ, note the ratio. For example, if the reference body length is 120 mm and your panel allows 90 mm, your drawing will be about three-quarters the reference length. These numbers are hypothetical examples, not standards.
- Measure the reference's body length and height in millimetres and record both values.
- Measure the blank panel's usable width and height; choose a scale ratio that fits.
- Mark a faint baseline and a midline on the panel to help place the body and tail.
- Decide where the eye turret overlaps the head contour and note that overlap point.
Follow the outer contour slowly
Start at the casque, the raised ridge behind the head, and move along the back toward the tail. Keep your eye on the reference edge rather than on your pencil. If the line breaks, restart at the same point and continue; a contour drawing can have a few deliberate breaks, but the overall edge should read as one form.
Compare the angle of each segment to the baseline. A segment that rises steeply near the casque should look steeper than a gentle slope along the back. Check distances between key points, such as casque tip to eye turret centre, and eye turret centre to tail base, using your ruler on the reference and then on your drawing.
- Draw the casque edge first, then the back edge, then the tail curl.
- Pause at each major change of direction and compare the angle to the baseline.
- Add the belly edge from the front foot to the tail base, keeping the line continuous where possible.
- Close the outer contour at the head and tail without adding scale patterns.
Add interior contours for major forms only
Interior contour lines describe large forms: the eye turret, the mouth line, the tail spiral, and the gripping feet. Draw the eye turret as a closed contour that overlaps the head edge. Draw the mouth as a single line from the snout toward the jaw hinge. Draw the tail spiral by following the visible outer edge inward, stopping when the curl becomes too small to read clearly.
Keep interior lines sparse. The goal is to show the chameleon's structure, not to fill the body with detail. If a line does not help explain a major form, leave it out. This makes the drawing easier to check against the reference.
- Draw the eye turret contour and check its centre against the head edge.
- Draw the mouth line and compare its endpoint to the jaw hinge on the reference.
- Draw the tail spiral from the outer edge inward, checking the number of visible turns.
- Add the front and back feet as simple gripping contours, then stop.
Check proportion and edge accuracy
Use a simple check: measure three distances on the reference and the same three on your drawing. For example, casque tip to eye turret centre, eye turret centre to tail base, and tail base to tail tip. Convert your drawing measurements to the same scale as the reference using your chosen ratio, then compare. A difference of a few millimetres is acceptable for a freehand contour; a large difference means you should adjust the next attempt.
Check that the outer contour closes and that the eye turret overlaps the head edge as planned. Check that the tail spiral follows the visible edge without crossing itself unnecessarily. These checks are about observation, not perfection.
- Measure the three chosen distances on the reference and record them.
- Measure the same distances on your drawing and convert using your scale ratio.
- Compare the converted values and note any large differences.
- Check that the outer contour closes and the eye turret overlap is visible.
Worked example
A reference chameleon has a body length of 100 mm and a tail spiral width of 30 mm. You draw on a panel that allows a body length of 80 mm. What should the tail spiral width be in your drawing, using the same scale ratio?
Worked answer
The scale ratio is 80 divided by 100, or 0.8. The tail spiral width should be 30 times 0.8, which equals 24 mm. These values are hypothetical examples.
Four practice exercises
Exercise 1
A reference chameleon body length is 150 mm and its casque height above the back is 20 mm. You draw at a scale ratio of 0.6. What casque height should you aim for in your drawing?
Show answer and check
12 mm.
Why: Multiply the reference casque height by the scale ratio: 20 mm times 0.6 equals 12 mm. Keep units in millimetres.
Check: Measure your drawn casque height with a ruler and compare it to 12 mm; a small freehand difference is acceptable.
Exercise 2
On a reference, the distance from eye turret centre to tail base is 90 mm. Your drawing uses a scale ratio of 0.75. What distance should you check for on your drawing?
Show answer and check
67.5 mm.
Why: Multiply 90 mm by 0.75 to get 67.5 mm. This is the scaled distance you should compare with your drawing.
Check: Measure from your drawn eye turret centre to tail base and compare to 67.5 mm; note any large difference.
Exercise 3
A reference tail spiral has 2.5 visible turns and a width of 40 mm. Your panel allows a tail spiral width of 28 mm. How many turns should you aim to show, and what is the scale ratio?
Show answer and check
Aim for about 2.5 turns; the scale ratio is 0.7.
Why: The scale ratio is 28 divided by 40, or 0.7. The number of turns is a shape feature, so keep it close to the reference rather than scaling it numerically.
Check: Count the turns on your drawing and compare to 2.5; measure the spiral width and compare to 28 mm.
Exercise 4
You measure three distances on your drawing: 50 mm, 35 mm, and 22 mm. Your scale ratio is 0.5. What are the corresponding reference distances?
Show answer and check
100 mm, 70 mm, and 44 mm.
Why: Divide each drawing distance by the scale ratio: 50 divided by 0.5 equals 100; 35 divided by 0.5 equals 70; 22 divided by 0.5 equals 44. All in millimetres.
Check: Measure the same three distances on the reference and compare to 100 mm, 70 mm, and 44 mm; large differences indicate proportion errors.
Common mistakes
- Drawing from memory instead of looking at the reference edge. Keep your eye on the reference for each segment and move the pencil only after you have traced the edge visually.
- Adding scale patterns or shading before the contour is accurate. Leave scale patterns out entirely; finish the outer and major interior contours first, then stop.
- Making the tail spiral too tight or too loose compared with the reference. Count the visible turns on the reference and compare the spiral's overall width to the body height before drawing.
- Ignoring the eye turret overlap and drawing it as a flat circle on the head. Mark the overlap point on the head edge first, then draw the turret contour so it crosses that point.
Self-check rubric
- Outer contour follows the reference edge with recognizable casque, back, belly, and tail curl.
- Eye turret is drawn as a closed contour that overlaps the head edge at a marked point.
- Tail spiral follows the visible outer edge and has a comparable number of turns to the reference.
- Three key distances are measured and compared using a consistent scale ratio.
- Interior lines are limited to major forms; no scale patterns or shading are added.
- Labels and notes are legible; valid alternative handwriting styles are accepted.
Questions and answers
Do I need to draw the chameleon in one continuous line?
No. One continuous line is a useful exercise, but deliberate breaks are acceptable if the overall edge still reads clearly. The convention here allows a few breaks at major form changes.
How much detail should I include?
Only major forms: outer body edge, eye turret, mouth line, tail spiral, and gripping feet. Leave out scales, skin texture, and habitat background.
What if my proportions are off?
Measure three key distances on the reference and on your drawing, convert using your scale ratio, and compare. Adjust the next attempt rather than erasing repeatedly.
Can I use a different letter style or handwriting in labels?
Yes. The rubric checks edge-following and proportion, not a single handwriting style. Keep labels legible and consistent enough to read.